|
Christmas gifts and stocking stuffer ideas from Blick Art Materials 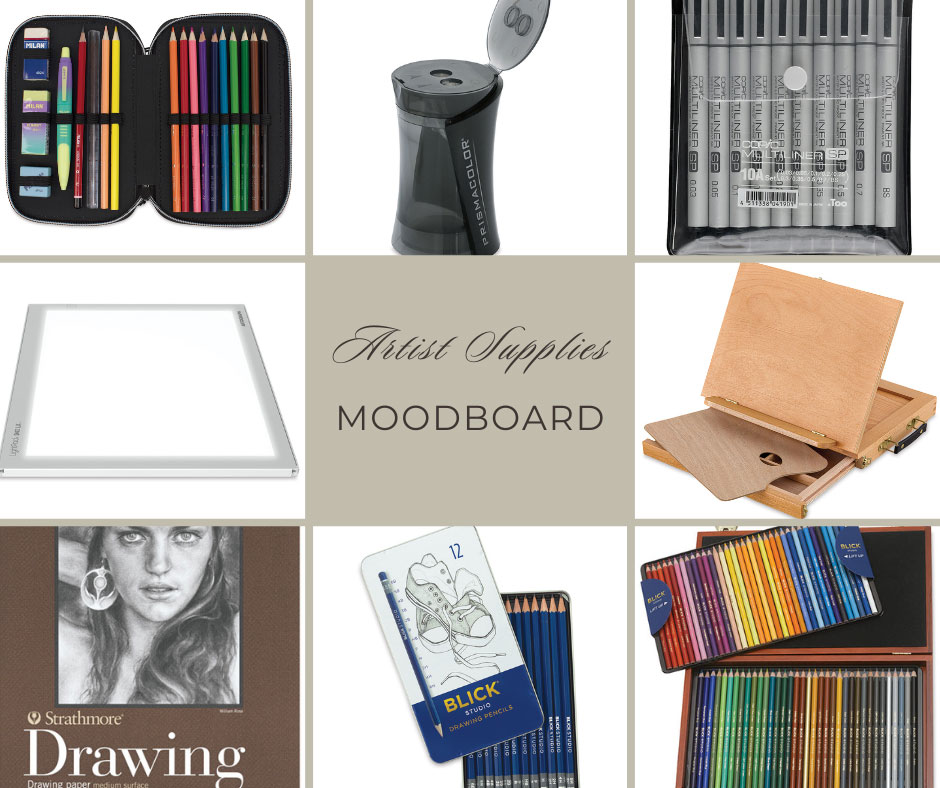 Images from Dickblick.com. Click the links below to view or purchase. Some of the posts in this article contain affiliate links. If you click on the link and purchase the item, I will receive an affiliate commission at no extra cost to you. I will only recommend products or services I use personally and/or believe will add value to my readers, so there is no conflict of interest. Can you believe the holidays are almost here? Where the heck did this year go?! With only a few weeks left for holiday gift buying, the pressure is on to find something for the creatives in your life. I scoured Blick Art Supplies for some of the most practical drawing supplies for my artistic readers and YouTube followers! Some of the items below are supplies I own or have purchased for one of the creatives in my household. (We’re all creative souls here!) So, without further ado, here are some of my best picks for drawing supply gift ideas for the artist in your life…  Item 1— Milan Sunset Series Double Decker Pencil Case with Supplies 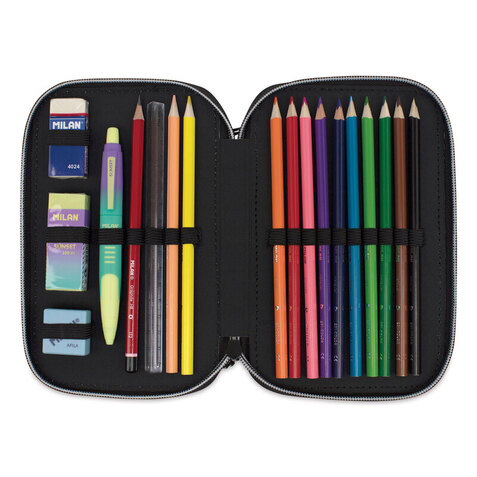 Item 2— artPOP! Sketchbox Easel 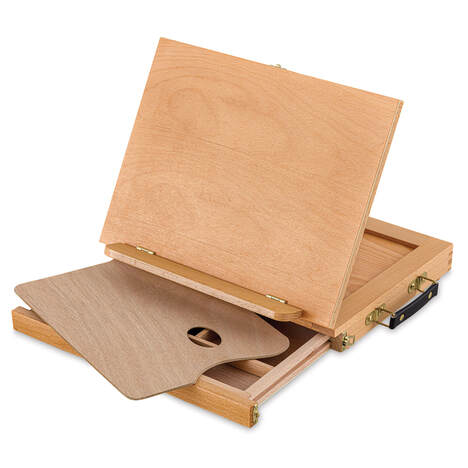 Item 3— Prismacolor Pencil Sharpener  Item 4— Blick Studio Artists’ Colored Pencils 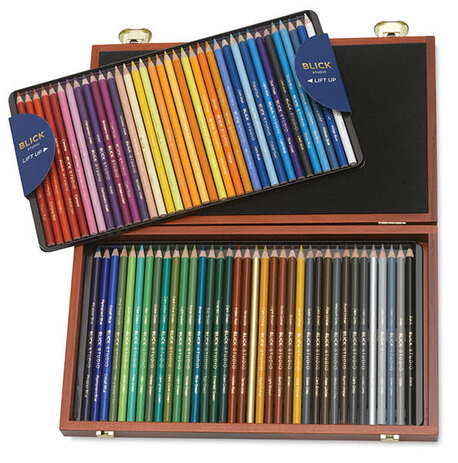 Item 5— Blick Studio Drawing Pencils 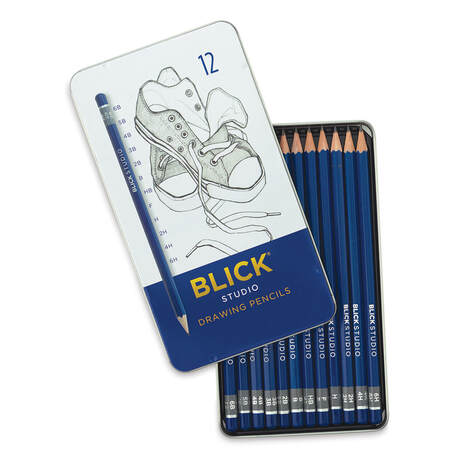 Item 6— Strathmore 300 Series Drawing Pads 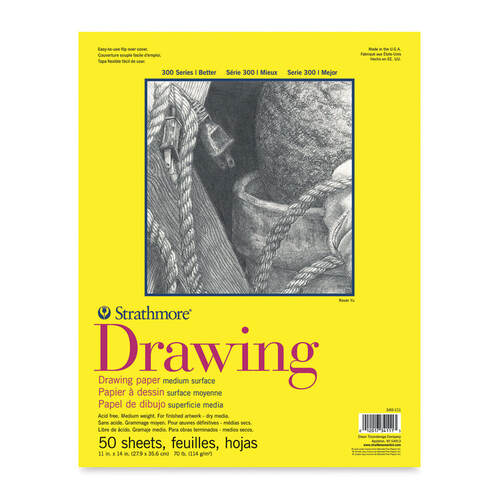 Item 7— Strathmore 400 Series Drawing Paper Pads 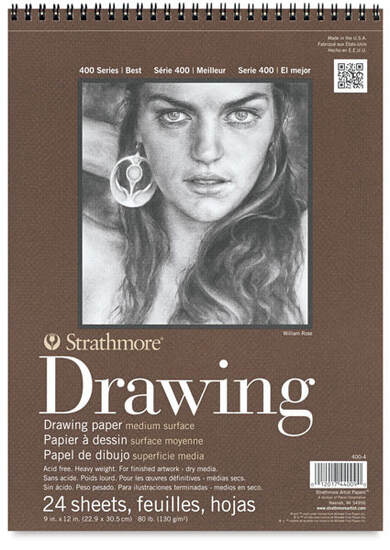 Item 8— Bienfang Mixed Media Pad 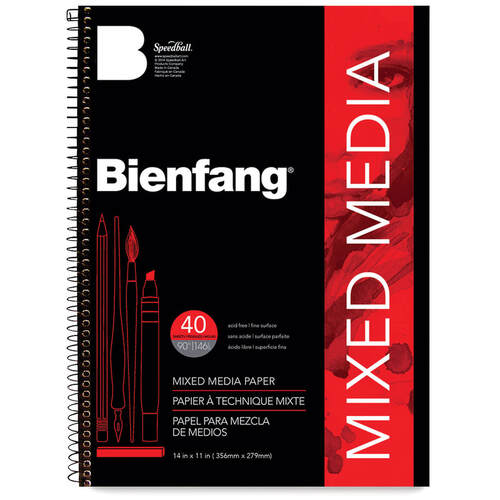 Item 9— Manuscript Modern Calligraphy Dip Pen Sets 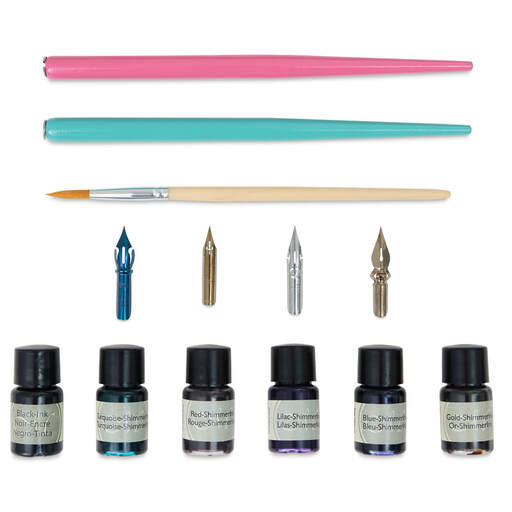 Item 10— Prismacolor Premier Dual-Ended Chisel Tip Markers 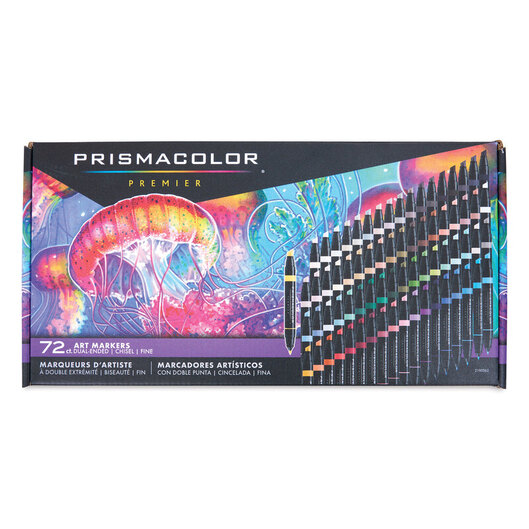 Item 11— Copic Sketch Markers 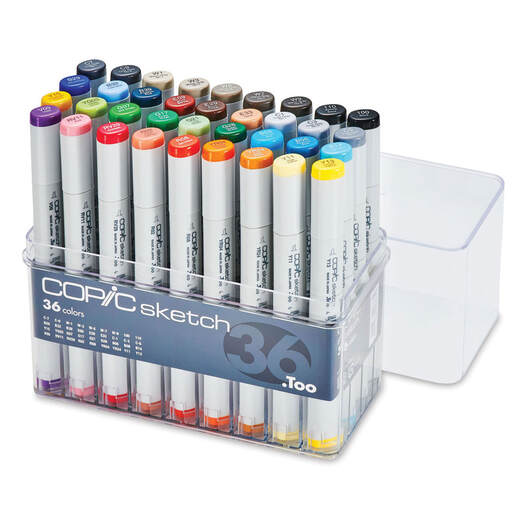 Item 12— Copic Multiliner SP Pens 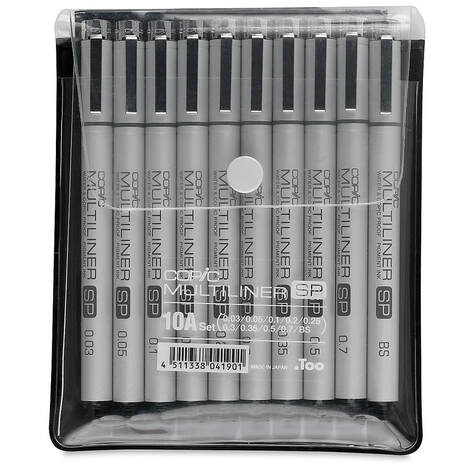 Item 13— Faber-Castell Pitt Artist Pen Set - Black Wallet Set, Set of 4, Assorted Nibs 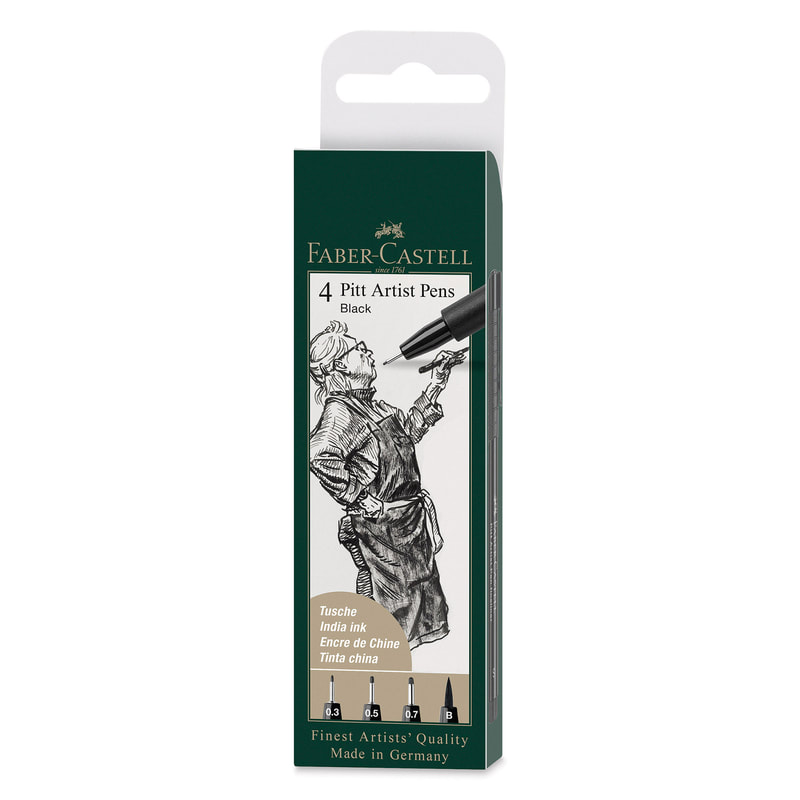 Item 14— Artograph LightPad LX LED Light Box 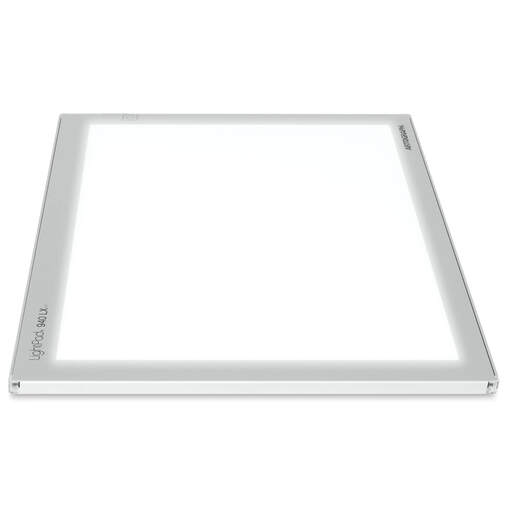 Item 15— Blick Studio Series Softside Portfolios 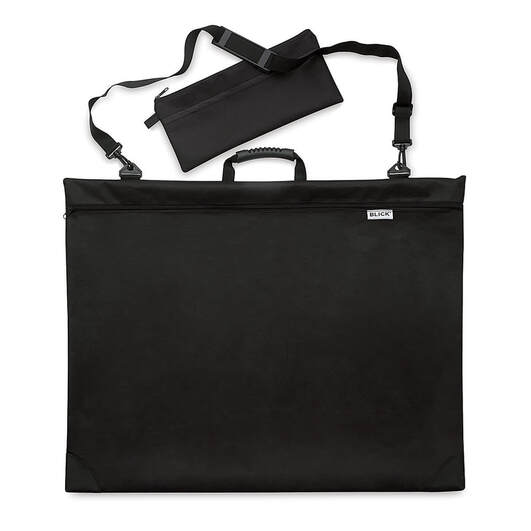 Item 16— Itoya I-Series Art Profolios  Do you like drawing tutorials and DIYs? Follow me on YouTube here! My channel has Celtic art drawing tutorials, faux floral videos, and DIY projects. You can also find many Celtic art drawing tutorials on my blog page here. https://www.disstudiodesigns.com/blog/category/celtic-inspired
0 Comments
Winter Wonderland holiday decor inspiration from Amazon 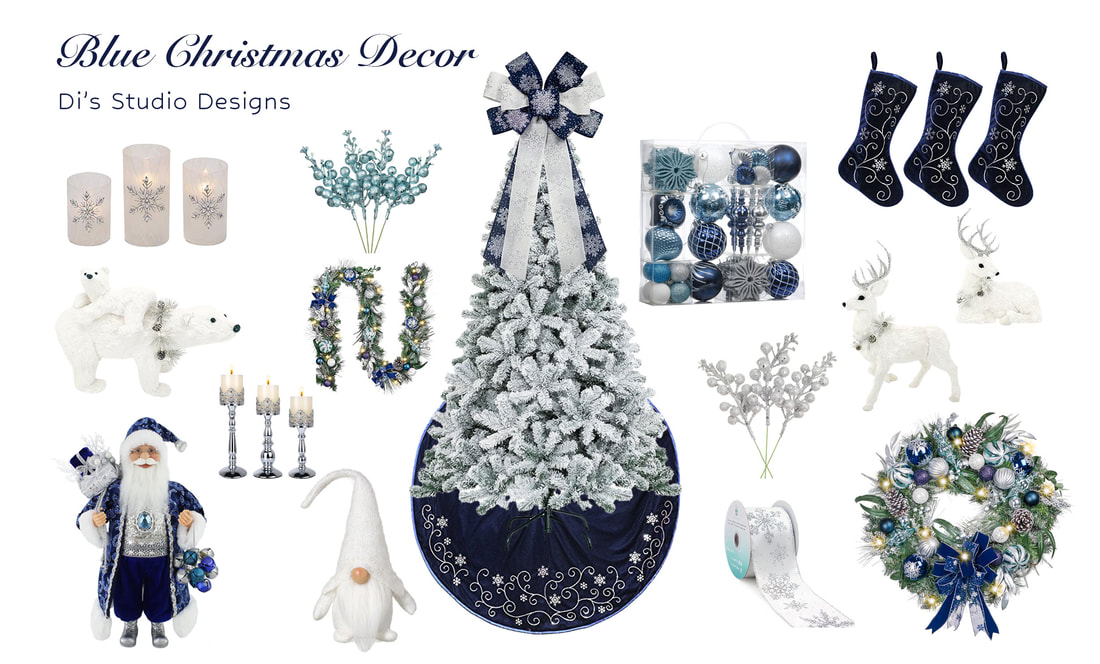 Images from Amazon.com. Click the links below to view or purchase. Some of the posts in this article contain affiliate links. If you click on the link and purchase the item, I will receive an affiliate commission at no extra cost to you. I will only recommend products or services I use personally and/or believe will add value to my readers, so there is no conflict of interest. The holidays are almost here, and it’s time to think about dragging out the boxes and bins of holiday decor. If you have blue-themed decor—or would like to change your usual Christmas decor colors—this blog post is for you! The theme of this mood board is frosty Arctic winter and embraces the blue, white, and silver color scheme with a holiday twist. Let’s have some fun…Take a look at these 16 wintry holiday items found on Amazon! Item 1— 16” Santa Figurine in Blue Clothing by the Windy Hill Collection This wintry list starts with this gorgeous Santa figurine decked out in cobalt blue fabric with silver and white embellishments. The exquisite details include intricate sequin designs and faux fur. Further decorative details include a silver goodie bag with presents, jingle bells, and jewels.  Item 2— Set of 3 Silver Candle Holders by DRELIFAM These luxurious candle holders are made of iron with a shiny silver finish. The crowns have an intricate vintage-style design and hold pillar candles up to 3” in diameter. The height of the candle holders are 9”, 11”, and 12”. 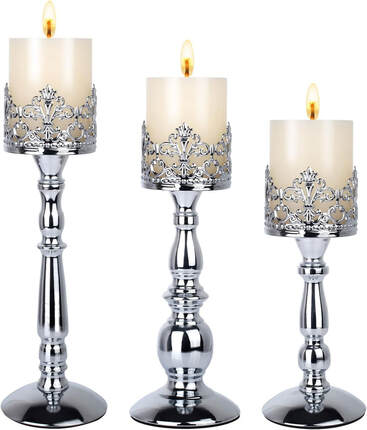 Item 3— 16” White Swedish Christmas Gnome by the Funoasis Store Your winter decor is not complete unless you have a gnome! This adorable plushy gnome is made of wool felt with a resin nose. 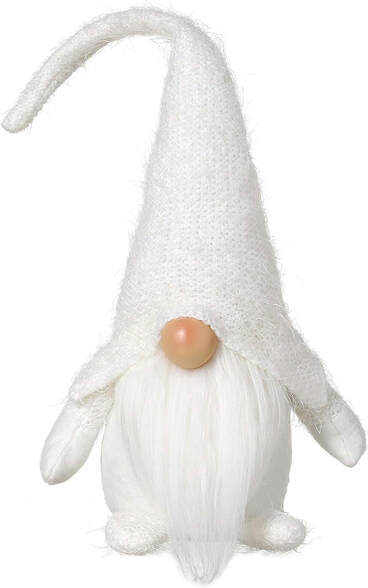 Items 4 & 5— 14 Pack 7.8” Glitter Berry Stems by the DearHouse Store Blue and white foam glitter berries can be mixed to create a festive tree topper or stuffed randomly into the tree to accent your ornaments. They also make a nice winter holiday arrangement for a table centerpiece. 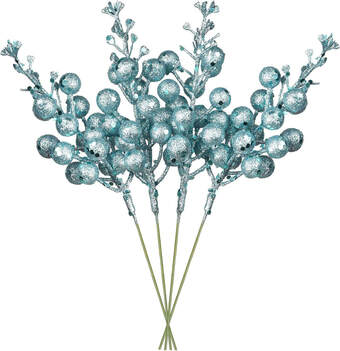 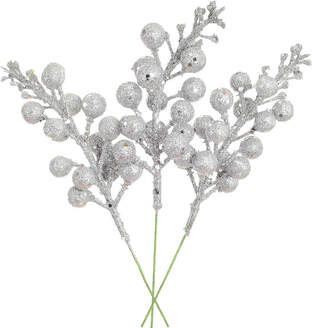 Item 6— 70ct Winter Wonderland Shatterproof Christmas Tree Ornaments by the Valery Madelyn Store I’m crushing over the holiday decor in the Valery Madelyn Store! This shop offers so many gorgeous ornaments but I particularly liked this set in silver, white, aqua, and navy. 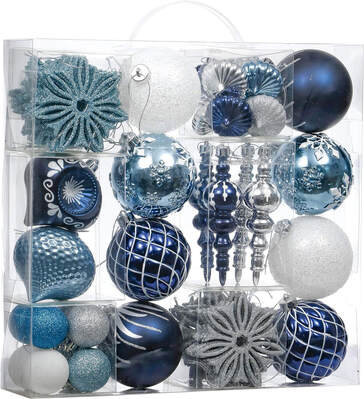 Item 7— Set of 3 Iced Glass Flameless Pillar Candles by Mark Feldstein & Associates If your table or mantle needs a touch of frosty pizzazz, try these frosted glass candle holders with a silver snowflake and jewel on the front! The candle holders have battery-operated flickering LED candles and are 4”, 5”, and 6” in height. 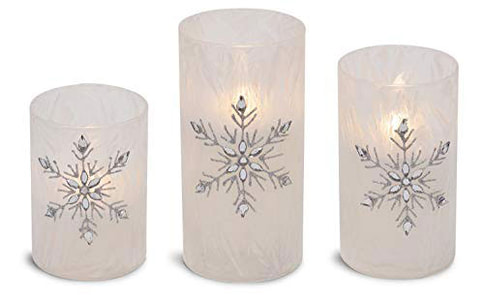 Item 8— Set of 2 White Woodland Reindeer Figurines by naturevibe I fell in love with these white reindeer the second I saw them! The silver antlers with realistic-looking white fur and frosted wreaths would look beautiful on a mantle all winter. 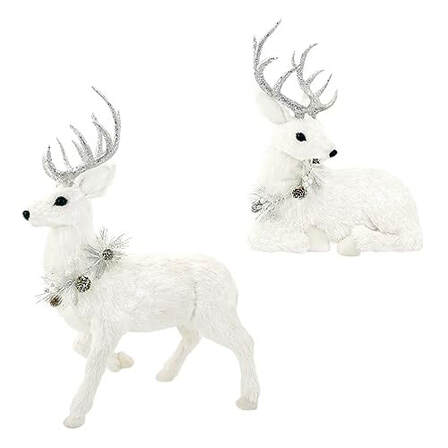 Item 9— Mamma Bear with Baby White Woodland Figurine by naturevibe And here is another figurine from the same shop—a mama bear with a cub riding on her back. How adorable is this! This piece has the same realistic-looking fur as the deer and is about 12.6” high. 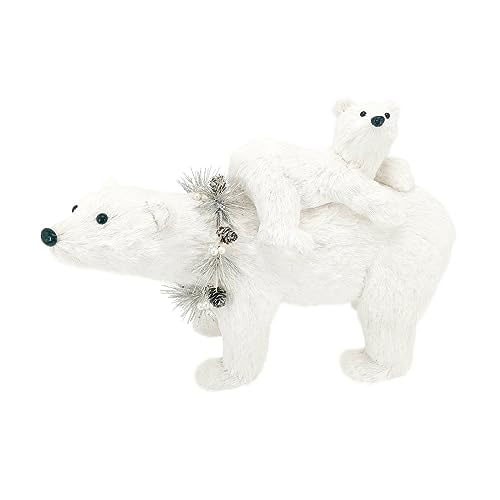 Item 10— Set of 3 Blue and Silver Velvet Christmas Stockings by New Traditions Simplify Your Holiday Store Aren’t these Christmas stockings elegant?! They are 20” long with dark blue velvet fabric, taffeta piping, and silver sequin vines…  Item 11— Blue and Silver Velvet Christmas Tree Skirt by New Traditions Simplify Your Holiday Store And they match this tree skirt made of the same material with the same snowflake and swirls design. This velvet tree skirt is an ample 48” in diameter.  Item 12— Large Blue and White Christmas Bow by Hying I found these beautiful blue and white bows with snowflake designs and thought they’d make festive tree toppers or decorative bows for railings, doors, or banisters. The bows are a substantive size at 19.6” x 11.4”. 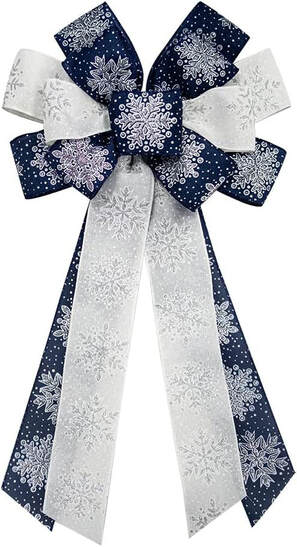 Item 13— White Satin 2.5” Wide Wired Ribbon with Silver Snowflakes by the CT CRAFT LLC Store Staying with the snowflake design element, this white satin ribbon with silver snowflakes could be used to deck out your Christmas tree, banisters, or even gifts. The 2.5” wide ribbon has wire to keep your bows in shape, and you have 10 yards of ribbon on each roll. 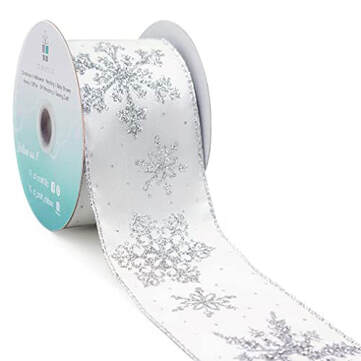 Item 14— 9ft Pre-Lit Christmas Garland with Silver and Blue Ornaments by Valery Madelyn The greenery for this mood board includes this 9ft garland with blue ribbon, pinecones, and ornate silver, white, and blue ornaments. The garland is lit with battery-operated warm LED lights. 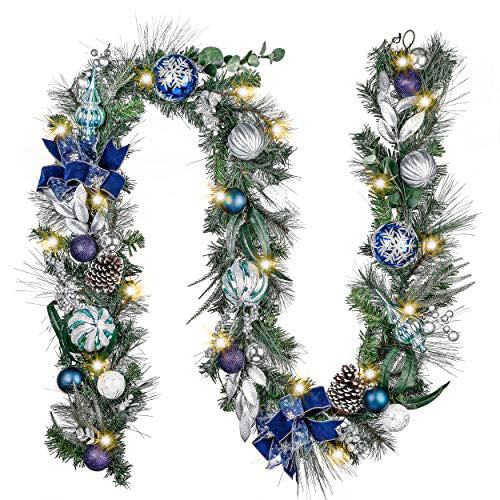 Item 15— 30” Pre-Lit Christmas Wreath with Silver and Blue Ornaments by Valery Madelyn The door wreath was chosen to match the garland and also from the Valery Madelyn shop. This is one of many wreaths I could’ve selected from that shop, but I love the variety of textures and shades of blue. Like the garland, this wreath is lit with warm LED lights. 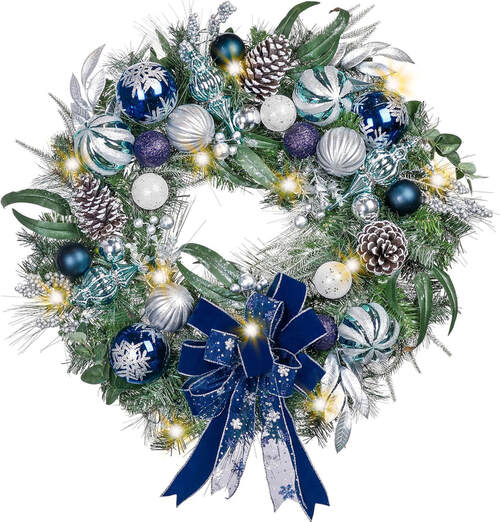 Item 16— 7.5ft Flocked Artificial Christmas Tree by the Goplus Store This blue, white, and silver color scheme goes best with a frosted tree, so we’ll end this list with this 7.5-foot flocked Christmas tree. The tree comes in 4 sections with an X-shaped foldable iron tree stand. 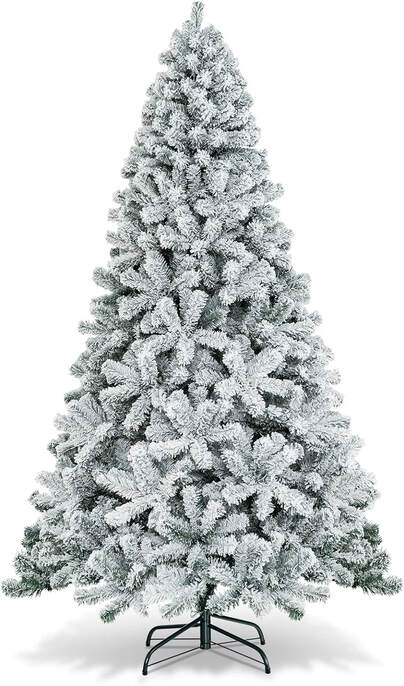 Related blogs you may want to read: Elegant gold & white Christmas decor ideas Inspirational decor ideas for a modern rustic Thanksgiving table Indoor Halloween Decor Inspiration Embrace the magic of fairy core decor this fall Dark Academia Decor for the Fall Create a cozy relaxing interior space this fall with neutral colors Brighten up your autumn decor with these items Pastel decorating ideas for autumn Need ideas for incorporating the color blue into your fall decor? Inspirational ideas for creating that cozy boho style Nine hygge decor ideas Winter color palette ideas for your home decor  Are you looking for a recipe for a spicy shrimp and rice dish? Well, I may have found just the recipe for you! Every time I see someone make a paella, I start to drool! I’ve always wanted to give it a try myself, but I don’t have a pan that big! So when I stumbled across this spicy cajun recipe, I thought it would make a delicious substitute. I’ve cooked this simple recipe a few times, and it tasted great every time! If you’re looking for an easy spicy dish that feeds a few people, this is your dish! As always, I doubled the original recipe (link at the end of this blog) to accommodate my family of five… Ingredients: 3 cups brown rice 32 oz chicken broth 2 lb cooked shrimp, peeled and deveined 1 stick butter, cut in half 2 tsp minced garlic Seasoning: 3 tsp paprika 2 tsp salt 1 tsp black pepper 1 tsp onion powder 1 tsp oregano 1 tsp cayenne 1/2 tsp red pepper flakes 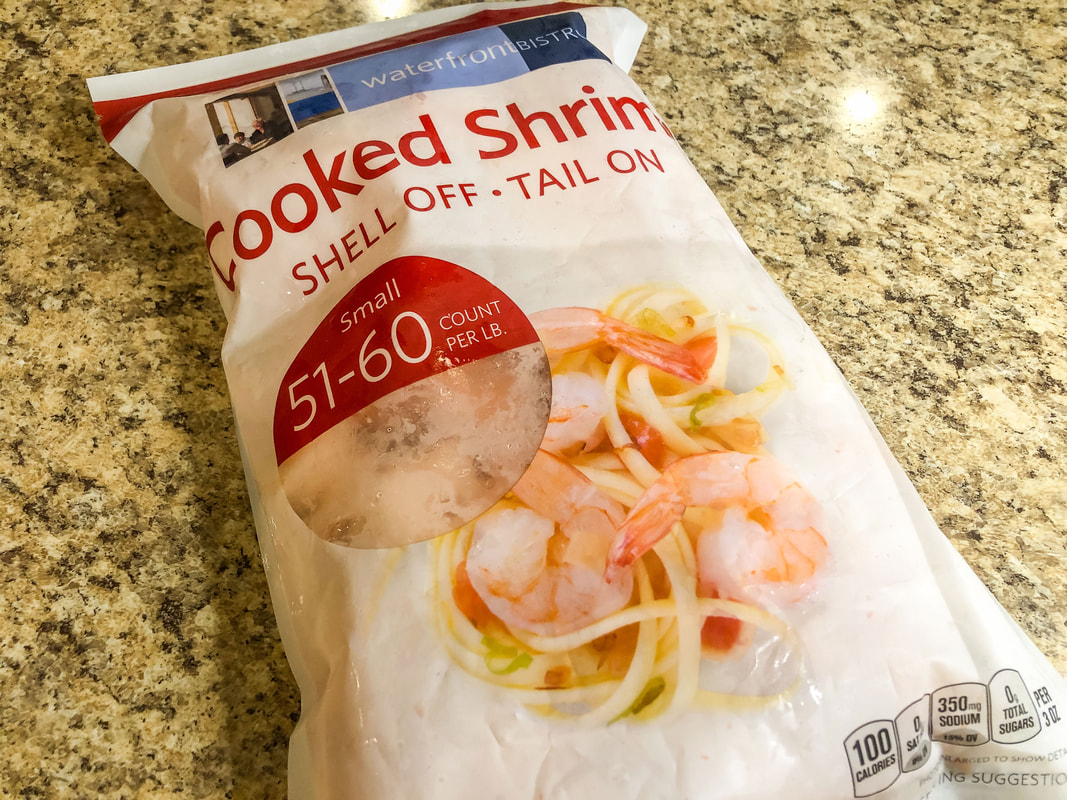 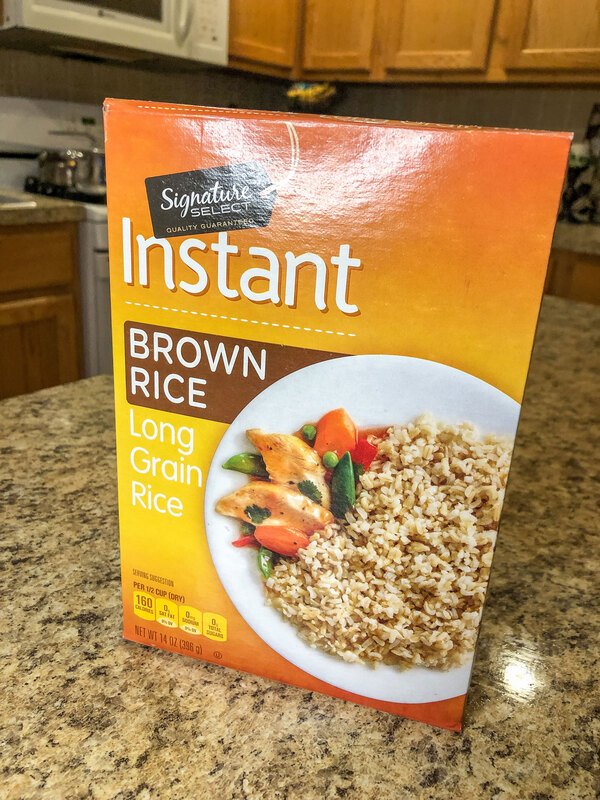 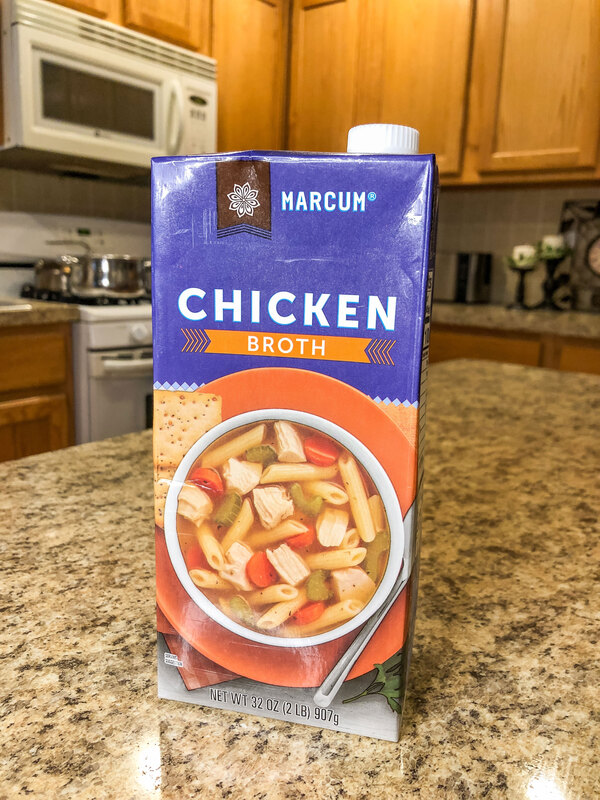 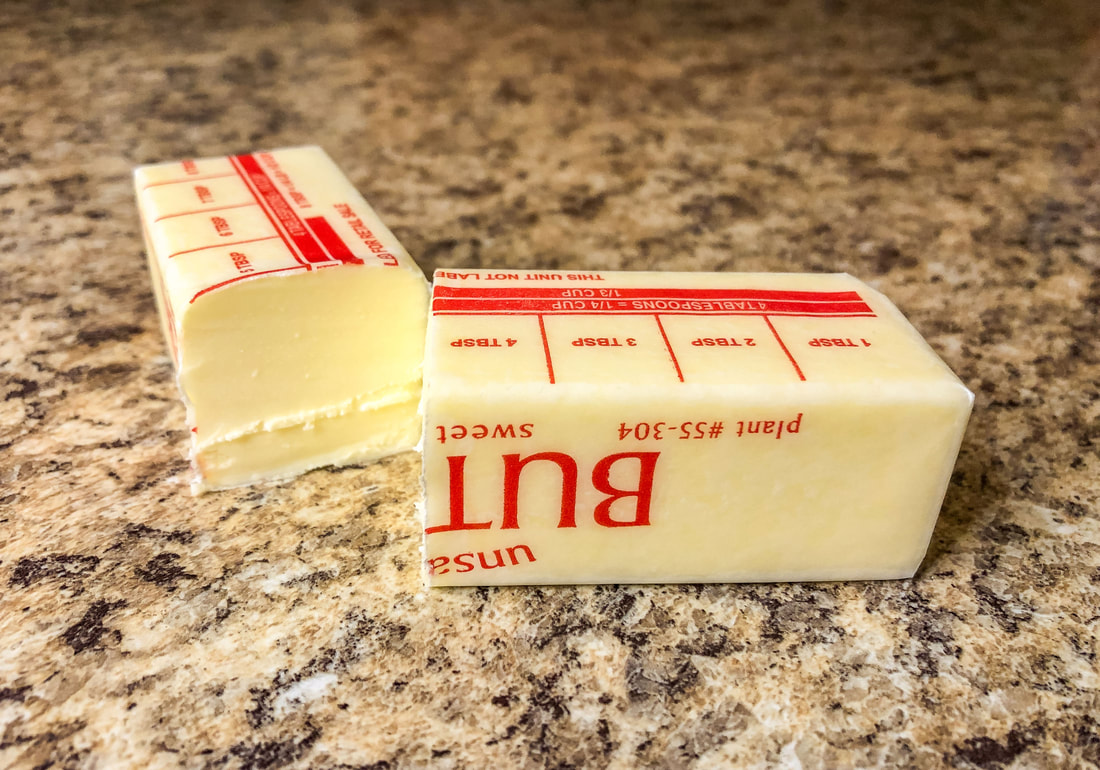 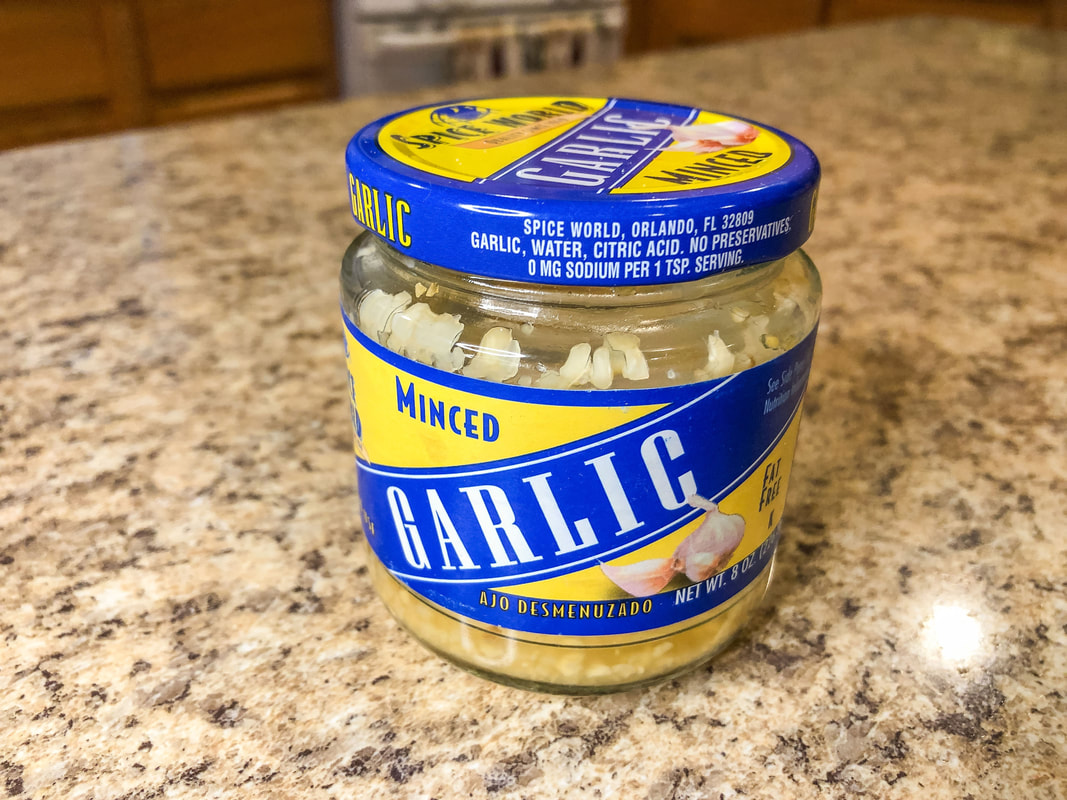 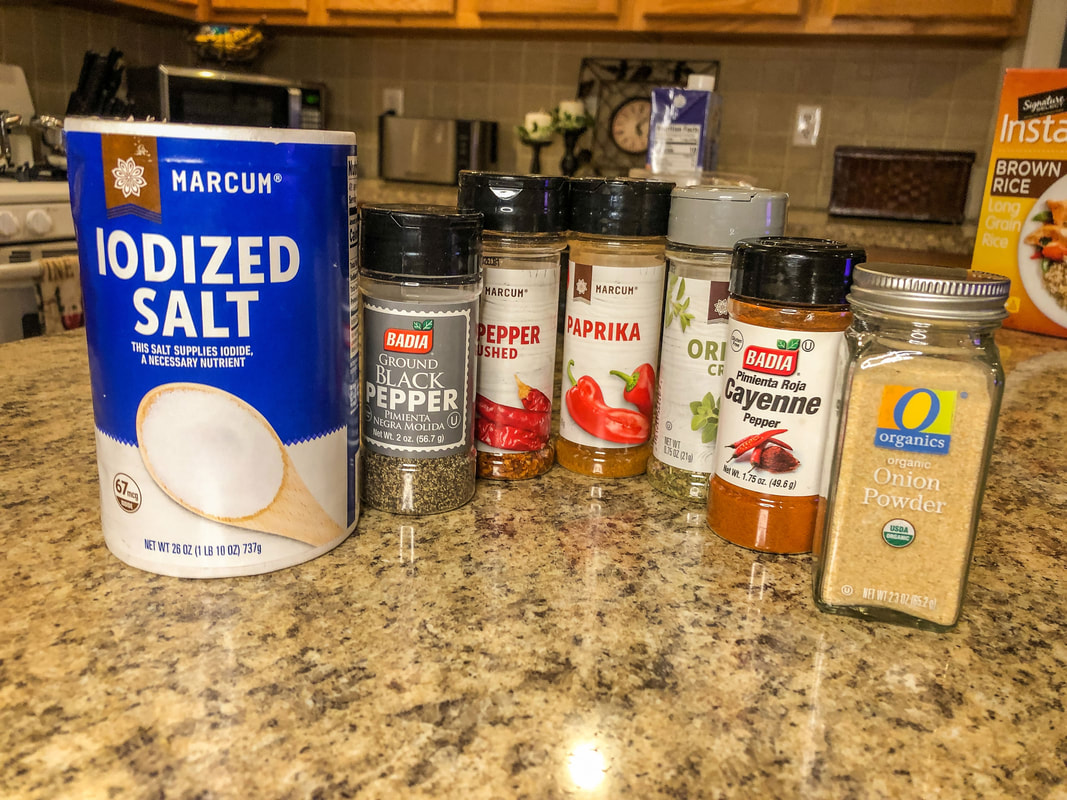 Mix spices in a bowl. Divide in half. 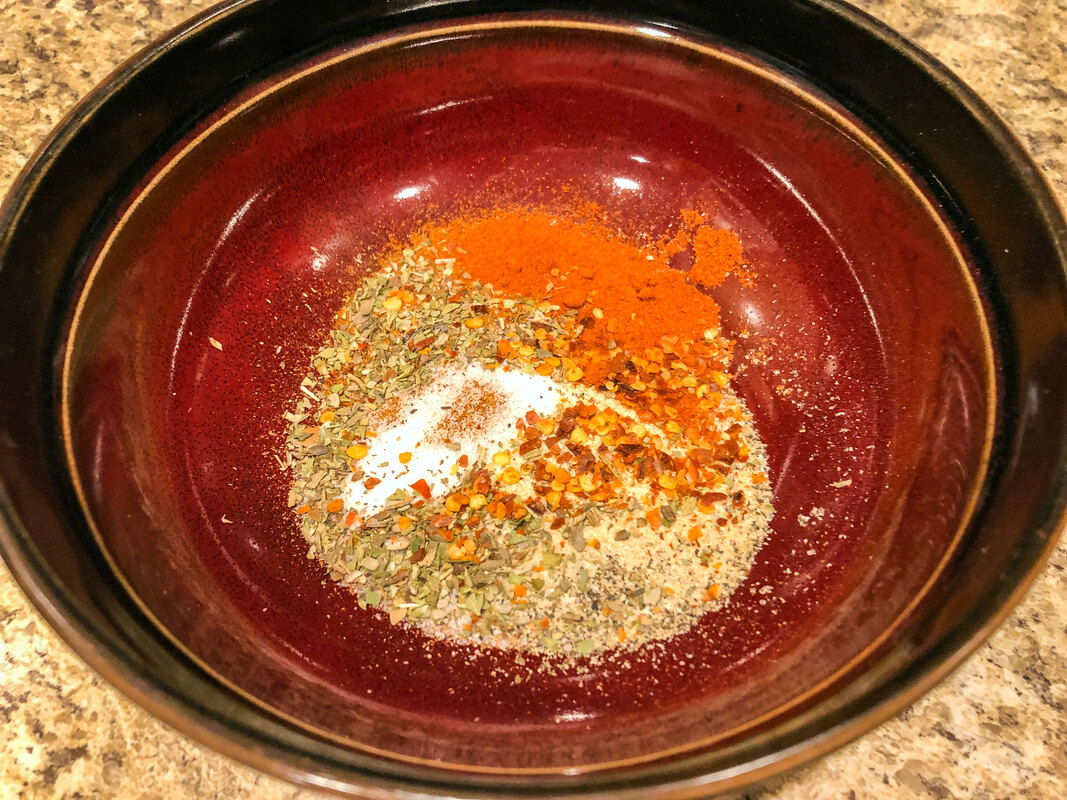 In a large pot, melt butter. Add garlic and saute just a little (20 seconds or so). Add uncooked rice and half of the spice mixture. Stir well to mix and coat the rice. 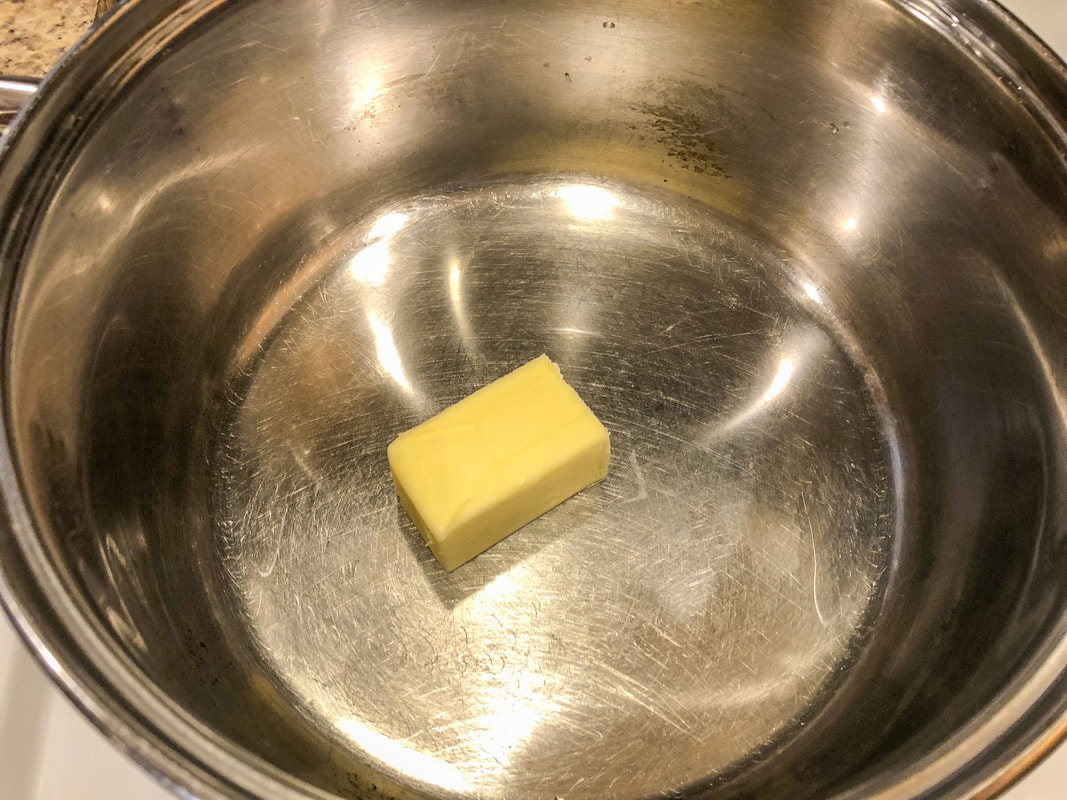 Add in chicken broth. Bring to a boil, reduce heat, and simmer for 15 minutes or until rice is just about cooked. 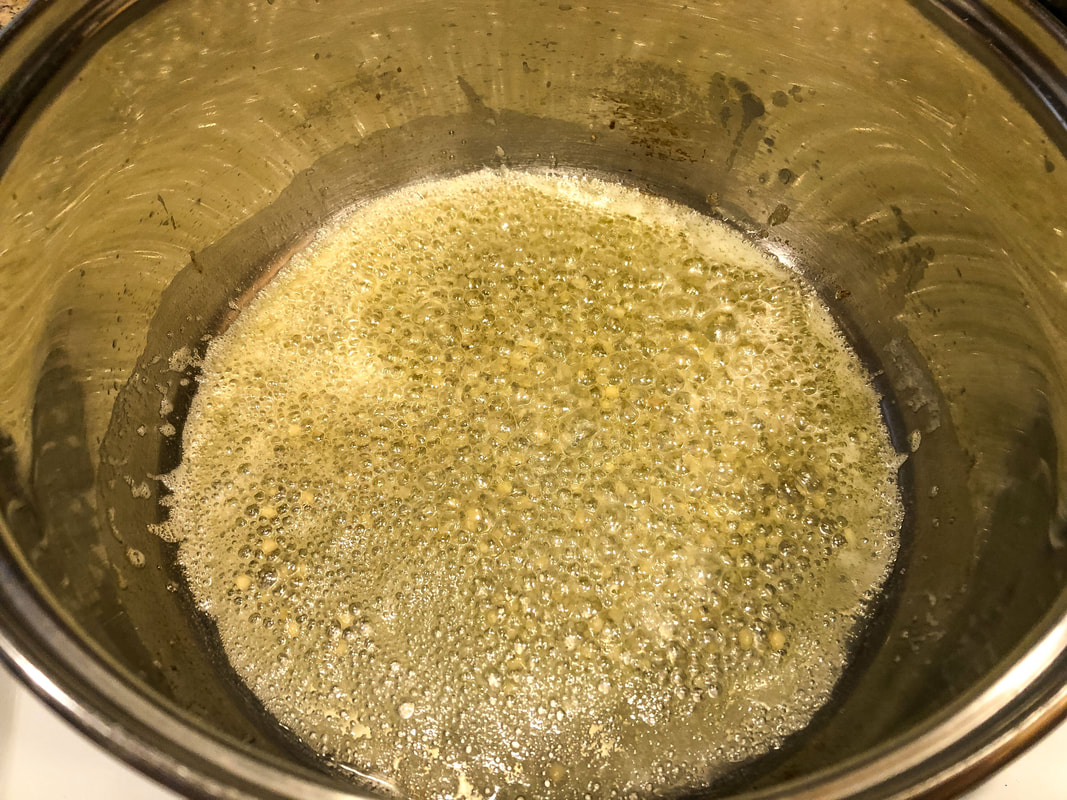 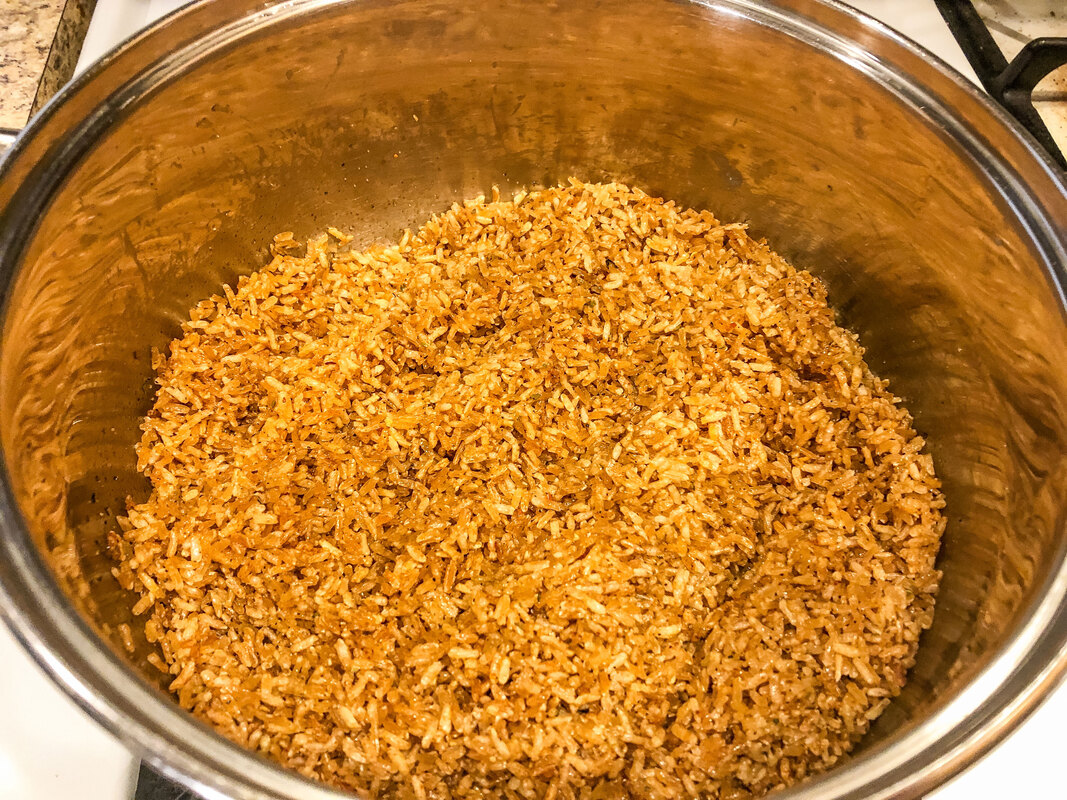 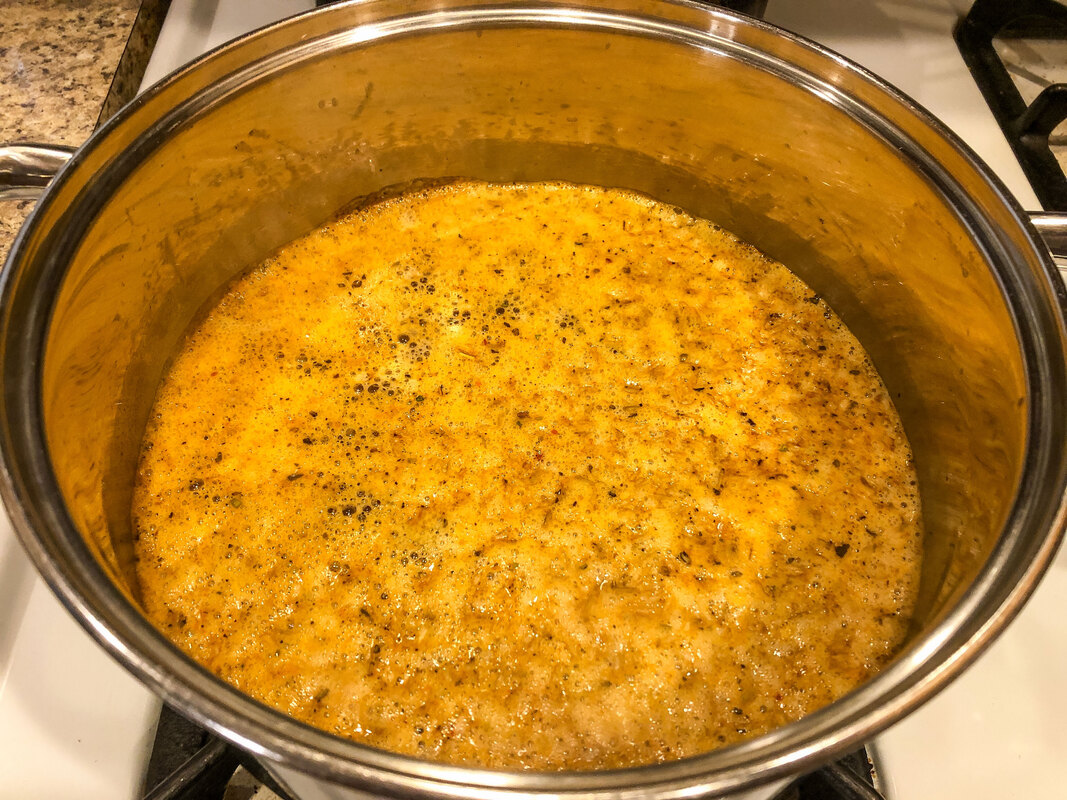 Melt butter in a separate pot. Mix cooked shrimp (I bought precooked, deveined) with butter and the second half of the spices. Make sure the shrimp is evenly coated. Heat through for just a couple of minutes. 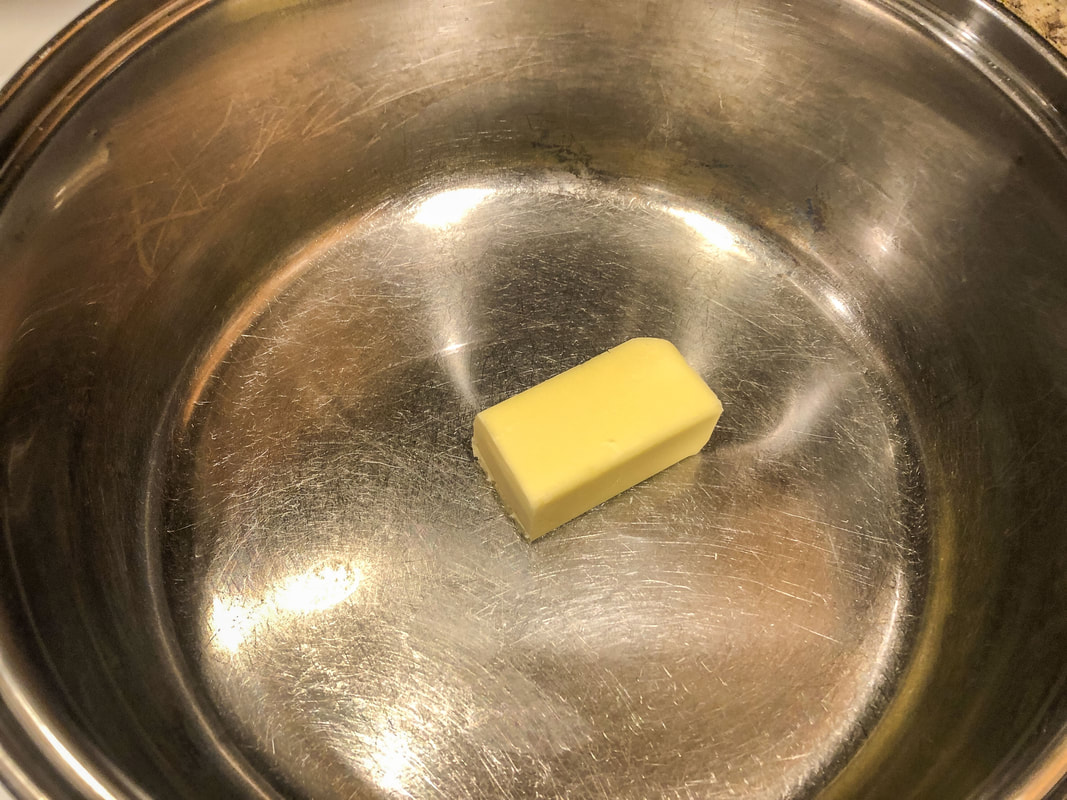 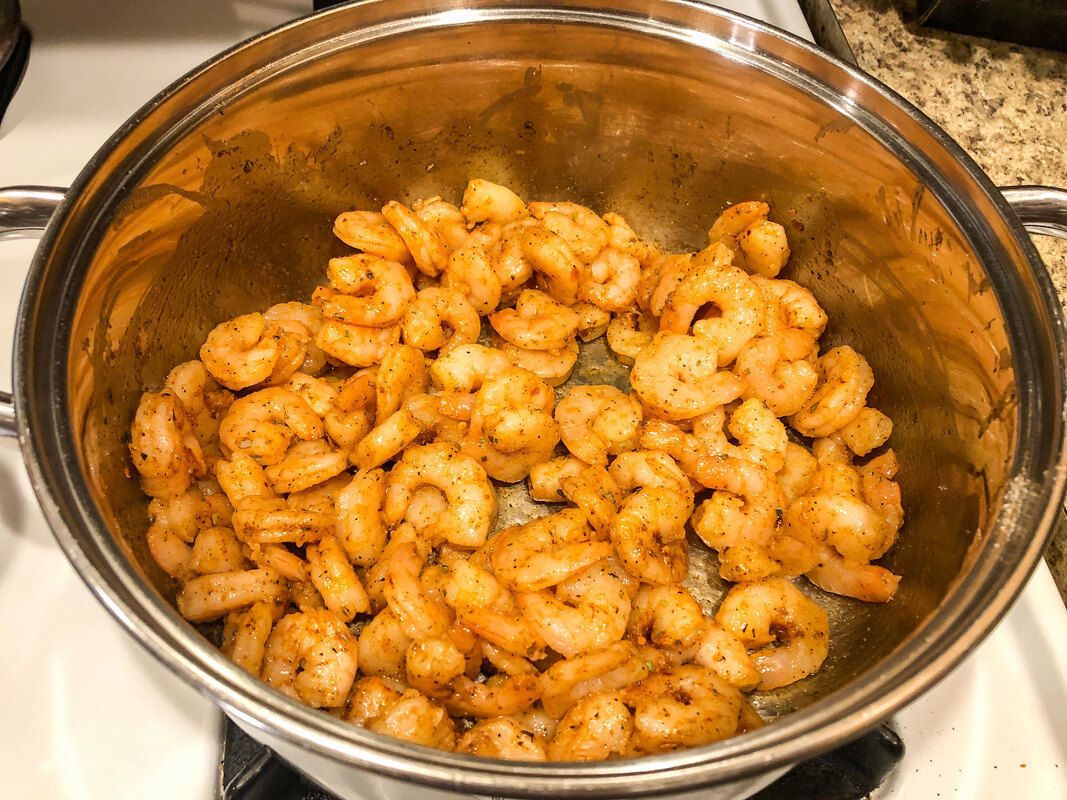 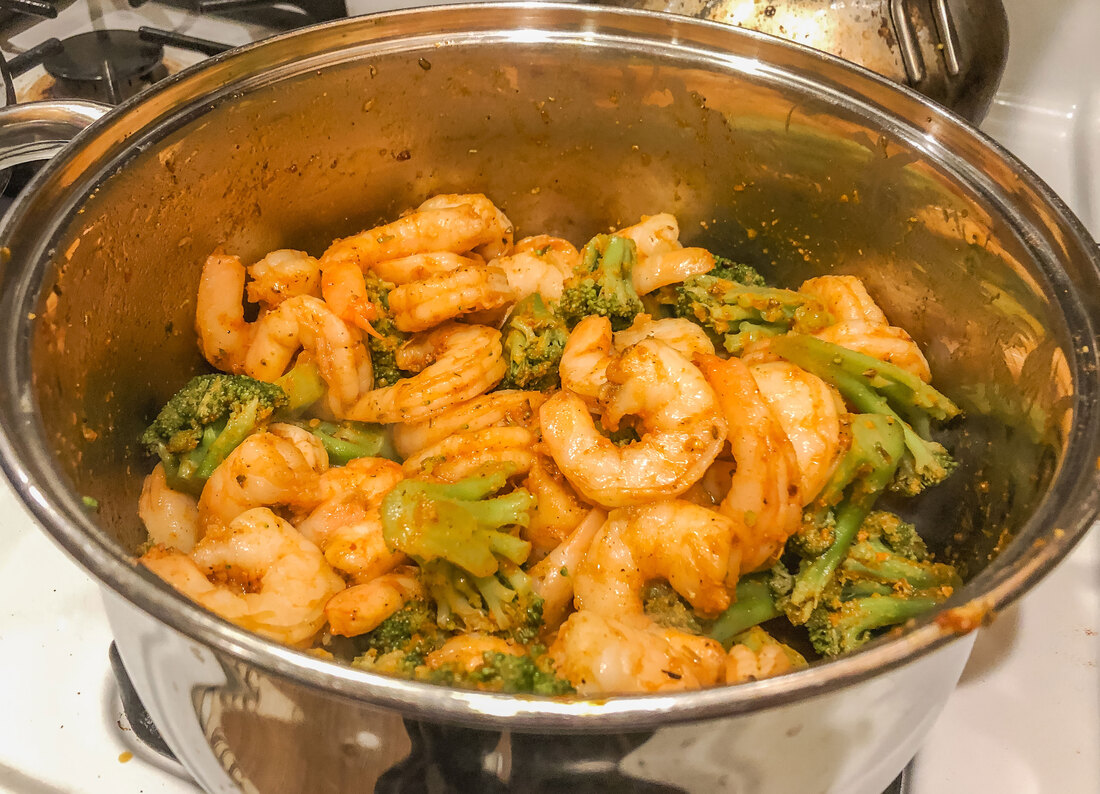 Add heated shrimp to rice and mix. Cover and heat together for a couple more minutes. (Don’t overcook the shrimp or burn the rice.) The first time I tried this recipe, I purchased raw shrimp. Maybe I am being lazy, but I found the process of removing shells to be time-consuming. The next time I tried the same recipe, I opted for pre-cooked shrimp. You can use either brown or white rice in this dish. Just as an FYI, this dish is very spicy! If you don’t like spicy foods, you may want to use fewer spices—or even a different combination of spices—according to your preferences. The third time I cooked this dish, I added leftover cooked broccoli. It turned out to be a delicious variation of this dish!   Let me know if you have tried this recipe and share your variations in the comments below! Original recipe https://www.lecremedelacrumb.com/cajun-shrimp-and-rice-skillet/ Related blogs you may want to read: Salmon chowder soup recipe Potato soup recipe Tuna noodle casserole recipe Chicken vegetable pot pie recipe Homemade chicken noodle soup This article may contain a few items or commercial mentions, but I only used them for demonstration purposes. I am not endorsing any particular product or receiving any monetary gain from this blog. Here are my favorite Amazon finds for an elegant fall or Thanksgiving table! 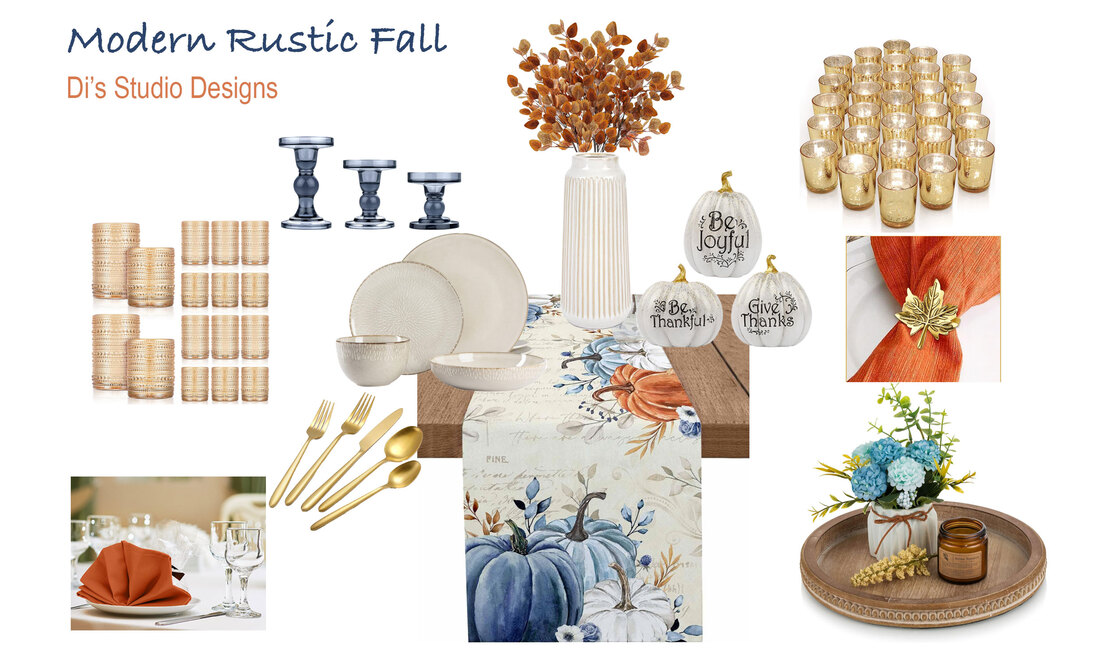 Images from Amazon.com. Click the links below to view or purchase. Some of the posts in this article contain affiliate links. If you click on the link and purchase the item, I will receive an affiliate commission at no extra cost to you. I will only recommend products or services I use personally and/or believe will add value to my readers, so there is no conflict of interest. I have definitely fallen for this year’s color trend of pairing blue with orange! Isn’t the tablecloth luscious?! The design concept for this mood board is Modern Rustic with a touch of gold for elegance. Simple line and texture is combined with contrasting cool blue and warm orange. This is such a vibrant festive look for your fall or Thanksgiving table! Details for each piece of decor on the board are below… Item 1— Matisse Dinnerware 16pc set, Taupe by Gibson Elite Store You can’t have Thanksgiving dinner without dinnerware, right?! Let’s kick off this list with dinnerware set for four, including dinner plates, dessert plates, double-size dinner bowls, and cereal bowls. Dishwasher and microwave safe, this taupe stoneware is the perfect blend of simple modern form with a rustic color and texture. 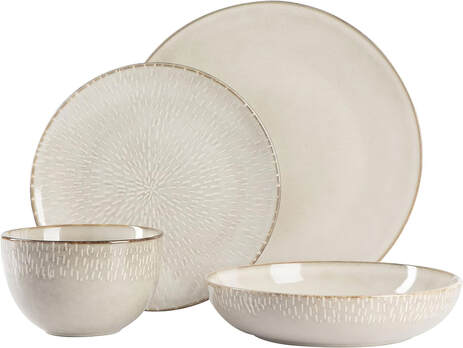 Item 2— 20 Piece Stainless Steel Matte Gold Cutlery Set by DEACORY This brass-dipped stainless steel gold cutlery set looks beautiful beside the taupe dinnerware. The roundness of the edges gives this cutlery a modern feel, and the matte finish tones down the gold finish, making this an excellent choice for a beautiful Modern Rustic table setting. 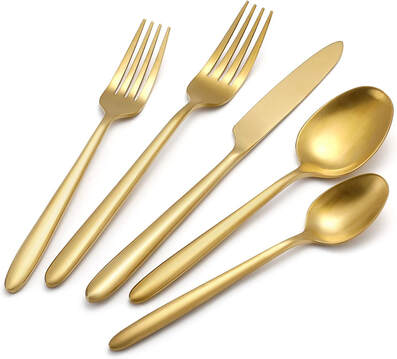 Item 3— Autumn Table Runner with Pumpkins, 108” long by AmbeHome This clean-edged tablecloth with blue and rust-colored pumpkins would make a beautiful statement on your Thanksgiving table! The cotton linen material is soft and easy to wash. Pair this with the Matisse dinnerware set and the matte gold cutlery, and you have the beginnings of a Modern Rustic tablescape! 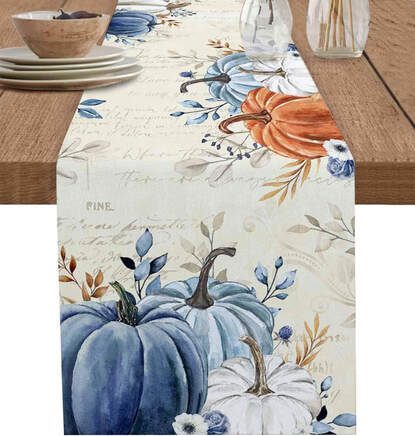 Item 4— 12 pack Cotton Polyester Blend Hotel Grade Dinner Napkins, 18 x 18 inch by Utopia Kitchen I chose these napkins for the simple look of the fabric and solid rust-orange color. The orange brings out the rust color from the pumpkins on the table runner and creates a warm feel to each place setting.  Item 5— Metal Fall Leaf Napkin Rings, Set of 8 by Pcineio Dress up your cloth napkins with these fall leaf napkin rings! Give each place setting a little autumn pizzazz with a single gold fall leaf to represent the spirit of the season. 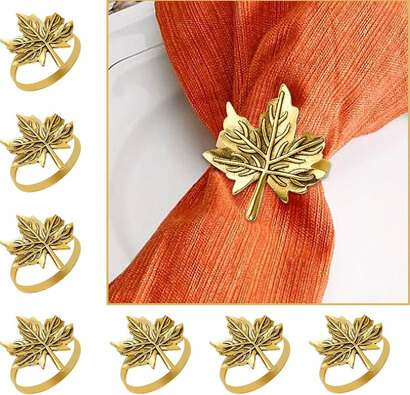 Item 6— Vintage Style Hobnail Glassware Set, 16 pieces by meekoo Store Serve your guests their favorite drinks in these vintage-style hobnail glasses! These amber-colored glasses have a modern feel with a tactile texture of smooth round hobnail details that you can’t resist picking up! 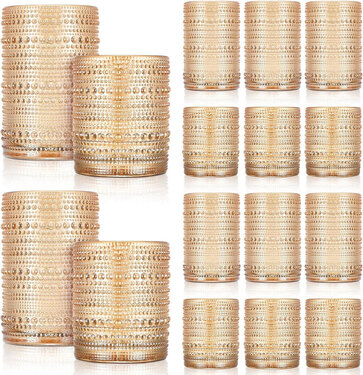 Item 7— 12 inch Round Farmhouse Boho Wood Beaded Tray by HPC DEC R OUR HAPPY PLACE Store This rustic tray is a nod to the feel of the boho or Farmhouse styles while maintaining a simple, round form. The tray comes in brown or white, but I think the brown creates a nice contrast against the pumpkin table runner mentioned earlier. 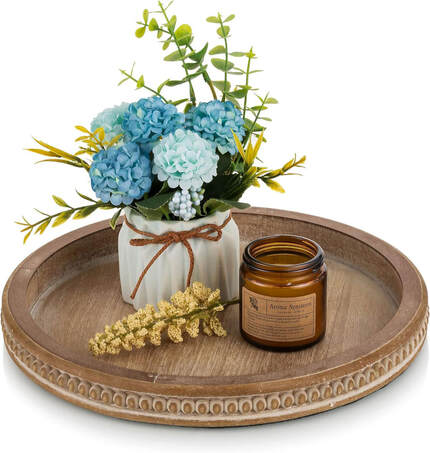 Item 8— Hand Glazed 9 inch Boho Farmhouse White Ceramic Vase by LiteViso Store This white ceramic vase has a nice balance of rustic weathering and clean, vertical, modern lines. The color and texture also complement the dinnerware mentioned at the beginning of this list. Place real or faux florals in this vase for the perfect fall table centerpiece! 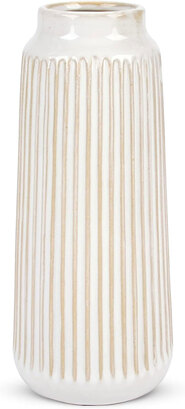 Item 9— Fall Silk Silver Dollar Eucalyptus Leaves by Sggvecsy Store The ceramic vase needs florals, so why not create a simple arrangement with these rust-colored silk eucalyptus branches? The rust color mirrors the warm oranges in the table runner and napkins, and the round silver dollar leaves feel simple and modern. 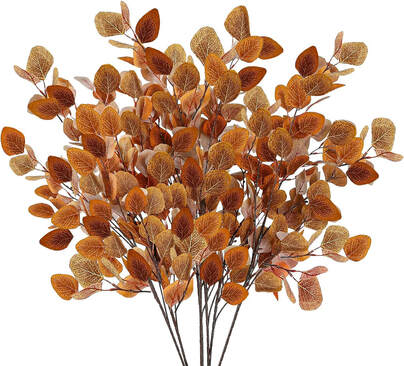 Item 10— Resin Pumpkin Figurines, Set of 3 by Prsildan Create thankful vibes at your Thanksgiving dinner table with this set of three resin pumpkins! The white ceramic pumpkins each have a positive affirmation for your guests. The gold stems pick up the gold elements in the rest of the tablescape. 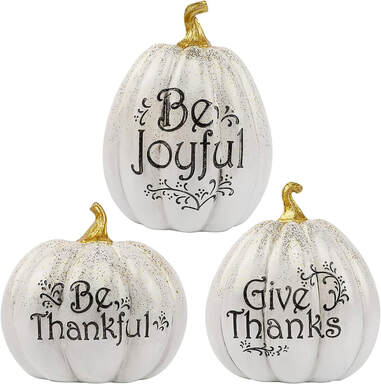 Item 11— Speckled Mercury Gold Glass Votive Candle Holders, set of 36 by LETINE Store And speaking of gold elements—no tablescape is complete without these mercury votive candle holders! Place LED tea lights in these gold candle holders to create a warm, elegant glow for your family dinner. 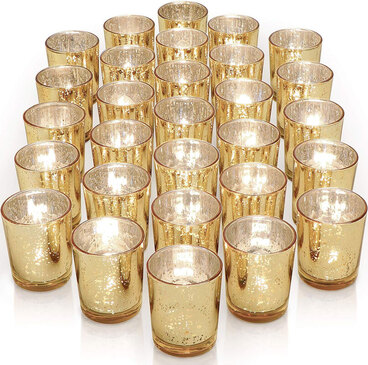 Item 12— Smokey Blue Glass Candle Holders, Set of 3 by Lewondr Store There are a lot of rust and orange colors listed here, so I thought I’d balance it out by ending with these blue taper candle holders. The smokey blue color complements the blue hues in the table runner and gives the tablescape a nice counterbalance to all the other warm colors. The sleek style also creates a sense of balance between the modern and the rustic elements.  Related blogs you may want to read: Indoor Halloween Decor Inspiration Embrace the magic of fairy core decor this fall Dark Academia Decor for the Fall Create a cozy relaxing interior space this fall with neutral colors Brighten up your autumn decor with these items Pastel decorating ideas for autumn Need ideas for incorporating the color blue into your fall decor? Inspirational ideas for creating that cozy boho style Nine hygge decor ideas Winter color palette ideas for your home decor Check out these 11 Amazon finds for inspiration! 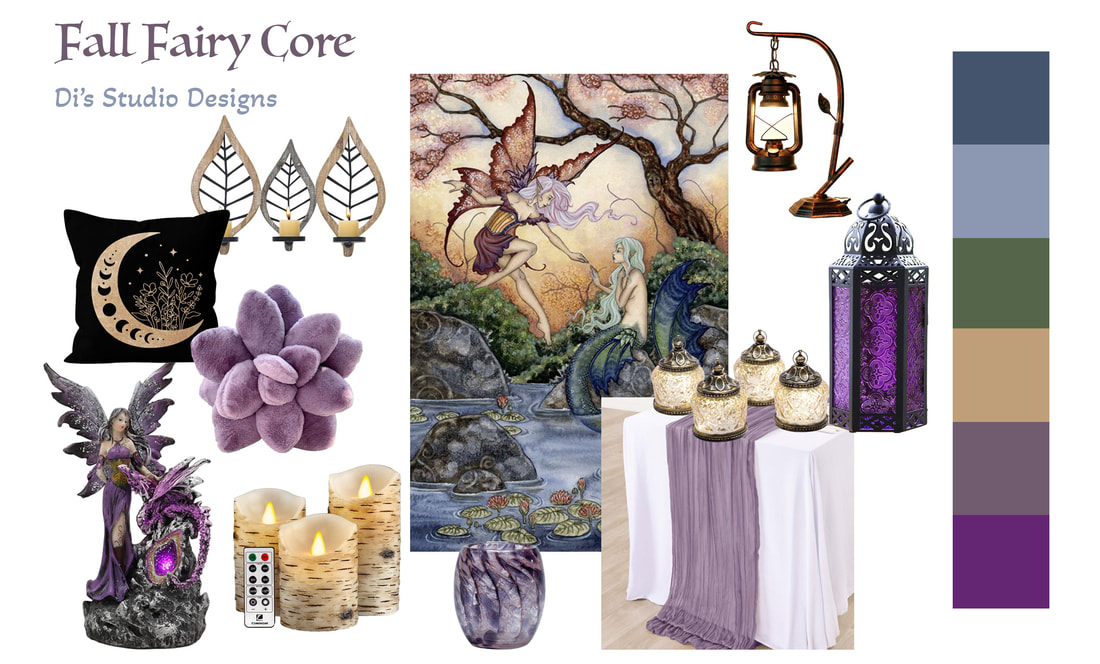 Images from Amazon.com. Click the links below to view or purchase. Some of the posts in this article contain affiliate links. If you click on the link and purchase the item, I will receive an affiliate commission at no extra cost to you. I will only recommend products or services I use personally and/or believe will add value to my readers, so there is no conflict of interest. If you’re a non-traditionalist or just looking for a more feminine fall decor style this year, this blog is for you! If I’m being honest, I had way too much fun creating this mood board! The whimsical fairy poster is the backdrop and inspiration for the rest of the fairy-inspired decor. The color palette embraces the cool end of the spectrum, with purples and blues being the most dominant. The cool colors are markedly different from the traditional warm orange, red, and yellow colors in most fall decor, making this design concept refreshing and unique! So, if you’re looking to shake things up a little bit this fall and bring a little fairy magic into your space, check out these 11 items I found on Amazon!  Item 1—3D Succulent Plush Throw Pillow by Danitar Find your happy place this fall when you snuggle up with this imitation rabbit fur 3D succulent pillow. This is such a unique pillow! It comes in other colors, but this purple shade is just perfect for your fall fairy decor. 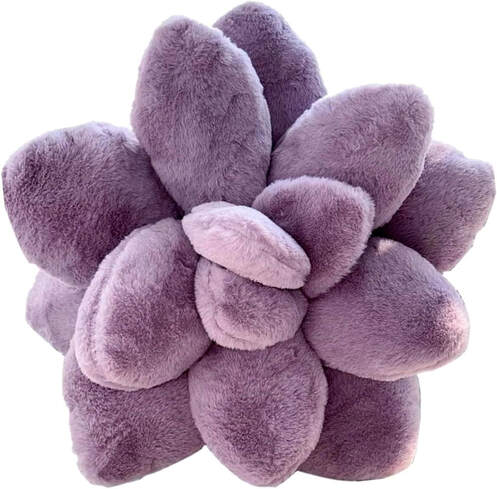 Item 2—Black Flannel Throw Pillow with Crescent Moon by HIWX The Bohemian vibe of this black throw pillow with a gold crescent moon will blend in well with the rest of your fairy decor. The soft flannel material adds warmth and comfort to your bed, chair, or sofa on a crisp fall night! 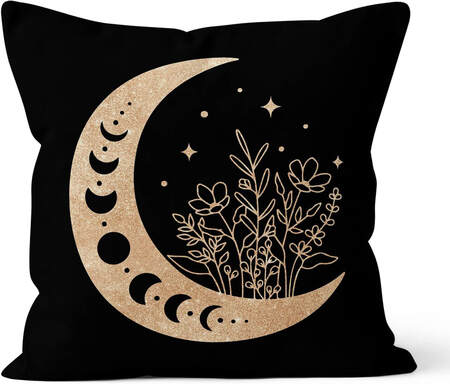 Item 3—Flameless LED Birch Bark Candles by Comenzar Add a touch of fairy woodland to your table with this set of three LED Birch bark candles. The warm flicker of the faux flames brings light and love into your space, creating a cozy and magical atmosphere. 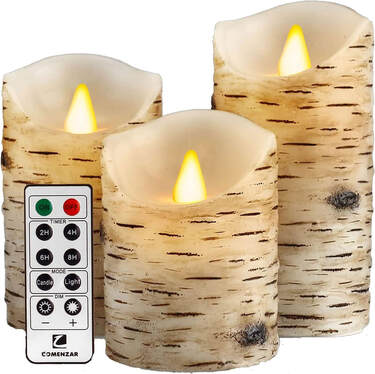 Item 4—Metal Moroccan Lantern with Purple Fairy Lights by Vela Lanterns Store The exotic look of this lantern will add whimsy to your fairy decor by day, and by night, the purple fairy lights will add an enchanted glow to your table or mantle piece. 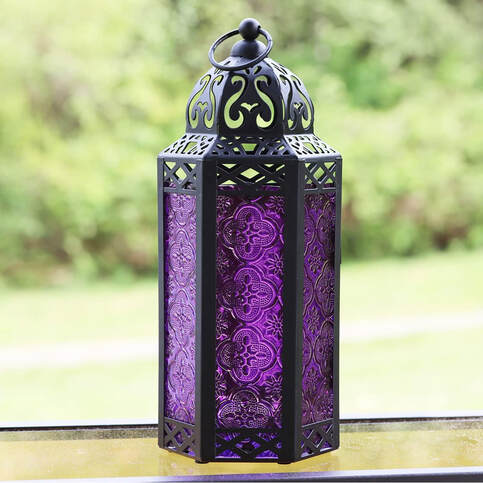 Item 5—Fairy Mermaid Fairycore 12 x 18 Art Print Poster by the Poster Foundry Store A winged fairy and a mermaid strike up a friendship in this beautiful fairycore art print poster. Mount in a frame and hang on a wall, or lean the print against a wall on a mantle or table surrounded by all your favorite fairy decor. 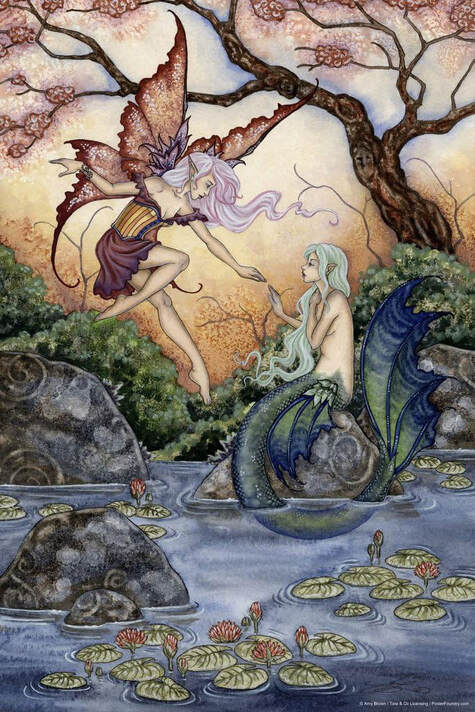 Item 6—Purple Cheesecloth Table Runner 35” x 120” by the DeZerlor Store This purple cheesecloth runner can used on a dining room tablescape or creatively draped on a side table or mantle. The sheerness of the material will add to the ethereal quality of your fairy design aesthetic. 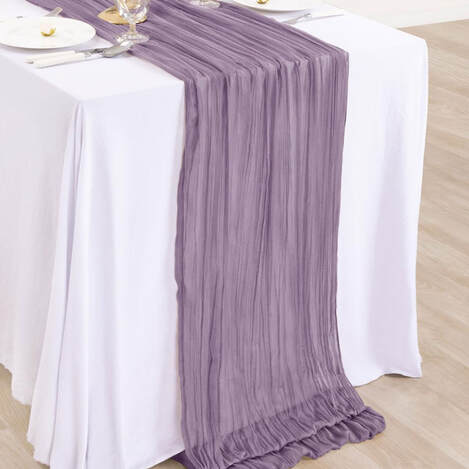 Item 7—Metal and Wood Leaf Wall Sconces by the Asense Store Bring more of the fairy woodland feel into your space with this openwork leaf silhouette wall sconce. Hang these sconces on your walls and place an LED flameless candle on the ledge to set the mood for your magical space. 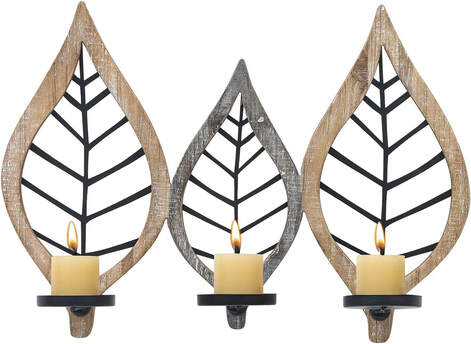 Item 8—Purple Fairy and Dragon Figurine with Geode Night Light by the Ebros Gift Store Make this enchanting fairy and dragon figurine a focal point of a fairy-themed vignette! This resin figurine is also an LED geode night light, perfect for a bedroom or to add a little mystery to a vignette in the evenings. 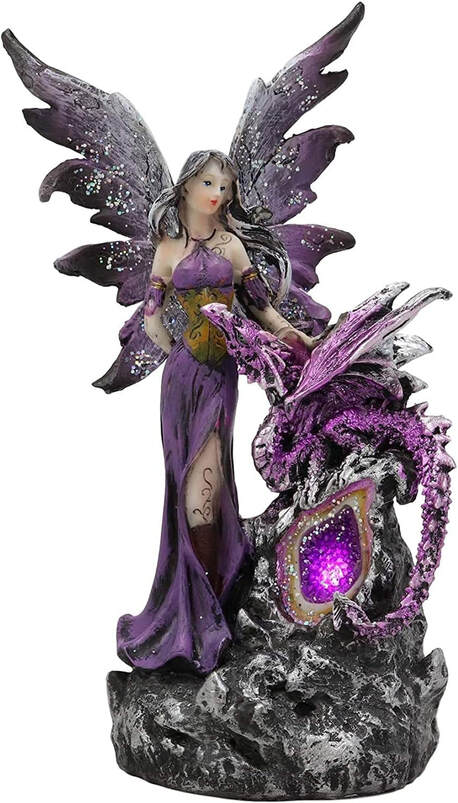 Item 9—Set of 4 Mini Glass and Antique Bronze Lanterns with LED Lights by the LampLust Store These mini lanterns are just adorable! They look exotic enough to fit into a fairycore design style while adding a warm, diffused glow when lit. 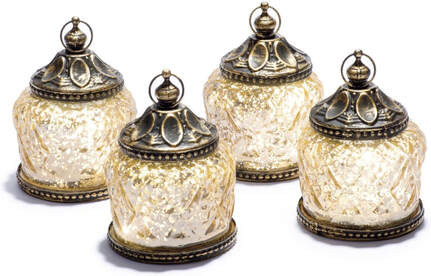 Item 10—Purple Fairy Wings Glass Votive Holder by the Dynasty Gallery Store Place an LED candle in this handblown glass votive holder in the evenings for a touch of magical ambiance. Place this votive holder on a table, or include it in a tablescape with other fairy-themed decorative elements. 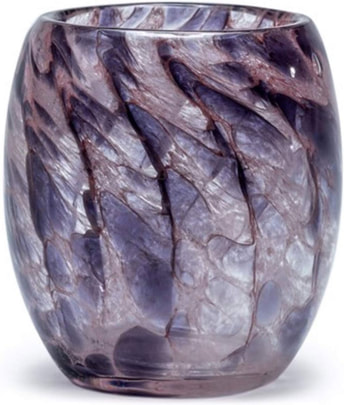 Item 11—Rustic Lantern Table Lamp by the Rarlonly Store Doesn’t this aged bronze lantern look like it’s hanging from a tree branch in a fairy wood? This charming table lamp will enhance the look of your fairy decor in a bedroom or living room. 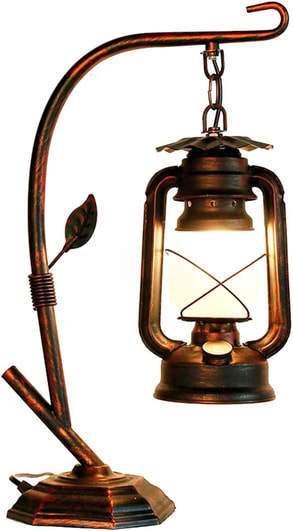 Related blogs you may want to read: Dark Academia Decor for the Fall Create a cozy relaxing interior space this fall with neutral colors Brighten up your autumn decor with these items Pastel decorating ideas for autumn Need ideas for incorporating the color blue into your fall decor? Inspirational ideas for creating that cozy boho style Nine hygge decor ideas Winter color palette ideas for your home decor Design concept for a dreamy coastal interior Let’s talk Bohemian 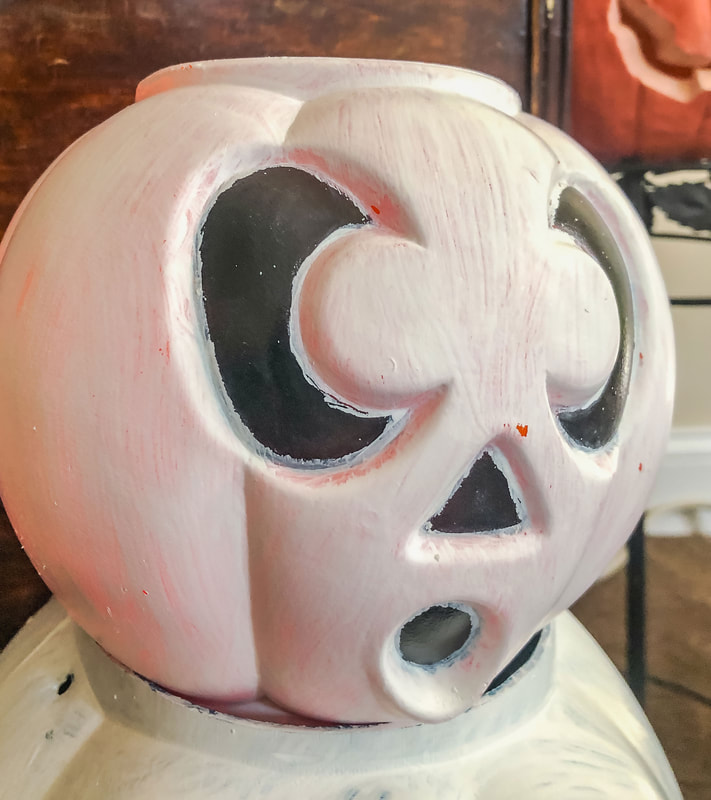 In a previous blog, I showed you how to up-cycled old jack-o-lanterns using chalk and craft paint. In this blog, I will share how I transformed a few old plastic Halloween candy buckets into “new” decor for my home. Reusing and updating old decor is such a fun and budget-friendly way to create a fresh look in your home for the season without breaking the bank! I don’t know about you, but money has been extraordinarily tight this year…And my kids are all grown now, so they don’t need those old buckets anyway! Here are some supplies that you may need for this project. (Items contain affiliate links.) Three plastic pumpkin buckets Dowel rod (optional) White craft paint Sponge brush General paintbrush Paint palette Thin paintbrush Spray sealant (optional) LED candles Fairy strands Step 1 Prep your buckets by pulling off the handles and giving them a thorough clean. 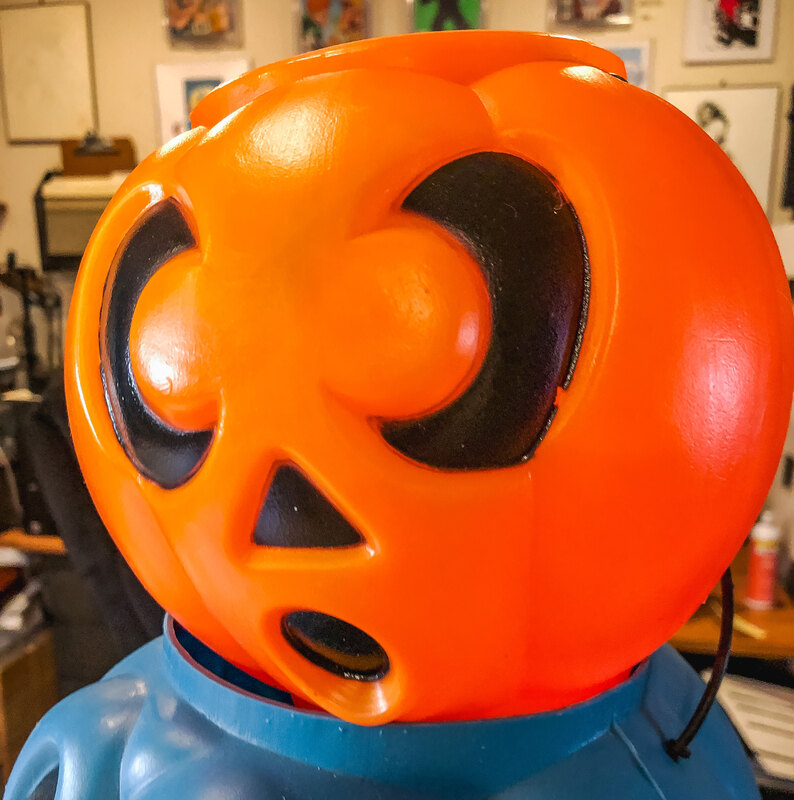 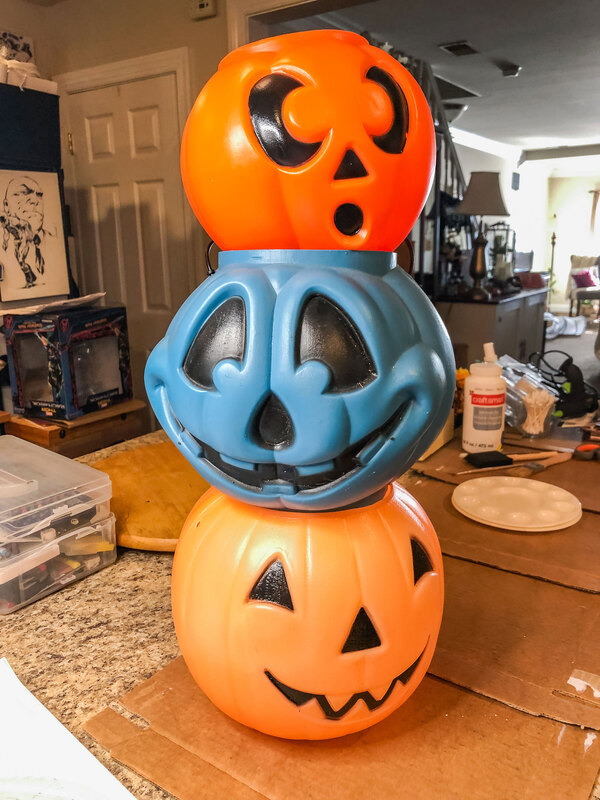 Step 2 (optional) Drill holes in the bottom of each bucket. Using a sharp blade, carefully cut out the eyes, nose, and mouth. Step 3 Apply the first couple coats of white paint on each pumpkin and let dry. You can opt for Mod Podge instead of craft paint if you’d like. The idea is to use something as a primer. 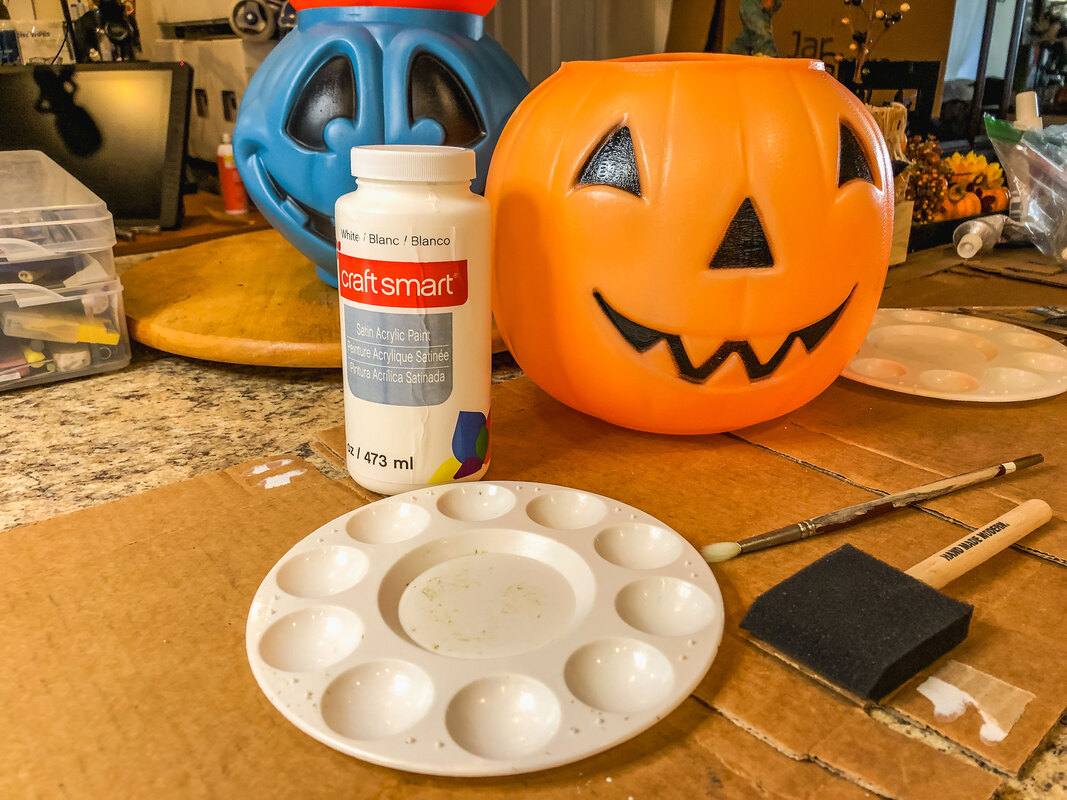 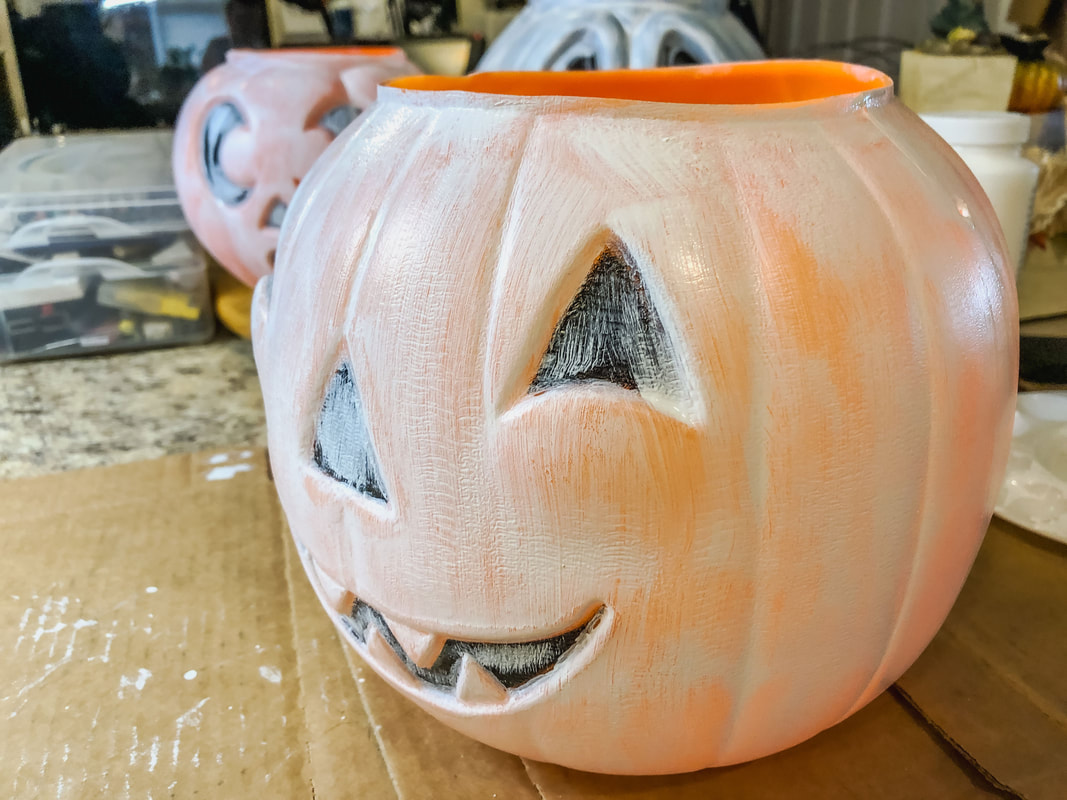 Step 4 Using a thin brush, paint inside all the creases of the pumpkins, including the areas inside the eyes, nose, and mouth that are not black. Use the same white paint for this step or a darker color to create a sense of depth. 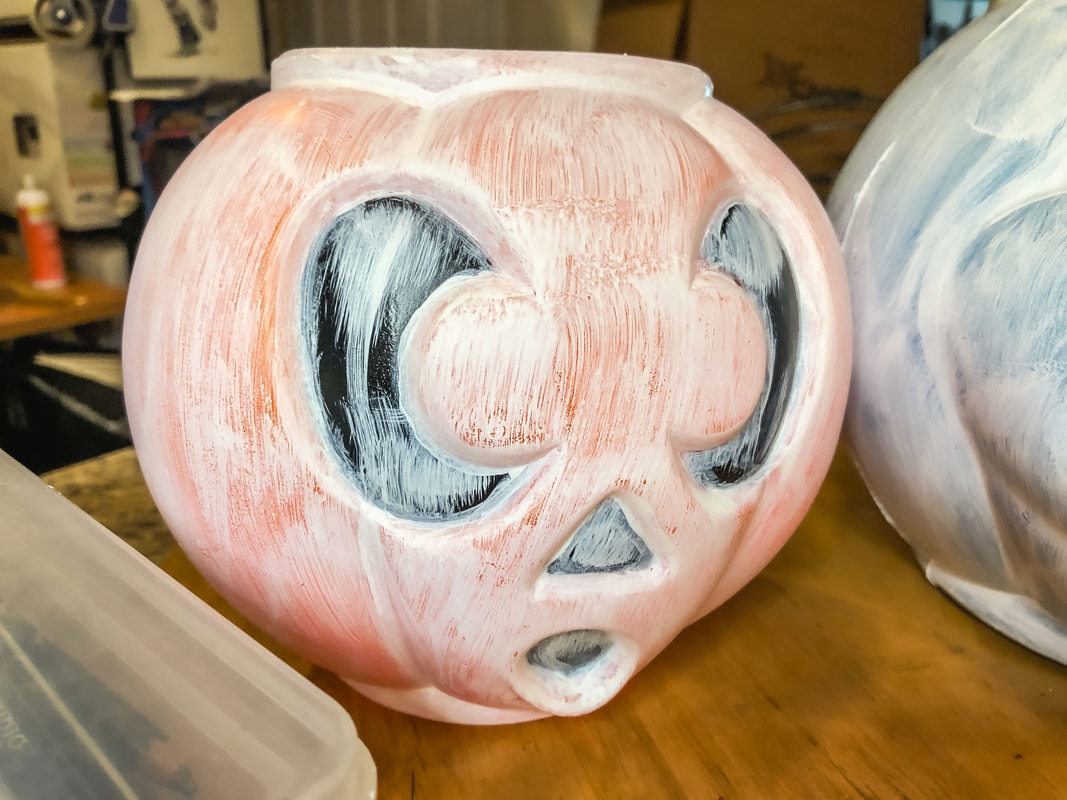 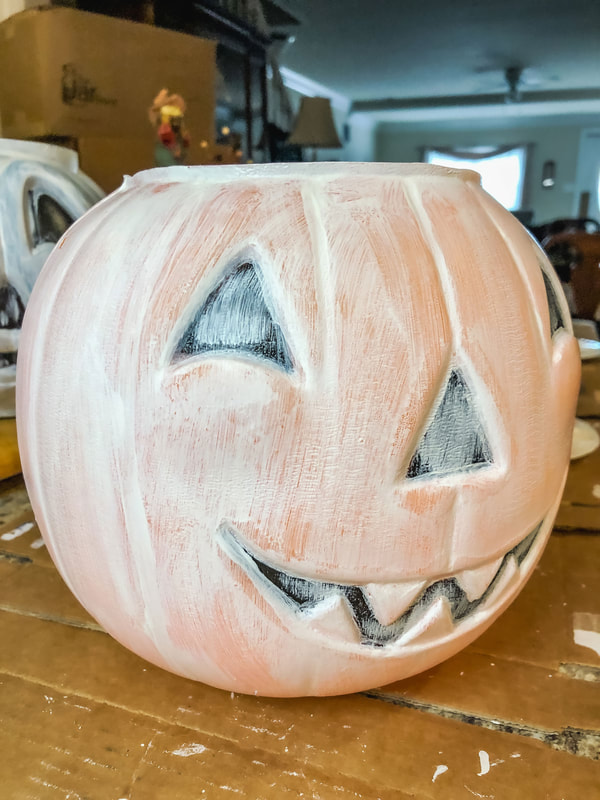 Step 5 Add a third coat of white paint, applied heavier this time to get full coverage. Let dry. Add a final coat of paint if desired. Step 6 Clean off any paint that may have gotten in the black areas of the eyes, nose, and mouth. (If you didn’t cut them out. ) 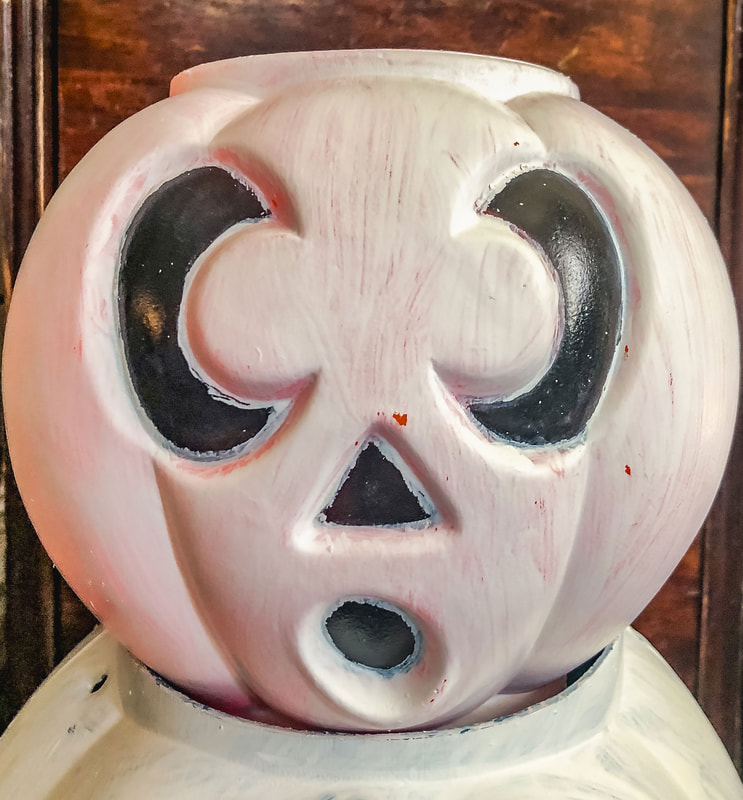 Step 7 (optional) Spray with a sealant if you will be using this decor outside. Step 8 Stack the newly painted pumpkin buckets one on top of another or attach them with a long, thin dowel rod. Light them up with LEDs or fairy strands to create a spooky glow! 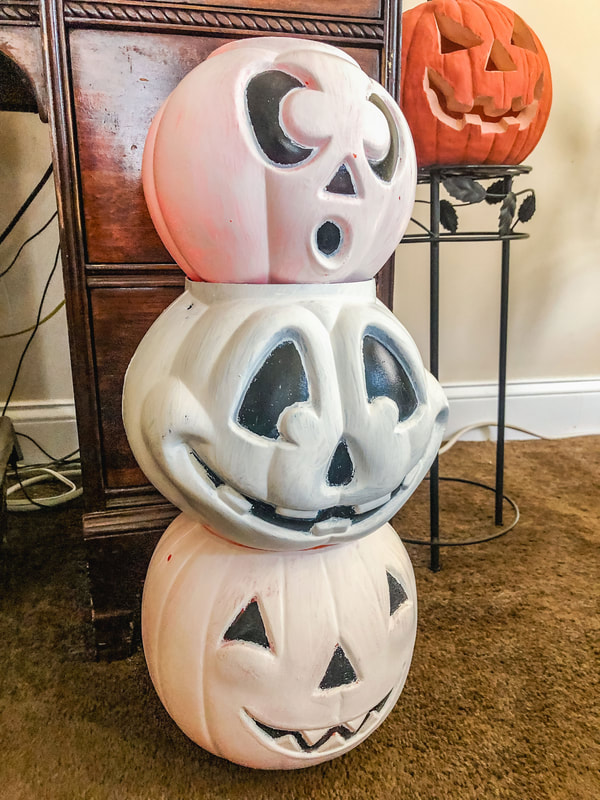 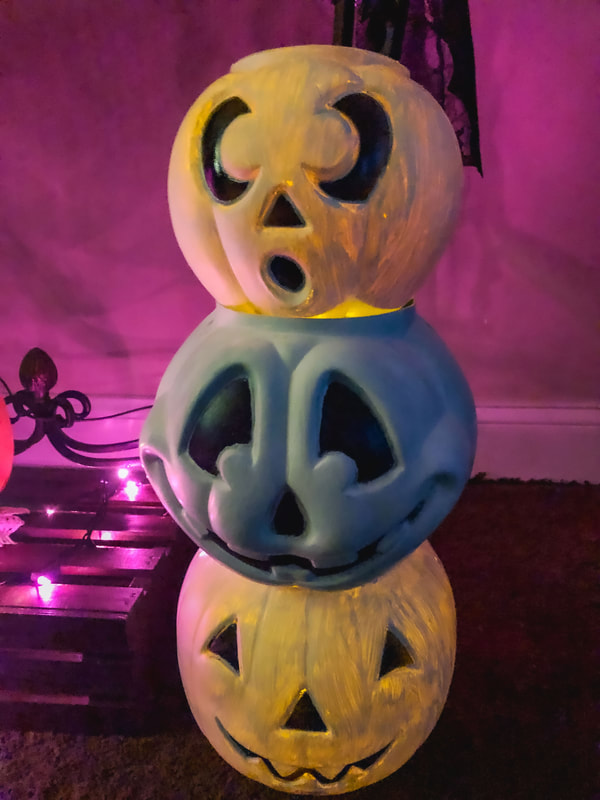 Related blogs you may want to read: Halloween DIY using chalk paint to revive an old plastic pumpkin Indoor Halloween Decor Inspiration Halloween Lawn Decor Ideas Some of the posts in this article contain affiliate links. If you click on the link and purchase the item, I will receive an affiliate commission at no extra cost to you. I will only recommend products or services I use personally and/or believe will add value to my readers, so there is no conflict of interest. 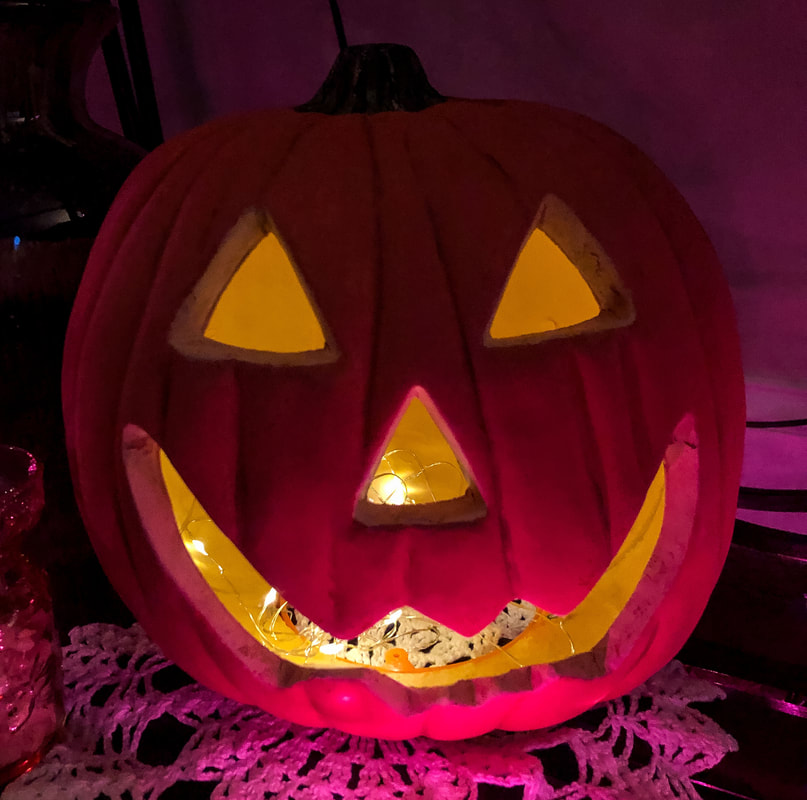 Money is tight this year, so the focus for the fall decorating season has been on up-cycling and reusing wherever possible. But, just to make my life more difficult, I also wanted to change my usual fall decor. Every year I pull out these light-up jack-o-lanterns along with the rest of my bright orange, yellow, and red fall and Halloween decor. This year, I decided I’d had enough of these bright colors! My kids are all grown, and I want more muted colors for this fall season. So, a Halloween DIY project was born! 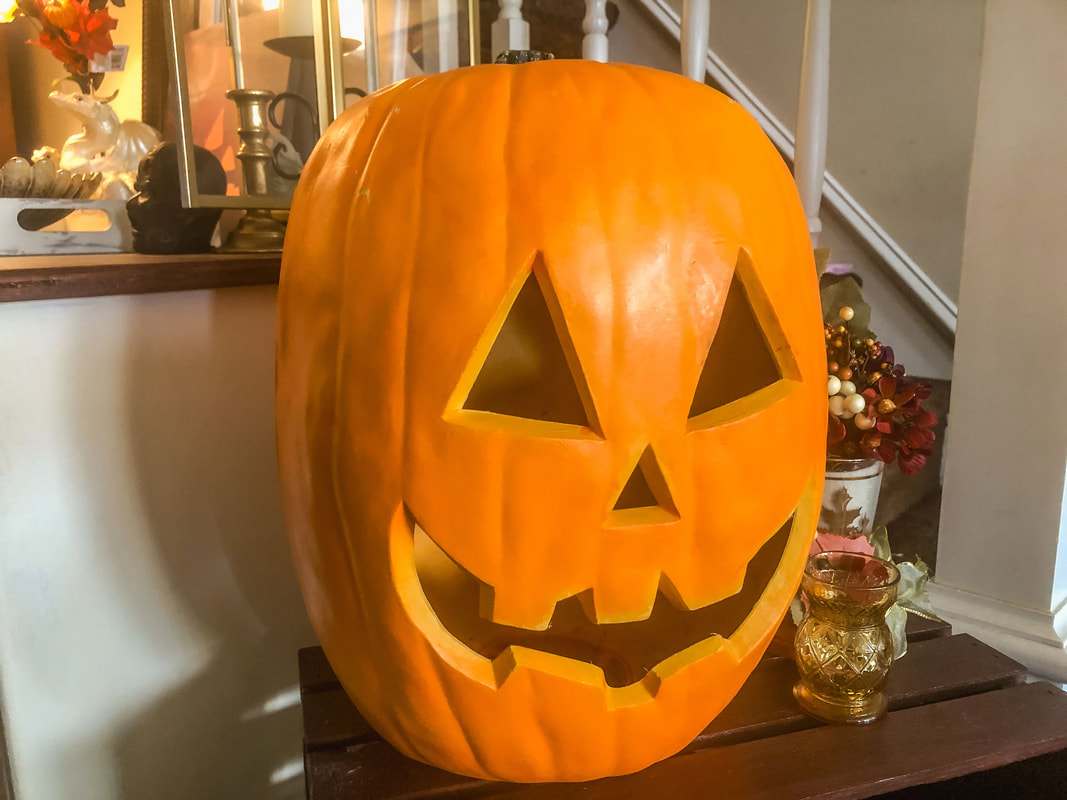 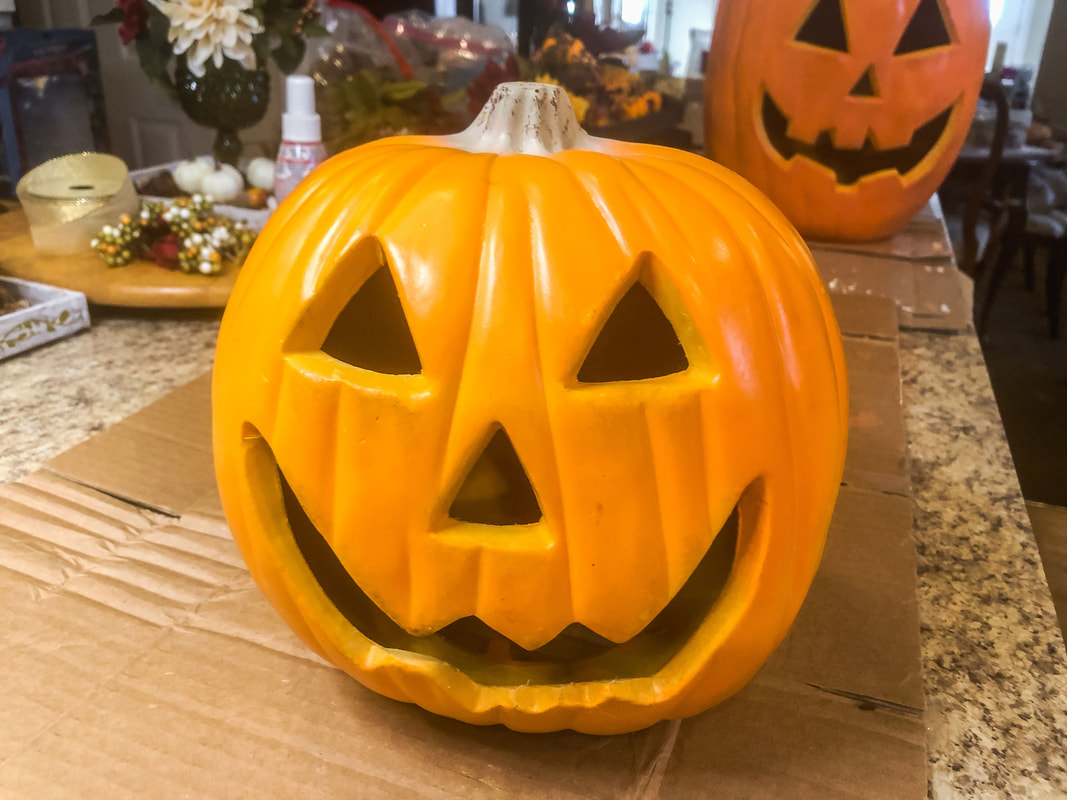 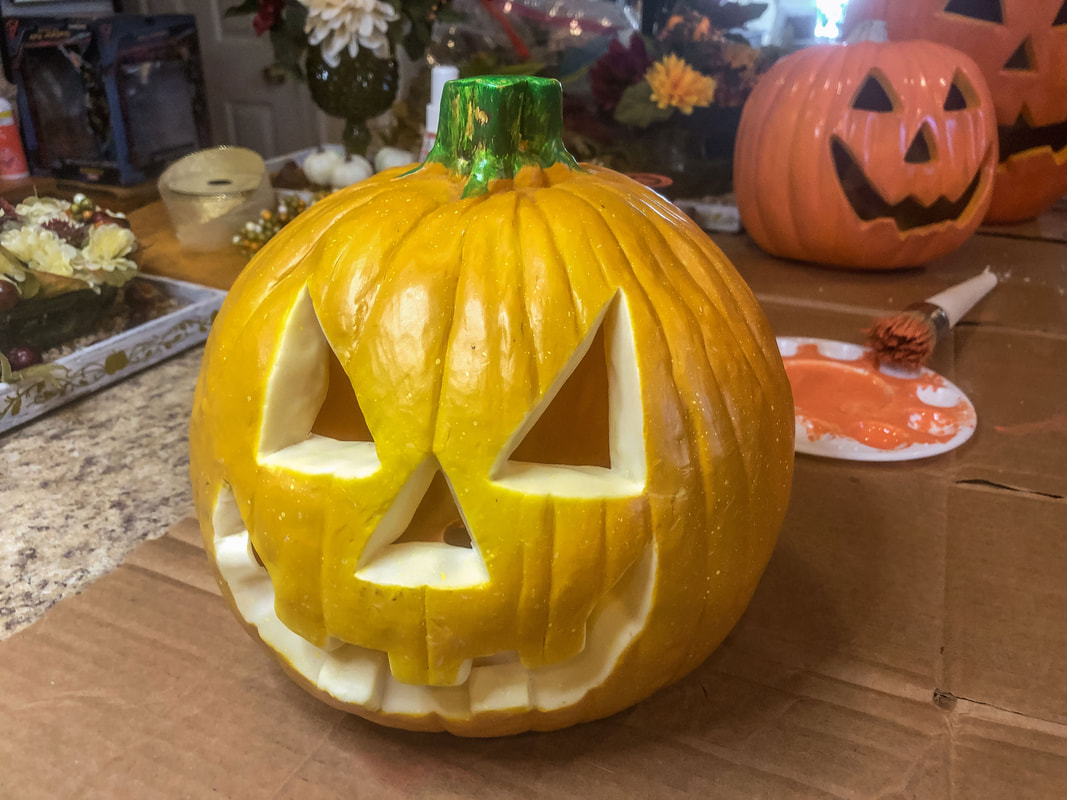 I gutted the lights of the three pumpkins and gave each one a good clean. I decided to use chalk paint and acrylic craft paint for this project, but you can use Mod Podge if that’s more to your liking. I’ve listed some supplies below that you may need for this project. (Items contain affiliate links.) Materials you’ll need: Old jack-o-lantern Chalk paint Craft paint Mod Podge Chalk paint brush Thin paint brush Foam brush Artist’s paint palette LED candle Fairy lights Step 1 Give your old jack-o-lantern a thorough wipe-down to clean off all the dust and grime. Step 2 Choose an orange shade of chalk paint (or Mod Podge) and a paintbrush. Liberally apply the first coat of paint over the surface of the pumpkin. Step 3 Allow the first coat to dry for a couple of hours, then apply a second coat of chalk paint. Allow that second coat to dry. Step 4 Use a thin brush and dark brown, red, orange, or green craft paint to lightly paint in the creases of the jack-o-lantern to give it some depth. Keep this process fluid and fun! Don’t use too much paint.  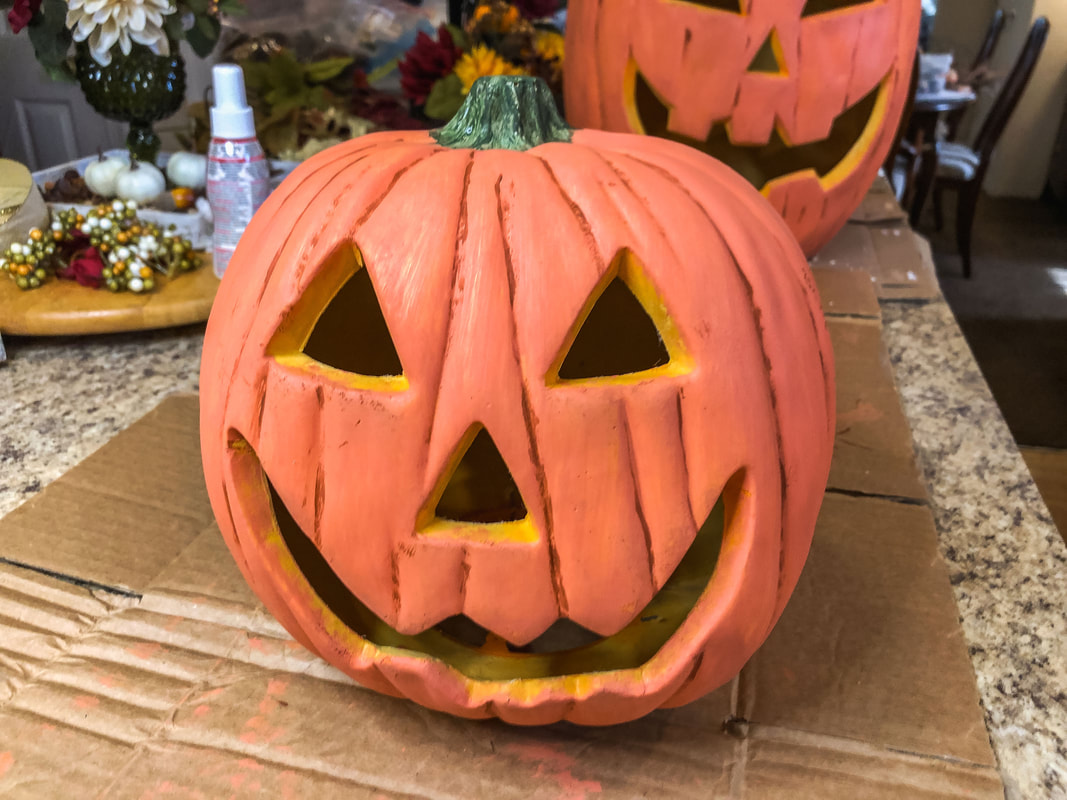 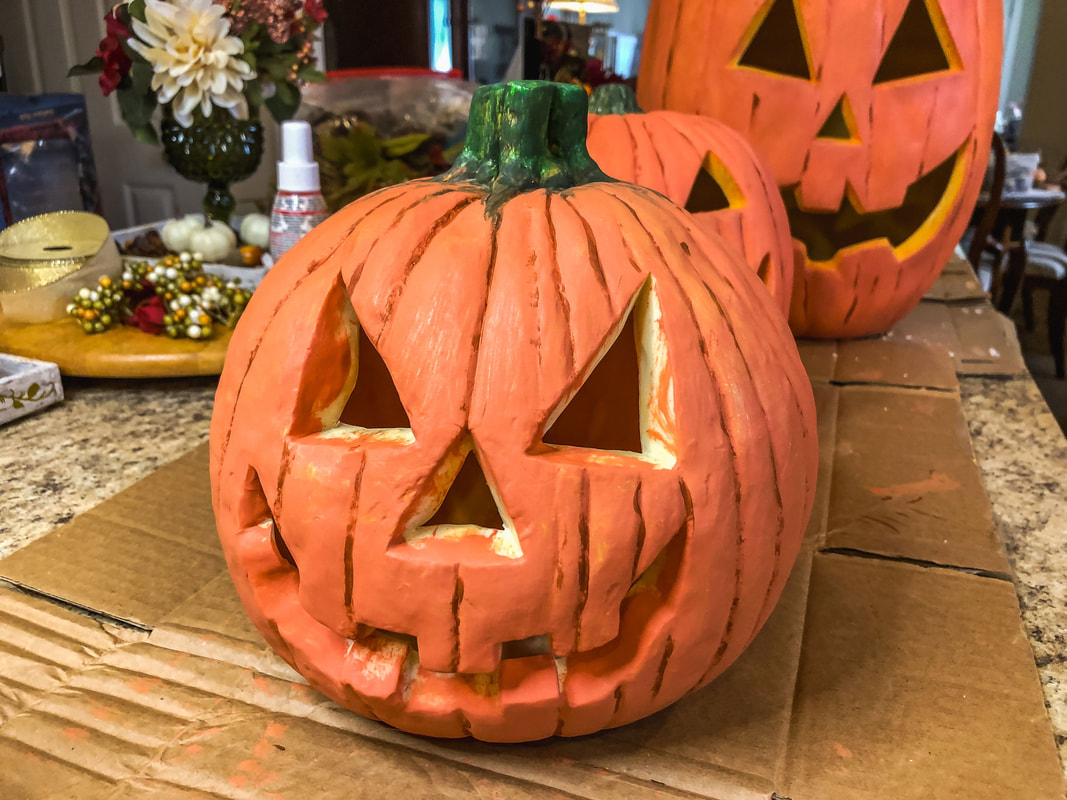 Step 5 Now choose a desired shade of green and paint the pumpkin’s stem. Step 6 Allow all the paint to dry so you can handle the pumpkin. Lightly apply a third coat of chalk paint. Do not use too much paint. You just want enough coverage to lighten the creases. (Think about blending makeup and contouring. Same concept.) Steps 7 and 8 Now for the finishing touches! Apply two coats of cream, orange, or yellow paint to the inside of the mouth, nose, and eyes. And that’s it! 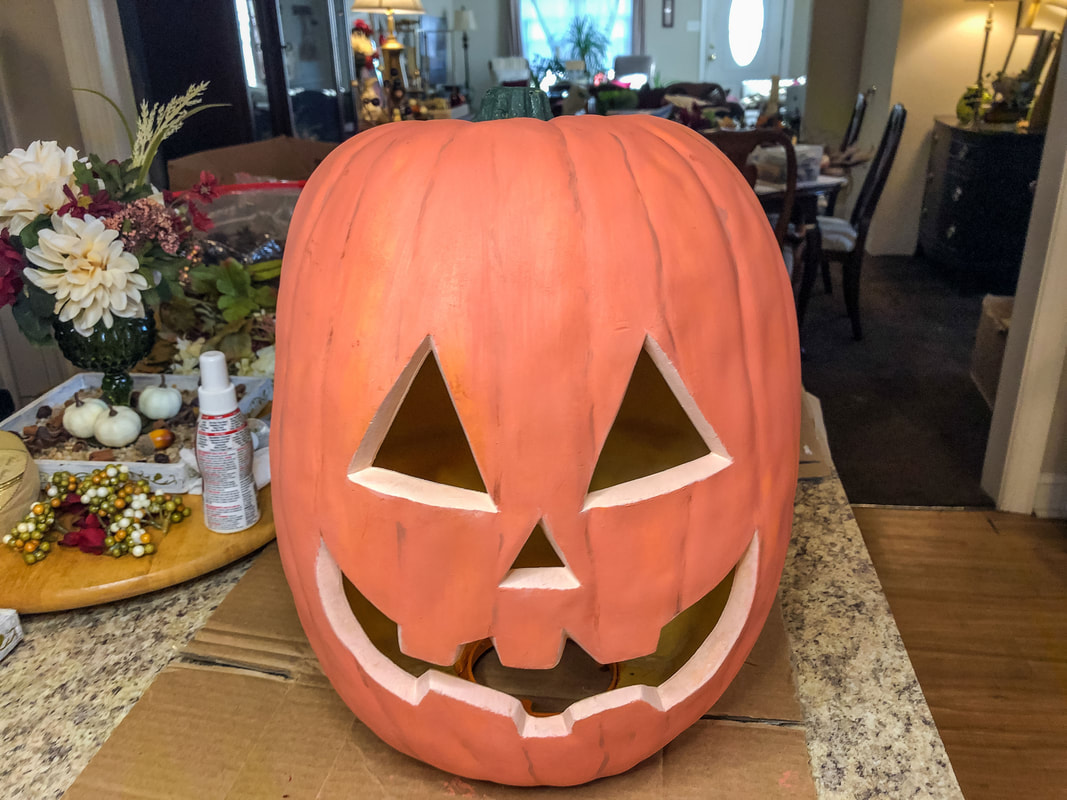 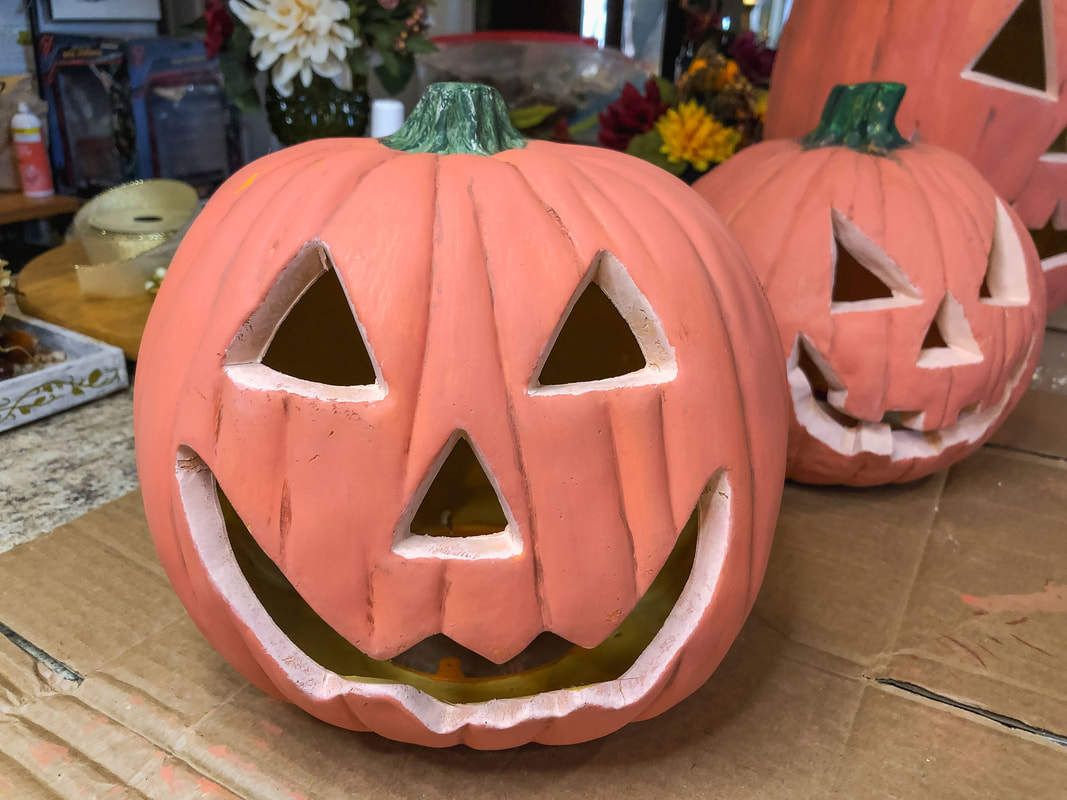 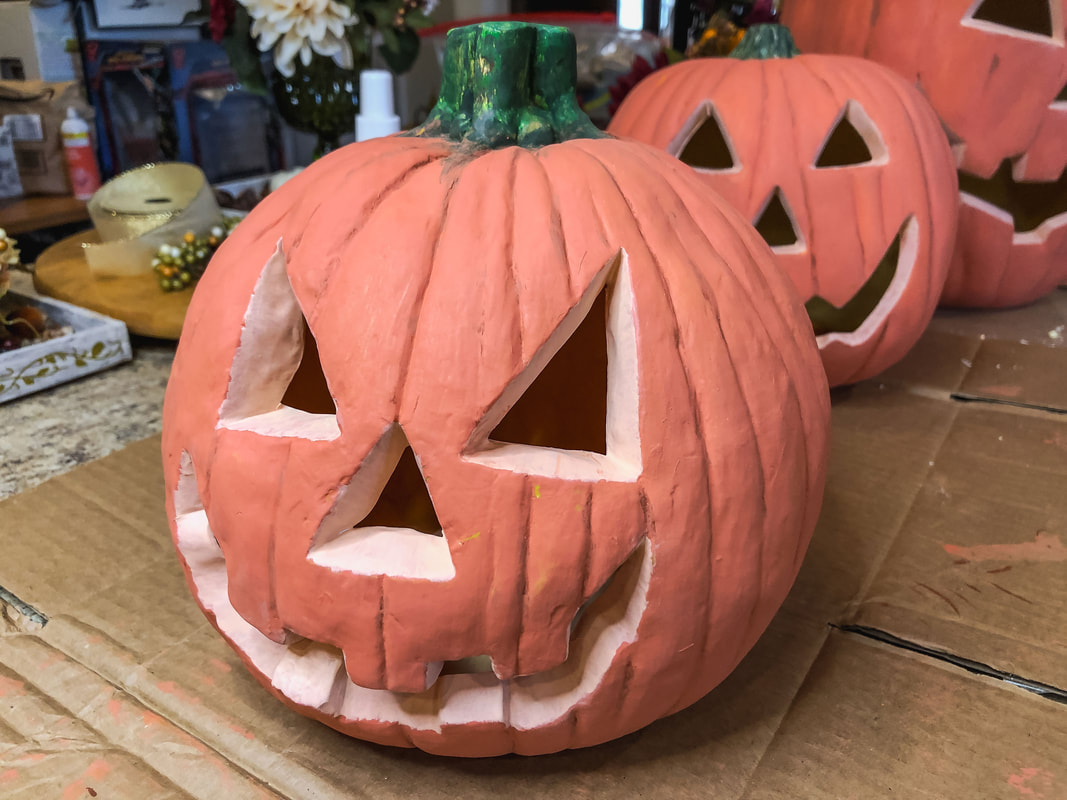 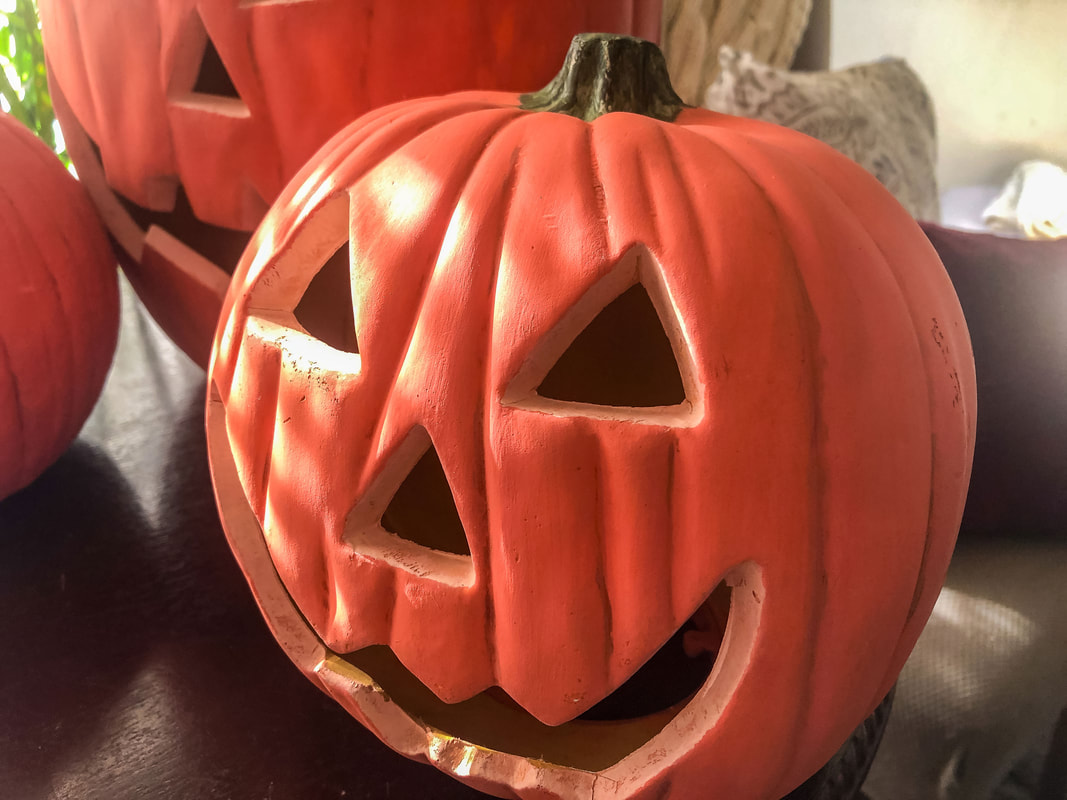  Light up your freshly painted, up-cycled jack-o-lantern with an LED candle or fairy lights! 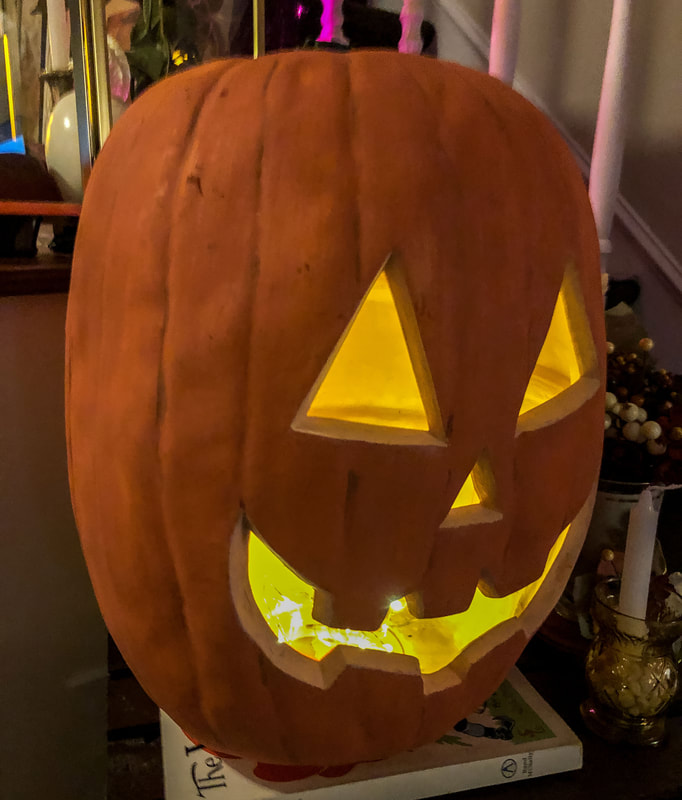 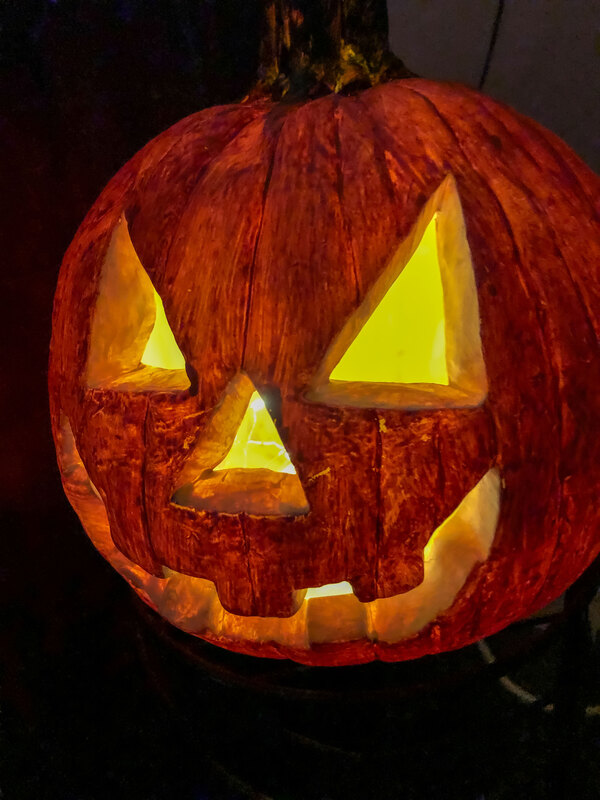 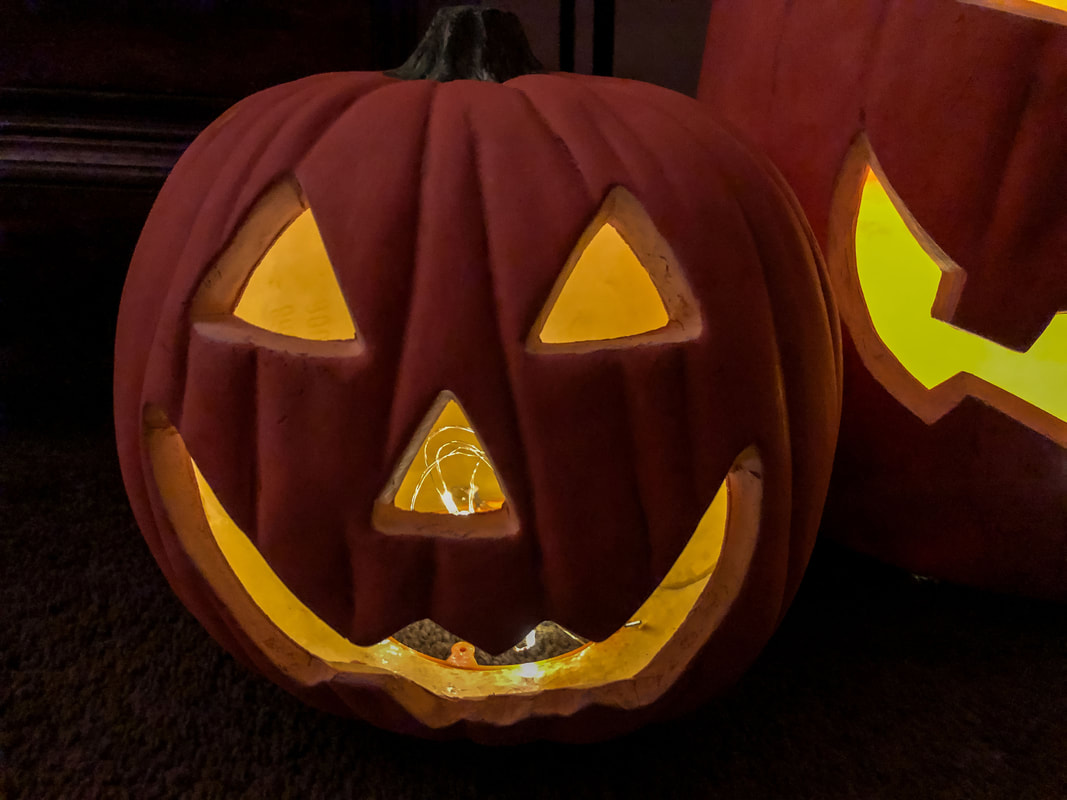 Related blogs you may want to read: DIY lighted pumpkin stack using up-cycled candy buckets Indoor Halloween Decor Inspiration Halloween Lawn Decor Ideas Some of the posts in this article contain affiliate links. If you click on the link and purchase the item, I will receive an affiliate commission at no extra cost to you. I will only recommend products or services I use personally and/or believe will add value to my readers, so there is no conflict of interest. 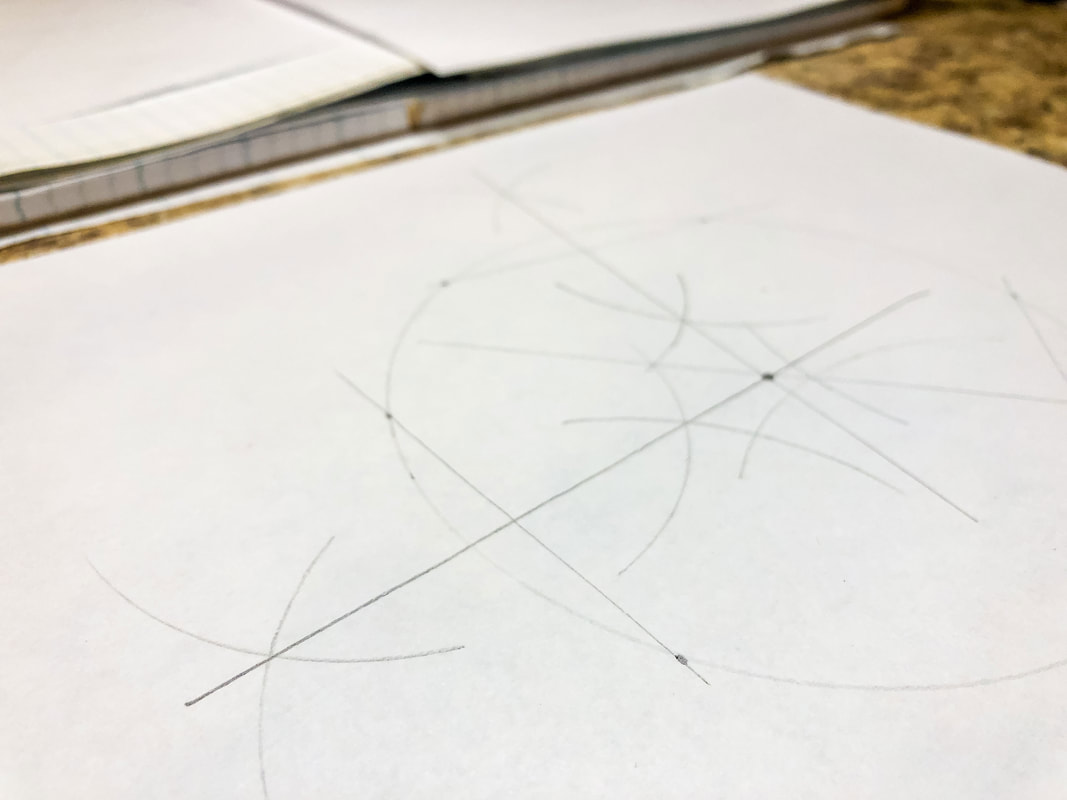 This week, I have started work on tutorials for drawing circular Celtic knot borders. Today’s blog post takes you through a couple of drawing tips that could be helpful for you as you follow along with these more complex Celtic design tutorials. Grab a pencil, a piece of paper, something with a straight edge, and a compass, and let’s get started! (Don’t have a compass? Use two pencils tied together with string at a length suitable for your project.) Find the midpoint of a line Draw a line and mark the endpoints. Open a compass to between 2/3 to 3/4 the length of the line. Create an arc above the line and another arc below the line. Do the same from the other endpoint of the line. Connect the points where the two sets of arcs intersect, and where the straight edge crosses the line is your midpoint. 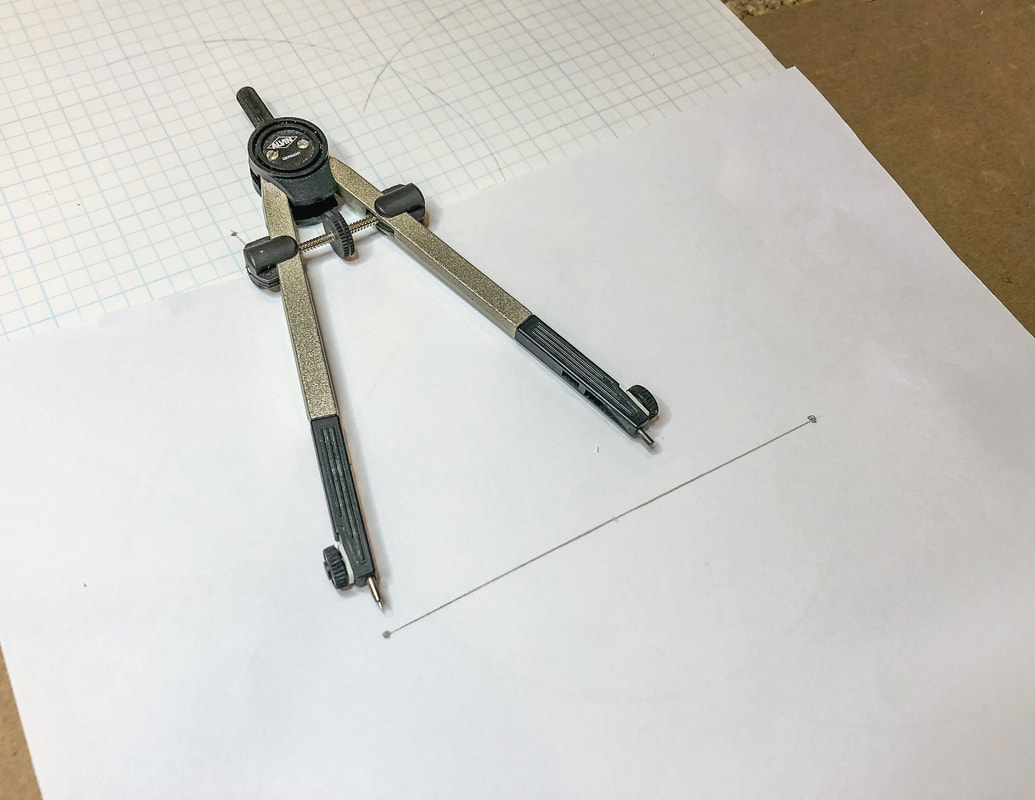  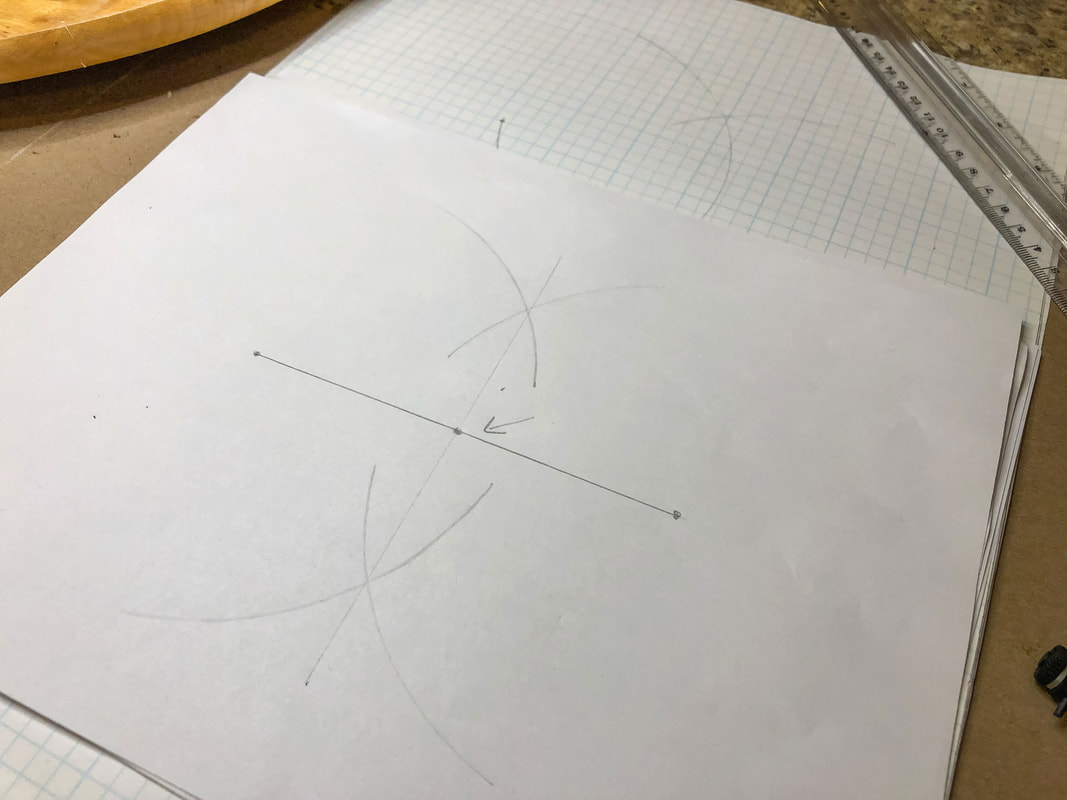 Find the midpoint of an arc Make a mark at either end of the arc for the endpoints. Open a compass to between 2/3 to 3/4 the length of the gap. Create a curved mark above the arc and another curved mark below the arc. Do the same from the other endpoint of the arc. Connect the points where the two sets of curved marks intersect. Where the straight edge crosses the arc’s line is the midpoint. 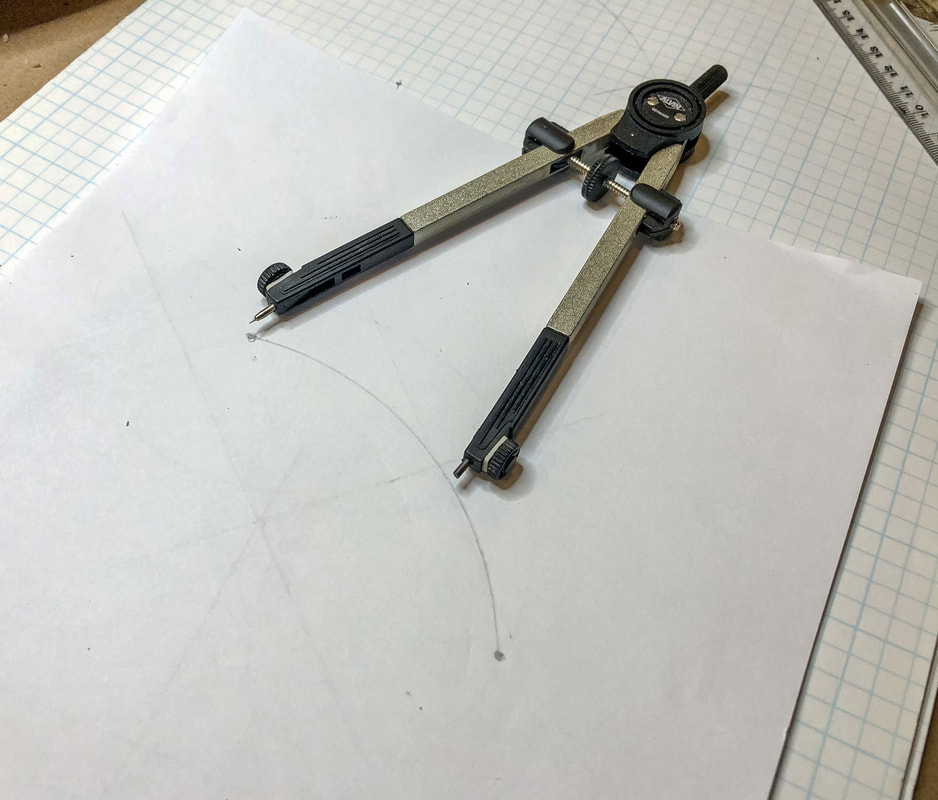 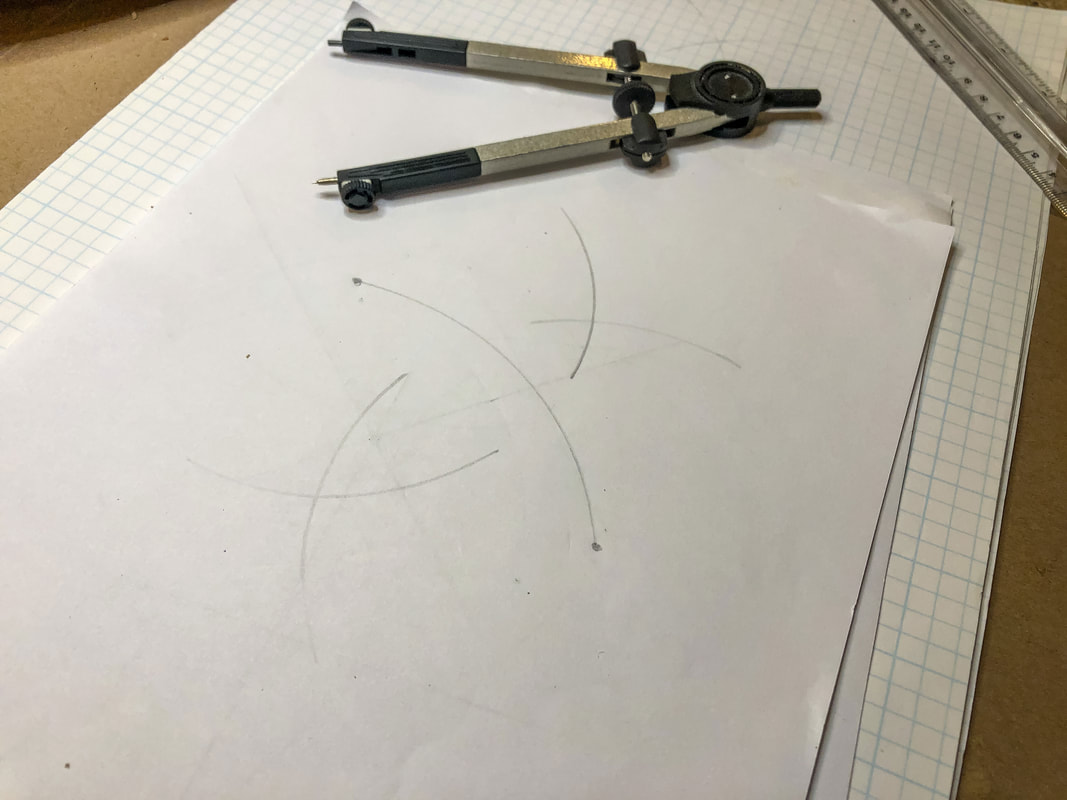 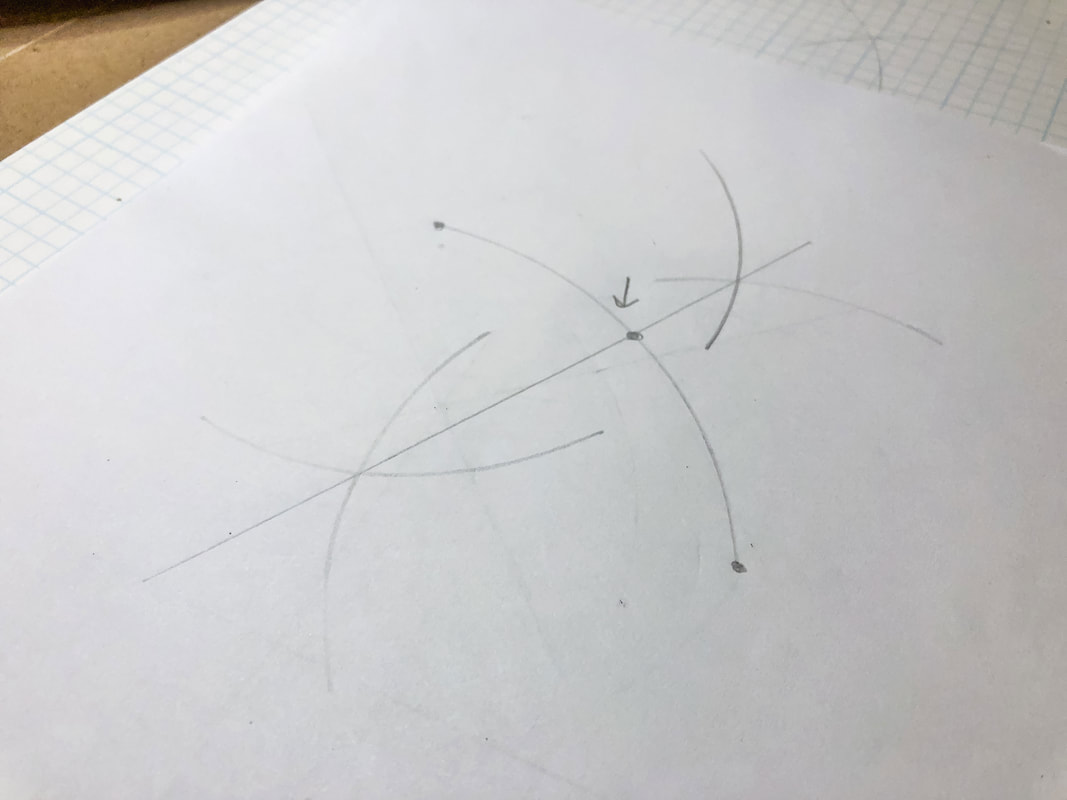 Find the center of a circle Draw a circle, or find one already drawn. Draw three random lines that cross the circle’s circumference at either end. Use the technique mentioned above to find the center of the line by drawing intersecting arcs above and below the line. Draw a line connecting the intersecting arcs that continue through the circle. Follow these same steps for the other two lines. You now have three new lines intersecting in your circle's center. This is the center of the circle. 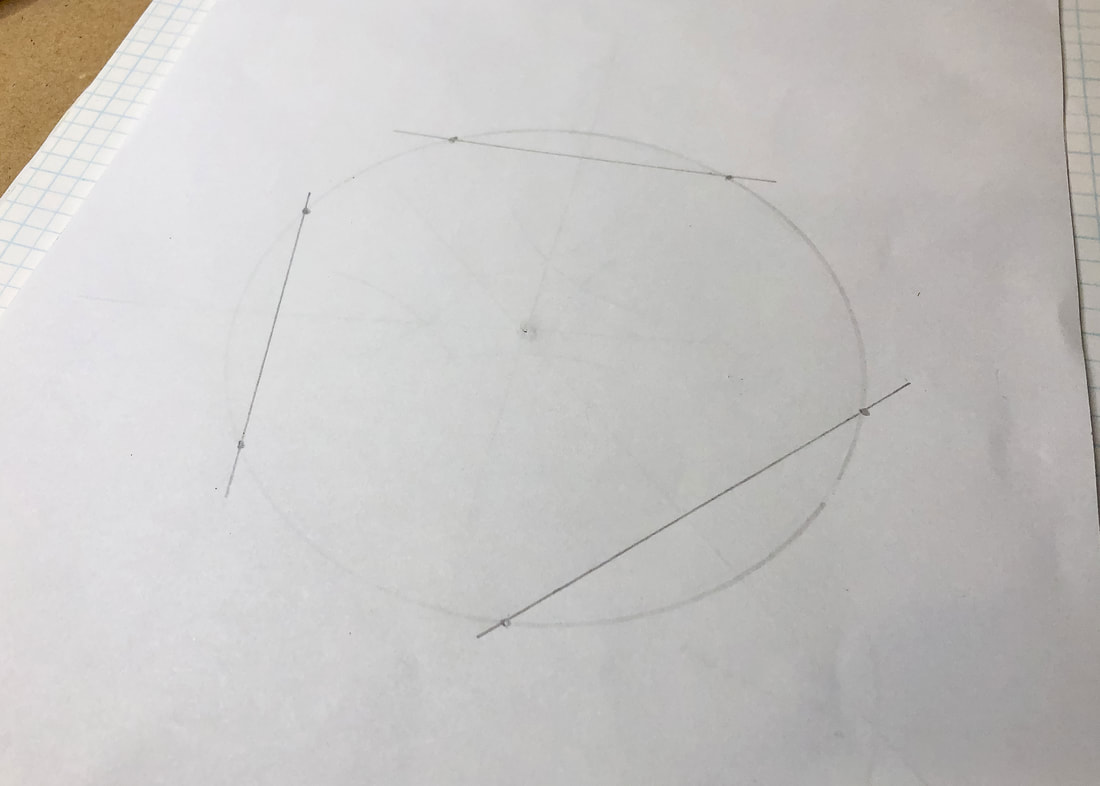 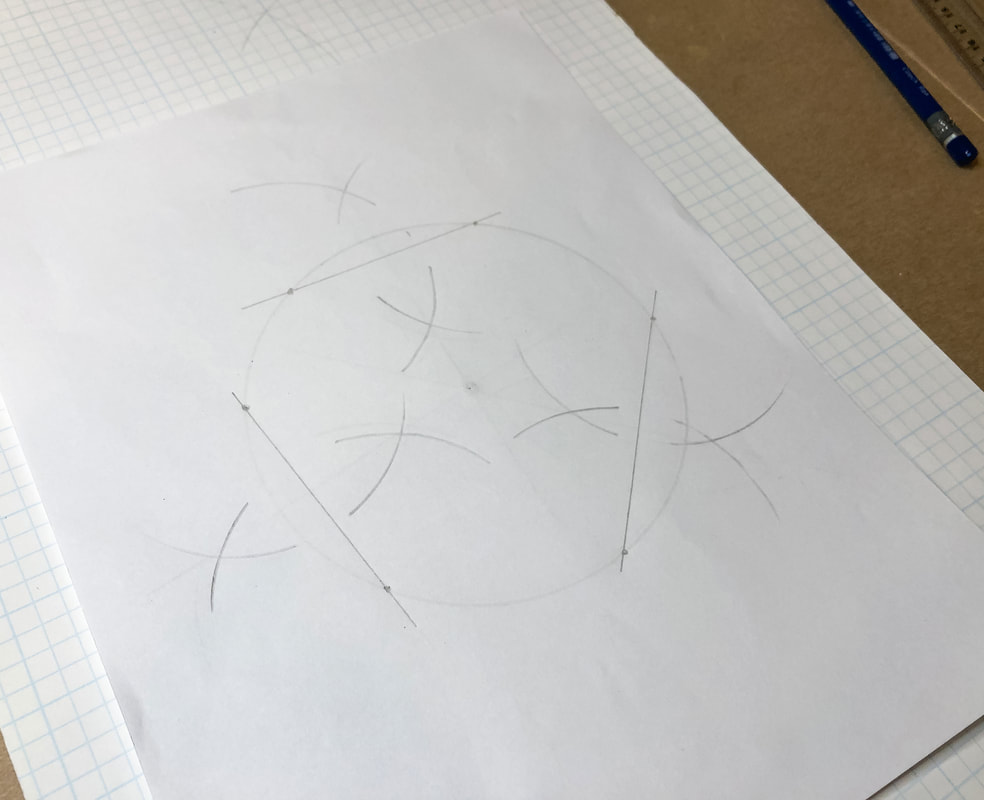 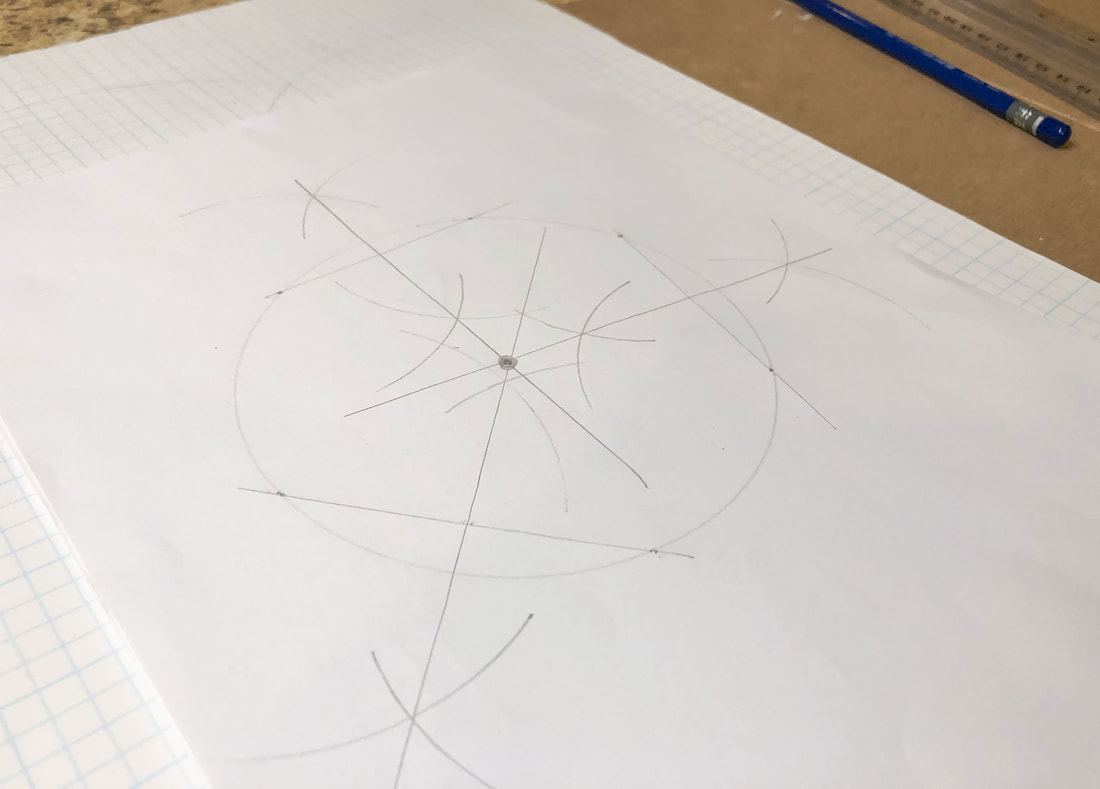 And that’s it! These simple tips are helpful when constructing designs that require precision but don’t have a ruler or protractor. For those of you who are visual learners—like me—I have a YouTube video link below that will take you through these same steps. Let me know in the comments if this was helpful or if you have other useful tips to share! Related blogs you may want to read: circular-celtic-border-knot-tutorial-basic-braid.html basic-twist-step-by-step-drawing-tutorial-using-grid-paper.html celtic-braid-step-by-step-drawing-tutorial.html basic-border-knot-with-vertical-breaks-step-by-step-drawing-tutorial.html basic-border-knot-with-horizontal-breaks-step-by-step-drawing-tutorial.html diy-chalk-painted-tray-with-celtic-border.html a-fun-diy-project-with-paint-and-a-thrifted-mirror-part-2.html the-celtic-motherhood-knot-a-symbol-of-love.html celtic-tree-of-life.html basic-celtic-knot-tutorial-pt-1.html celtic-knot-tutorial-part-2.html Be the spookiest house in the neighborhood with these 10 lawn decorations from Amazon!  Images from Amazon.com. Click the links below to view or purchase. Some of the posts in this article contain affiliate links. If you click on the link and purchase the item, I will receive an affiliate commission at no extra cost to you. I will only recommend products or services I use personally and/or believe will add value to my readers, so there is no conflict of interest. Are you ready to deck out that porch and lawn with some spooky Halloween goodness? This is my favorite time of year! I love walking around the neighborhood and seeing the creative way people add some spooky ambiance to the outside of their houses. Some people go nuts with lawn decor, creating a feast for the eyes, while others do the classic, understated look with a few simple but timeless pieces. If you’re a person who prefers a few carved jack-o-lanterns on the front step, this might not be for you…But if you’re a Halloween nut, read on! Item 1—Inflatable Witch Crashing into a Tree 4ft by Joiedomi What’s not to love about this zany inflatable witch? She is a 4ft inflatable with LED lights that can be wrapped around a tree, porch pole, or fence post. 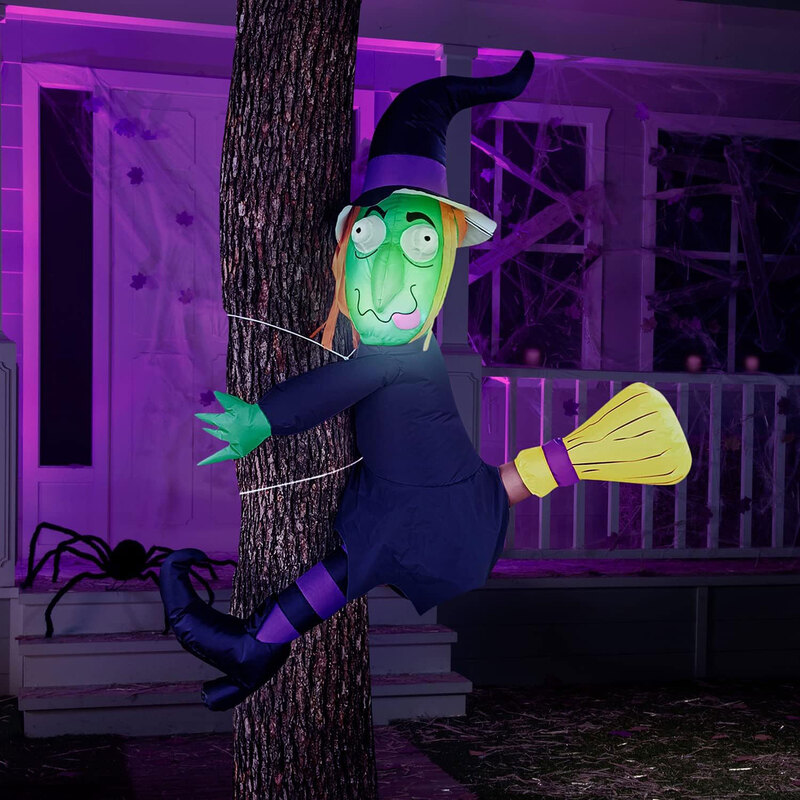 Item 2—LED Purple Halloween Solar Meteor Rain Lights by JMEXSUSS These purple meteor shower rain lights will create a spooky ambiance in your yard under trees or hung from porch eaves. These outdoor LED lights are waterproof and solar-powered.  Item 3—47” Hanging Talking Witch with Light-Up Eyes by JOYIN Every lawn needs a scary talking witch for Halloween! This item is a 47” animated talking witch that is sound-activated with wicked eyes that light up. Perfect for jump-scaring those trick-or-treaters! 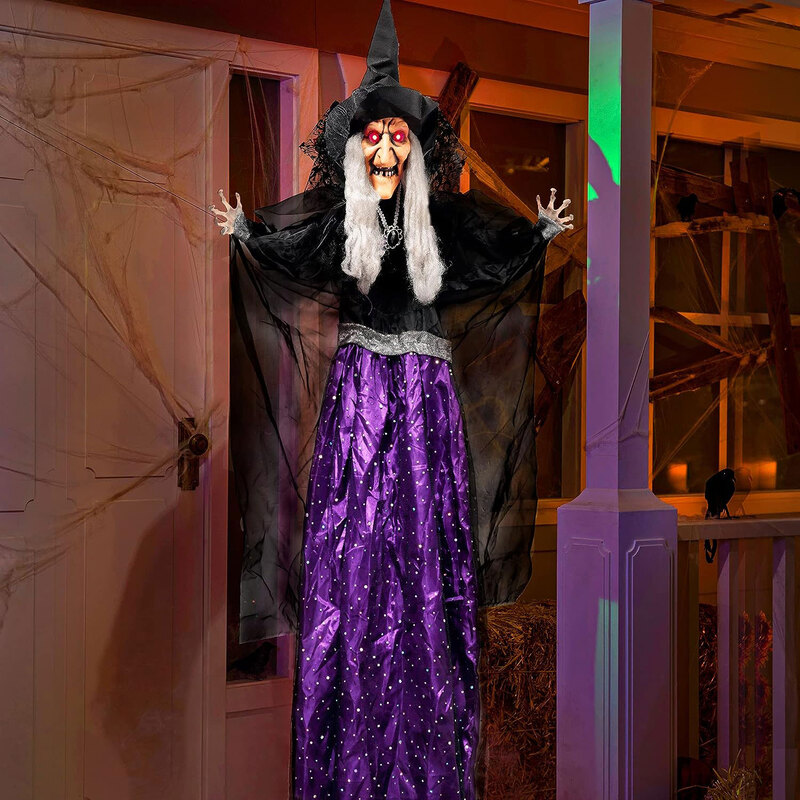 Item 4—7ft 2 Headed Inflatable Halloween Dragon by MICOCAH Here’s something a little bit different for this year’s Halloween lawn decor—a 7ft menacing two-headed inflatable dragon with flashing LED lights! 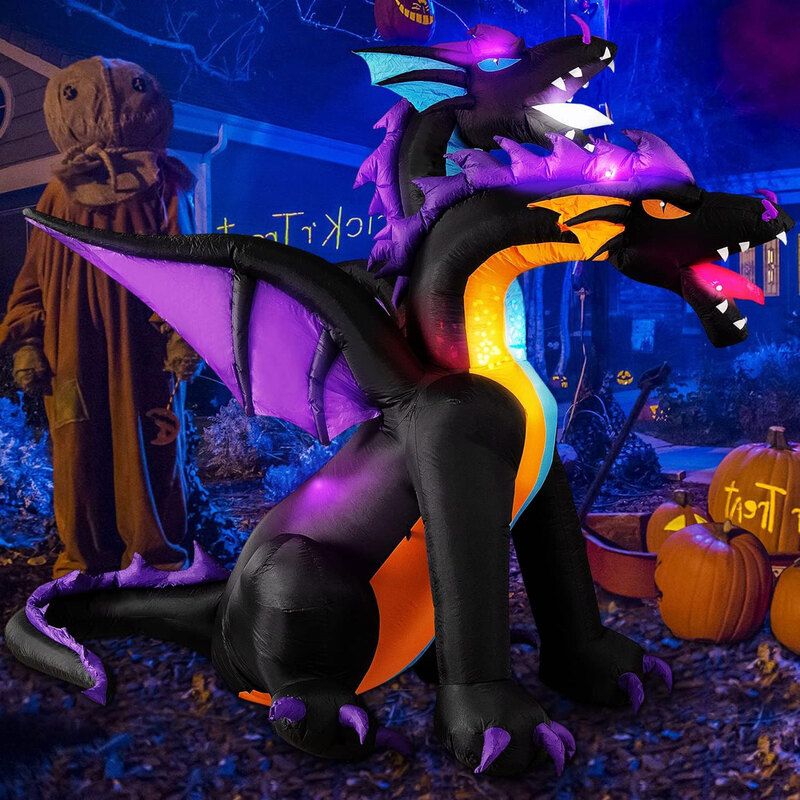 Item 5—Large Witches Cauldron with Tripod and Lights by ORIENTAL CHERRY This black witch’s cauldron is lit with green LED lights and comes with a tripod that stands 52” high. Add a witch and some special effects to make a creepy Halloween scene. 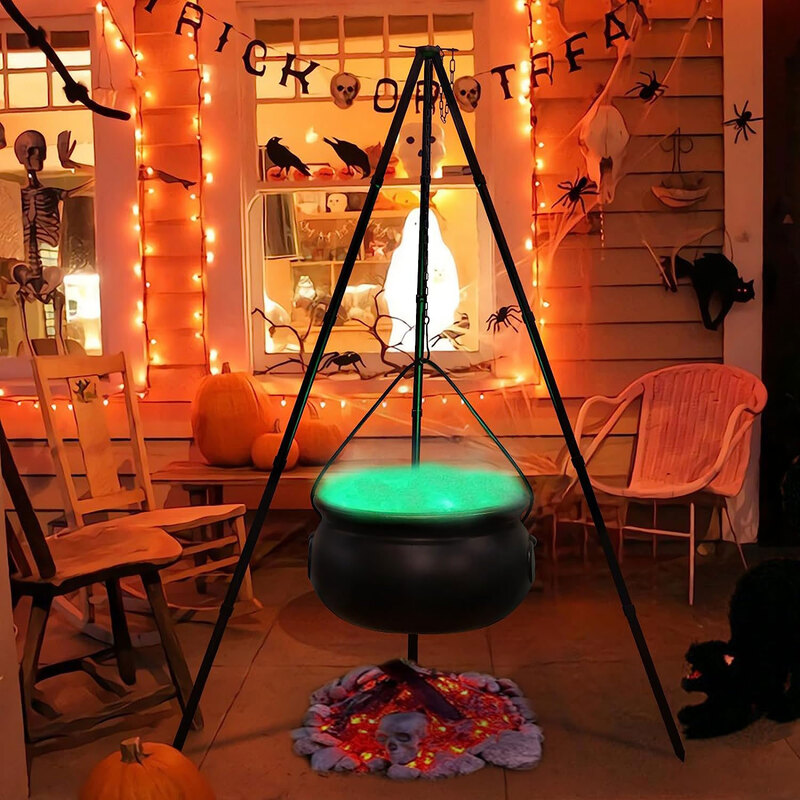 Item 6—5 pk Battery Operated Skull Candle Lights with Stakes by Hourleey Light up your driveway or garden with these skull candle garden stakes. This is a five-pack of LED plugin multi-colored candles held by skeleton hands. The multi-colors will add a festive feel to your Halloween lawn decor.  Item 7—8 pc Hanging Witch Hat String Lights by Dazzle Bright If you want to enhance your existing string lights this Halloween season, this set of 8 purple and orange witches’ hats with LED lights might do the trick! Hang them from a porch or tree and experiment with the various light modes to get the perfect lighting effect. 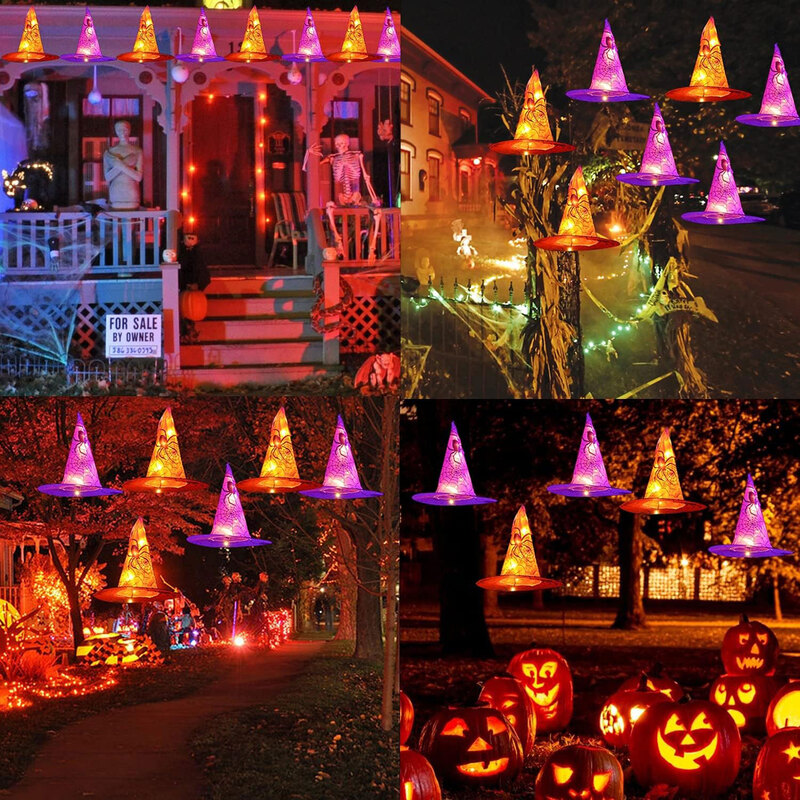 Item 8—200” Triangular Spider Web + 59” Giant Spider by OCATO If you’ve got a bit of space to work with, you might love this huge 200” web with a giant creepy spider! The spider’s legs are adjustable, and the triangular web can be attached to a structure, tree, or fence. Light it up or add to existing lawn decor to create something that will scare the neighbors! 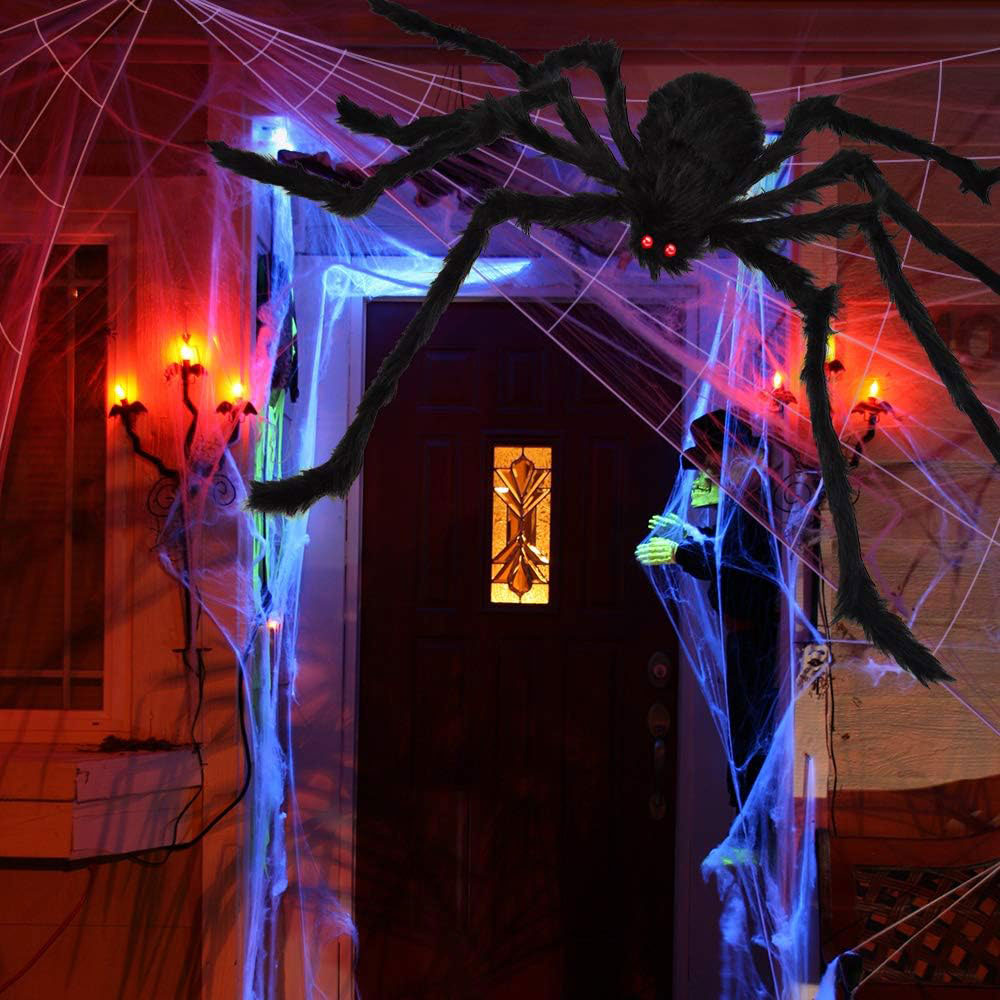 Item 9—Life Size Hanging Faceless Ghost by HOLLO STAR How scary is this hanging LED-lit ghost with no face?! And it emits a terrifying scream when activated by sound! 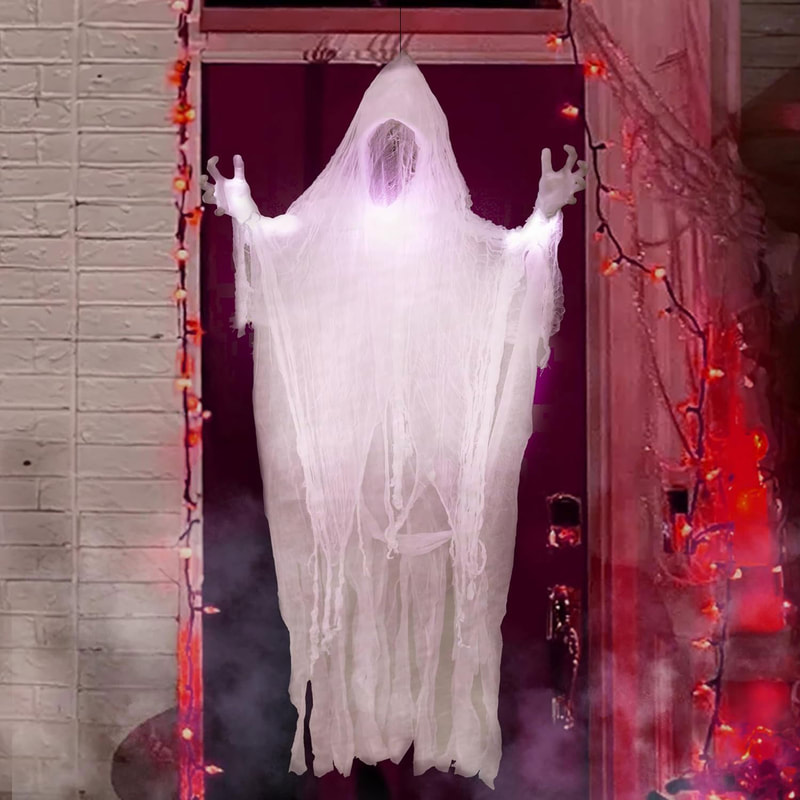 Item 10—11 ft Inflatable Halloween Black Cat by BZB Goods I saved the biggest one for last! Standing at 11 feet tall this inflatable black cat is sure to attract attention this Halloween! Not only is it giant, but this cat has a head that rotates back and forth to make it even more menacing! 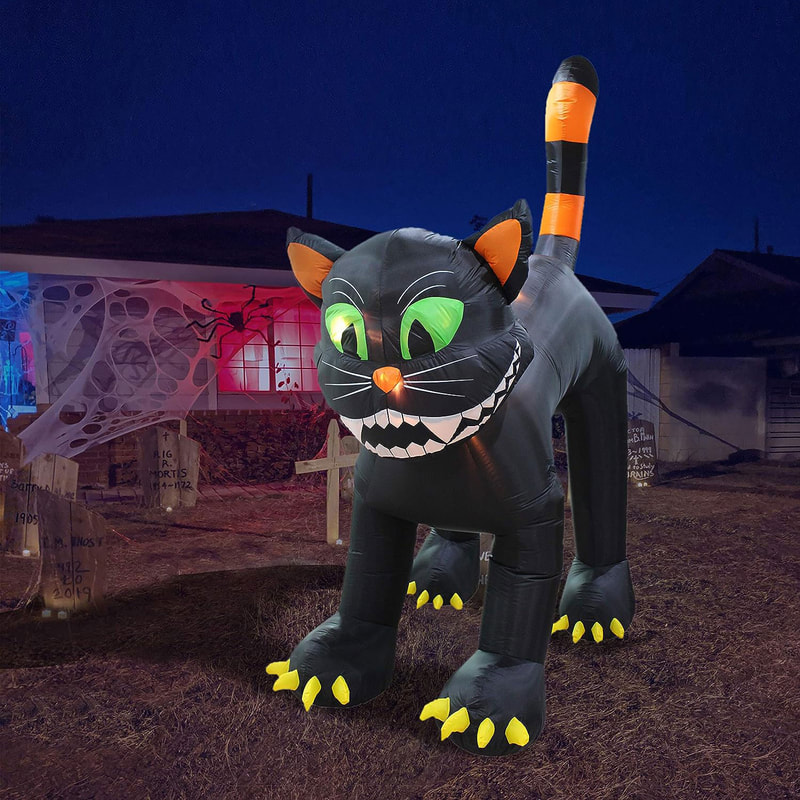 Related blogs you may want to read: indoor-halloween-decor-inspiration.html create-a-cozy-relaxing-interior-space-this-fall-with-neutral-colors.html brighten-up-your-autumn-decor-with-these-items.html pastel-decorating-ideas-for-autumn.html need-ideas-for-incorporating-the-color-blue-into-your-fall-decor.html inspirational-ideas-for-creating-that-cozy-autumn-boho-style.html nine-hygge-decor-ideas.html winter-color-palette-ideas-for-your-home-decor.html design-concept-for-a-dreamy-coastal-interior.html lets-talk-bohemian.html 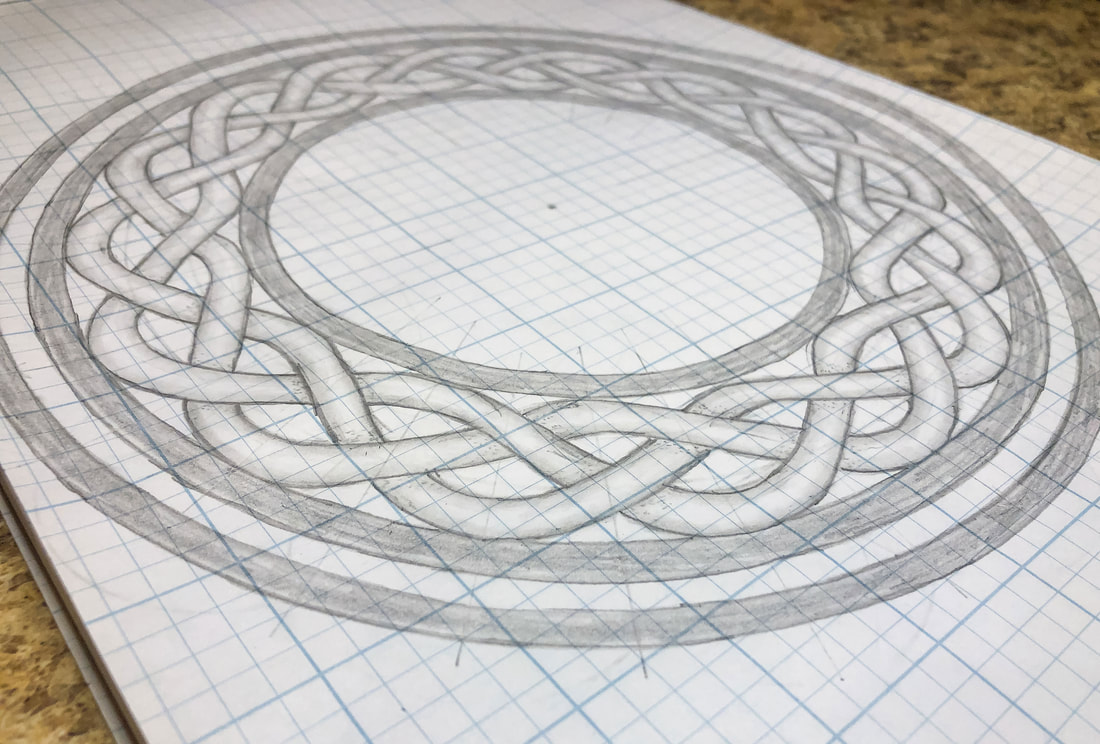 Hi again everyone! Are you ready for another Celtic drawing tutorial? This one is more complex than the border knots we’ve previously done. If you haven’t seen those tutorials, I suggest you click on the “Related blogs you may want to read” links at the end of this blog before attempting this circular Celtic knot tutorial. This tutorial is more advanced, and it will be beneficial to learn some basics first! Having said that, anyone can do this! I broke the process down into easy-to-digest bite-size snippets so that even a Celtic knot newbie can follow along! There are a lot of steps, so let’s jump right in… Below is a list of supplies you may want on hand (Blick Art affiliate links are included), but you certainly don’t have to have all of these supplies to do this tutorial. Just find yourself a piece of paper, a pencil, an eraser, and a ruler, and let’s get to drawing! Gather your supplies: Drawing pencils Markers Blending stumps Eraser Clic eraser Ruler Horse hair brush Grid paper Sketch pad Tracing paper Before you begin: Any lines and marks you make in steps 1 through 9 should be drawn using light pressure and/or a 2H drawing pencil. Most—if not all—of these lines will eventually be erased, as they are only guidelines for your final design. Also, you may want to watch this YouTube tutorial, especially if you are only using a few basic tools: How to find the center of a line, arc, and circle without a ruler Step 1: Place a dot in the middle of your paper. Make four marks 4.5” from that dot, above, below, and on either side. Using a compass, lightly draw an outer circle, which should be 9” in diameter. 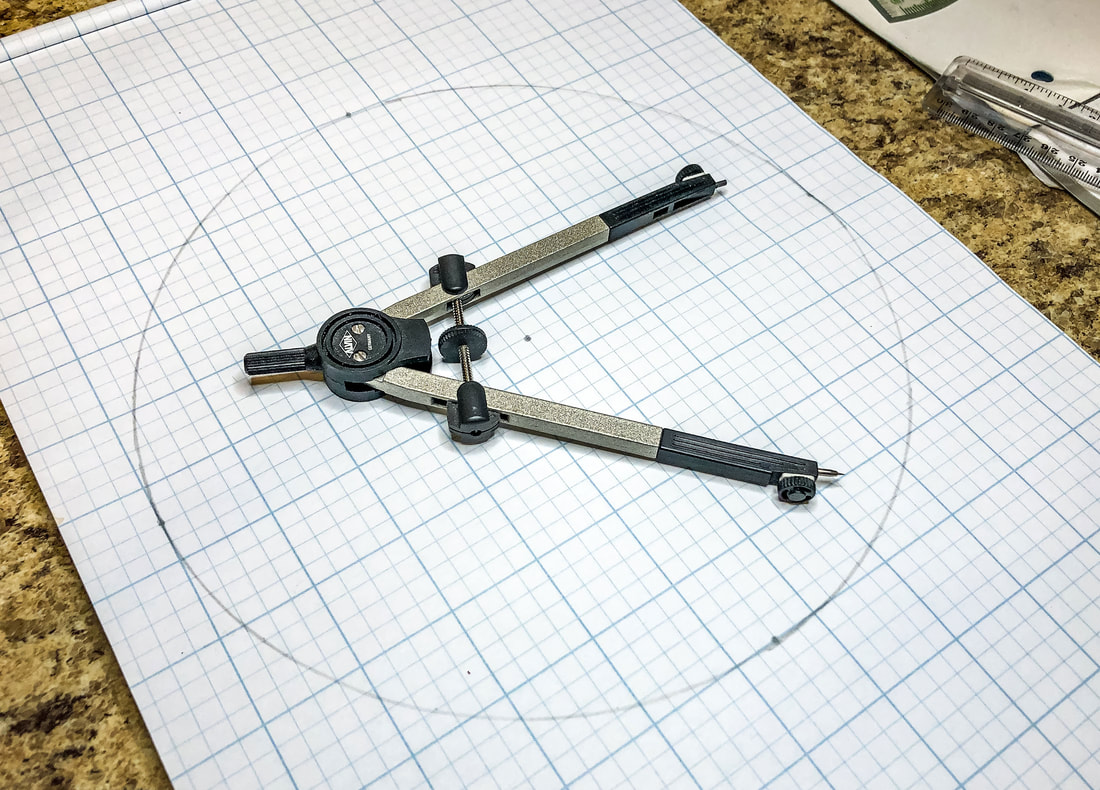 Step 2: Make marks 1/2” inside that circle. Using a compass, draw the first of three inner circles. Follow the same steps to create the next two inner circles. You should now have four concentric circles, 1/2” apart each. 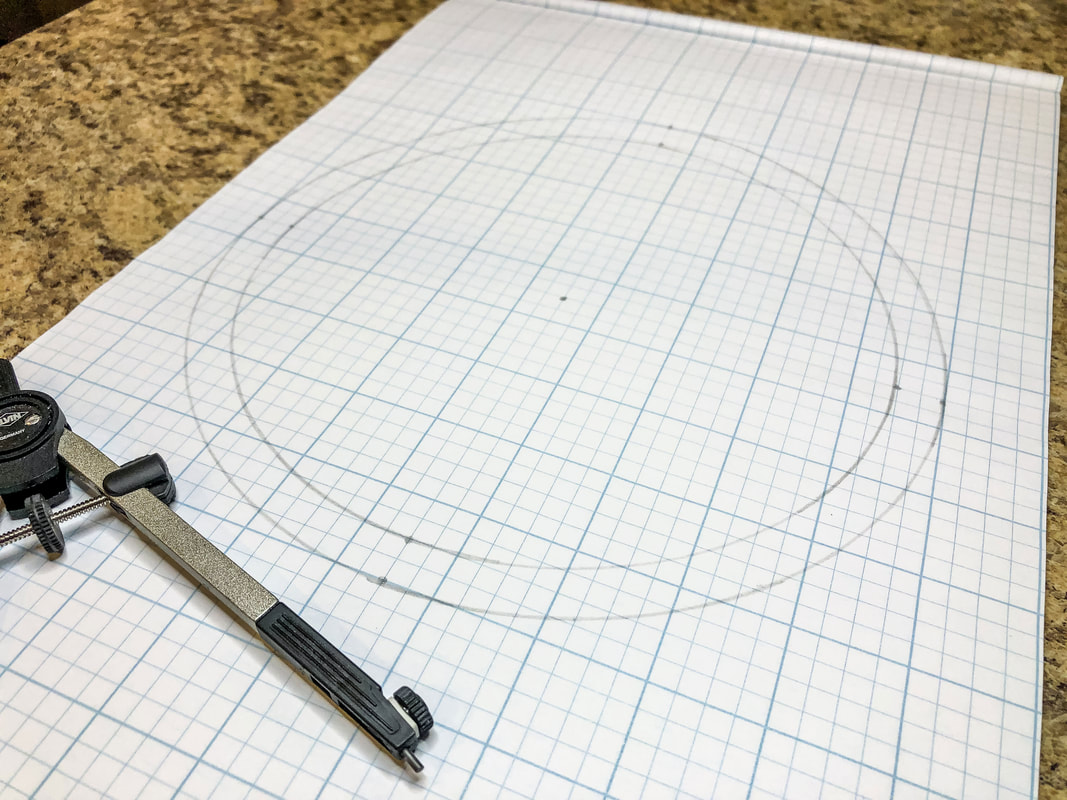 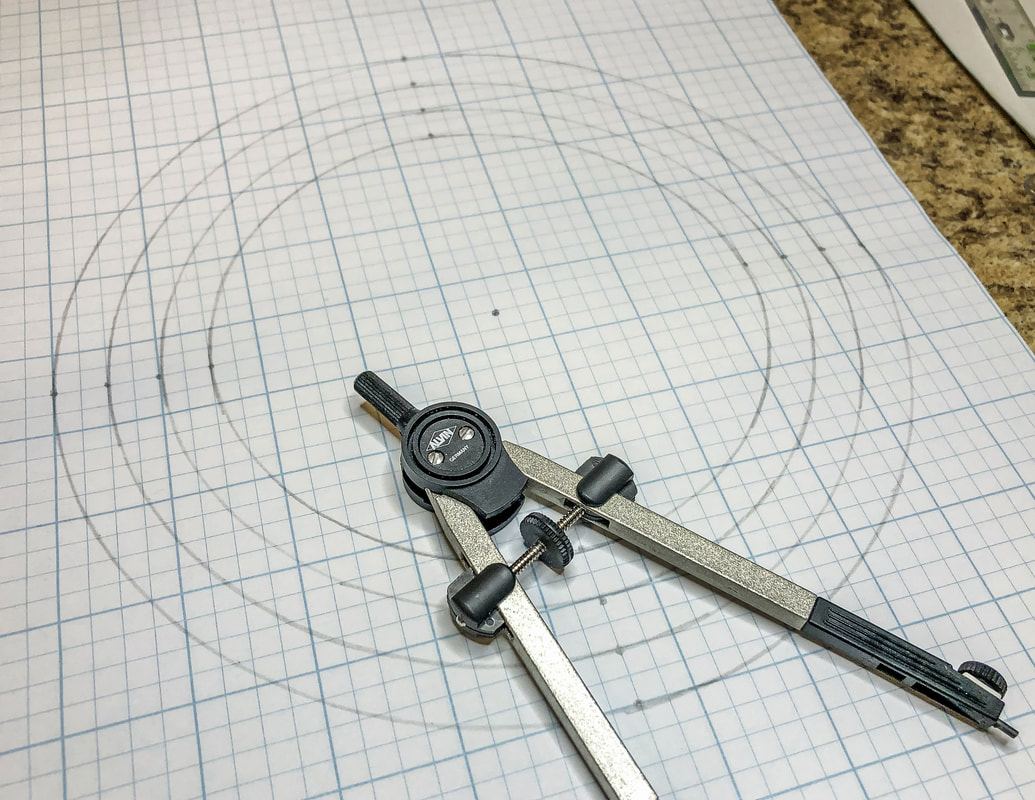 Step 3: Using a ruler, T-square, or grid as your guide, lightly divide the circles into halves horizontally and vertically, creating equal quadrants. 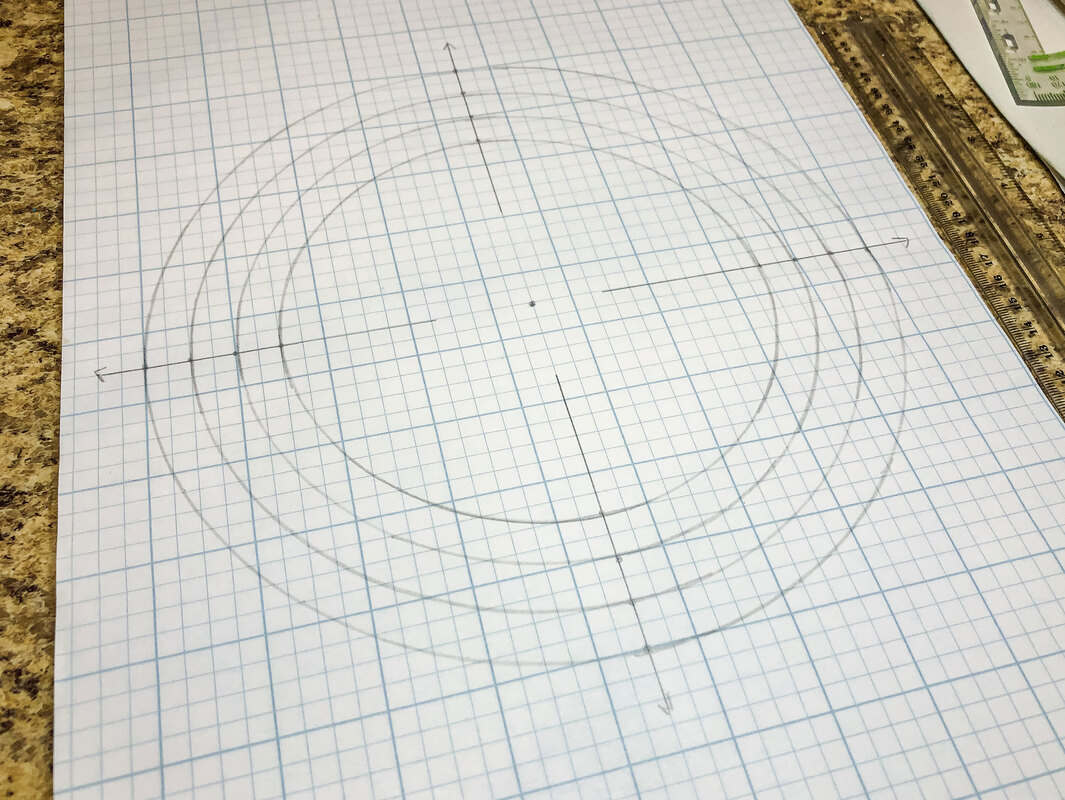 Step 4: Divide each quadrant into half using a protractor marking at 45˚. (If you don’t have a protractor watch the YouTube short previously listed to find the center of the arc.) You should now have eight sections. 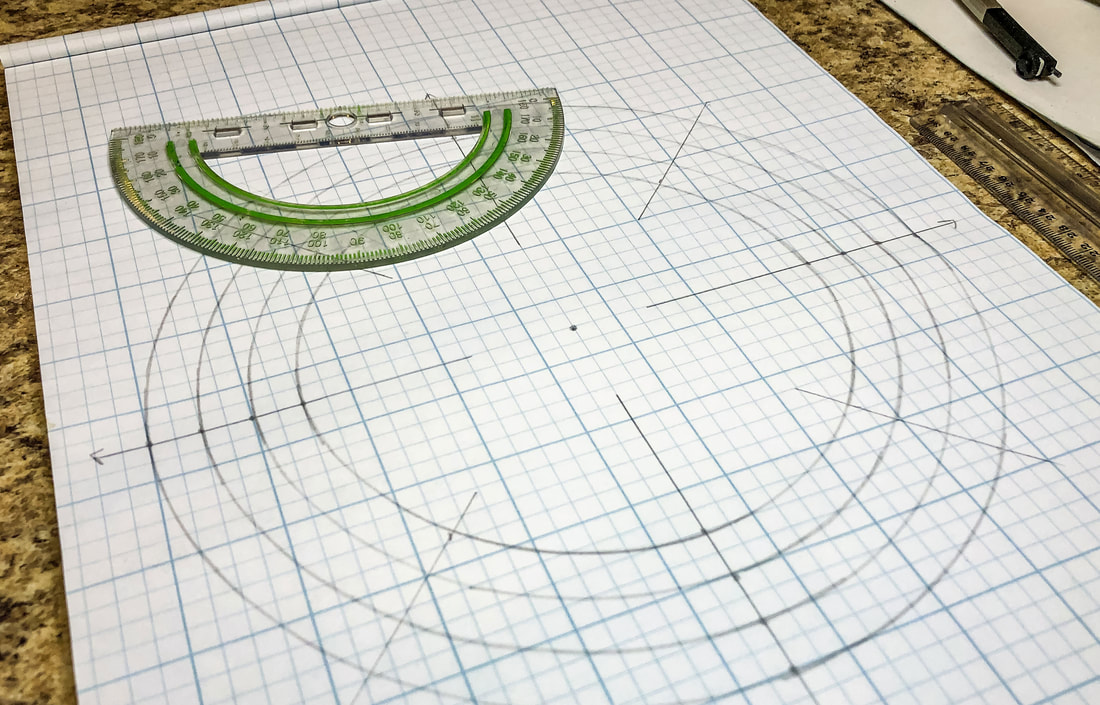 Step 5: Divide each of the eight sections in half again using a protractor marking at 22.5˚. (If you don’t have a protractor watch the YouTube short previously listed to find the center of the arc.) This will give you 16 sections. 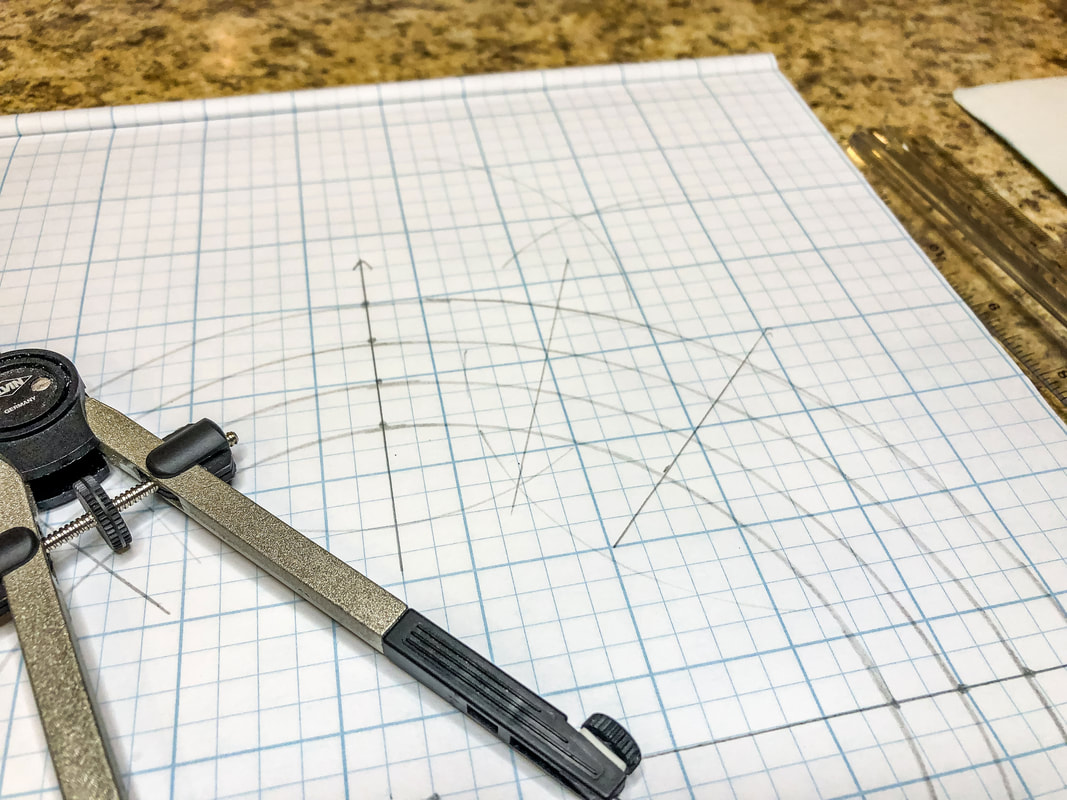 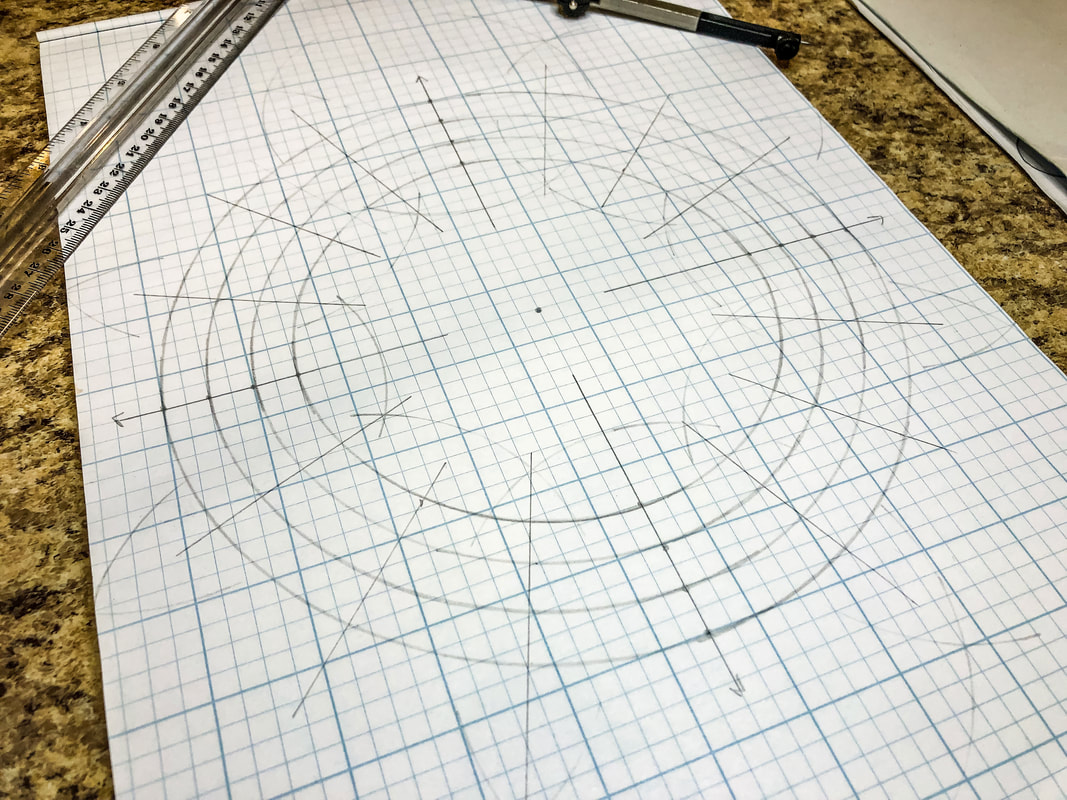 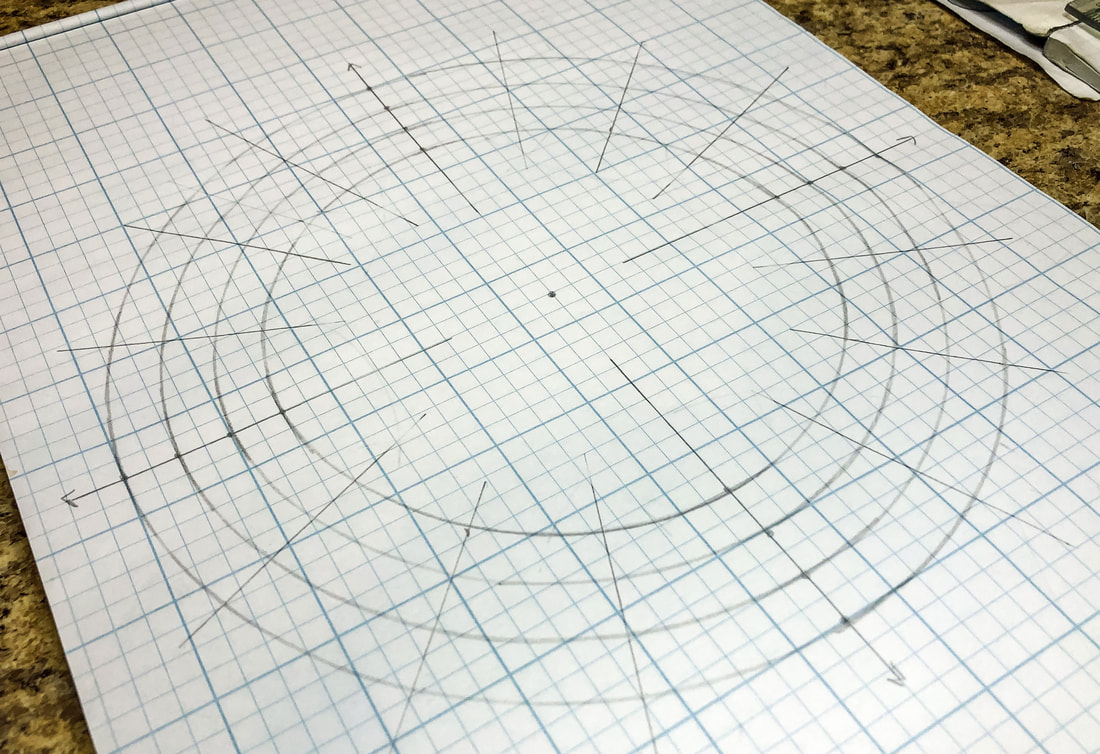 Step 6: Divide each of the 16 sections in half again using a protractor marking at 11.25˚. (If you don’t have a protractor watch the YouTube short previously listed to find the center of the arc.) This will give you 32 sections, creating your circle grid for your design. 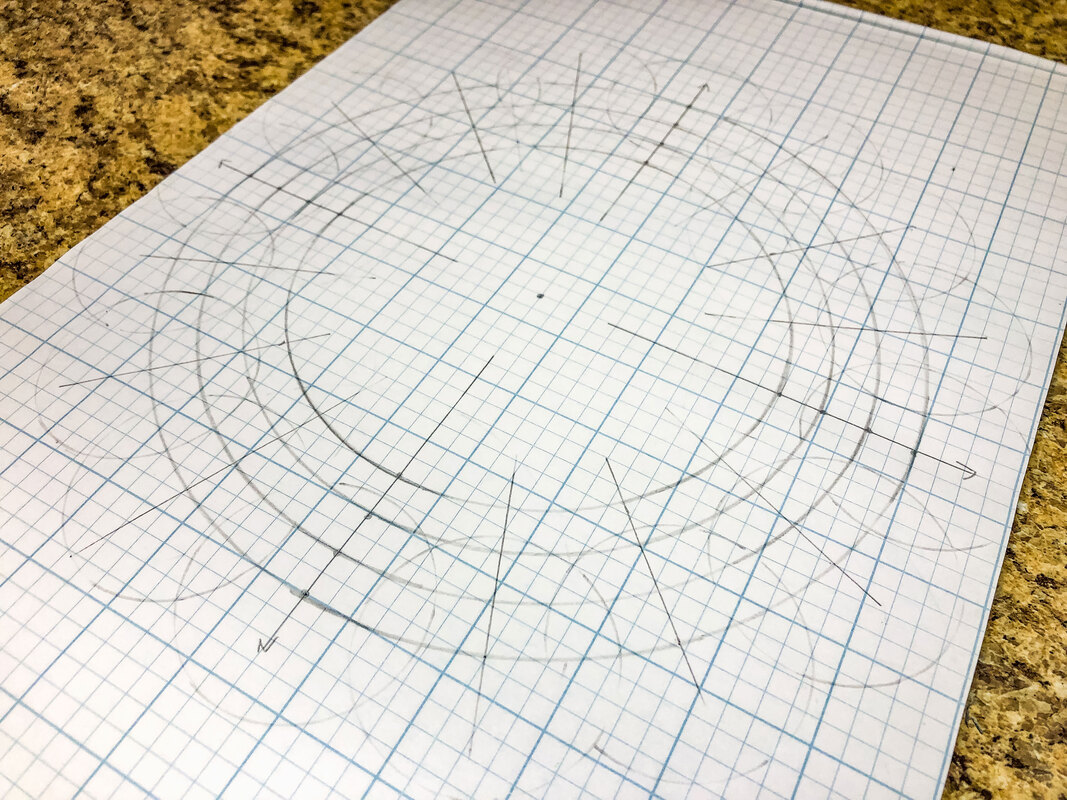 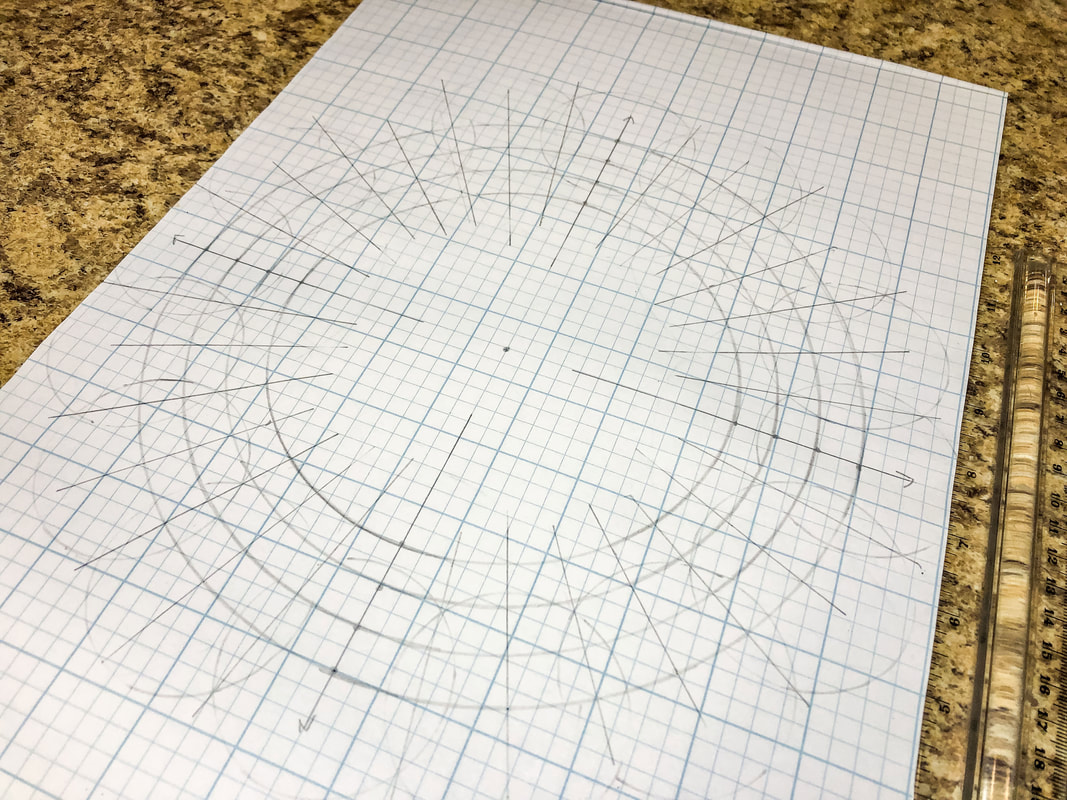 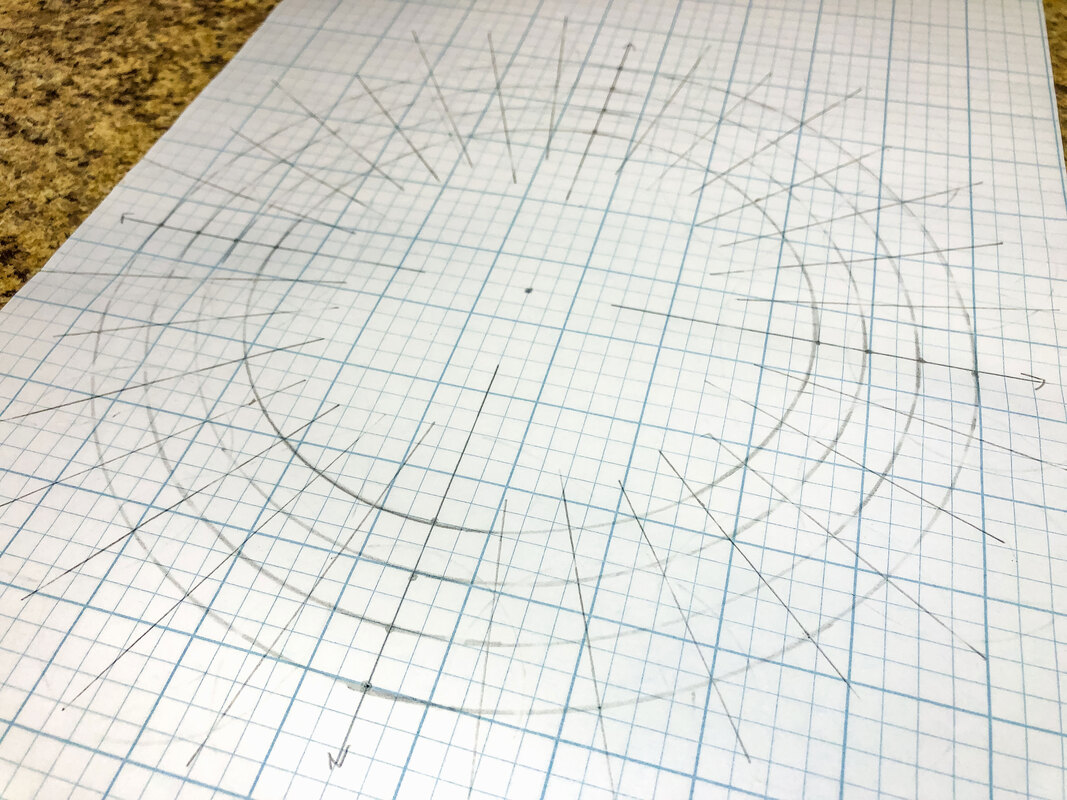 Step 7: Lightly draw a curved line spanning two outer blocks connecting the two intersections, as shown below. Do the same for the rest of the outer ring.  Step 8: Lightly draw a curved line spanning two inner blocks connecting the two intersections, as shown below. Do the same for the rest of the inner ring. 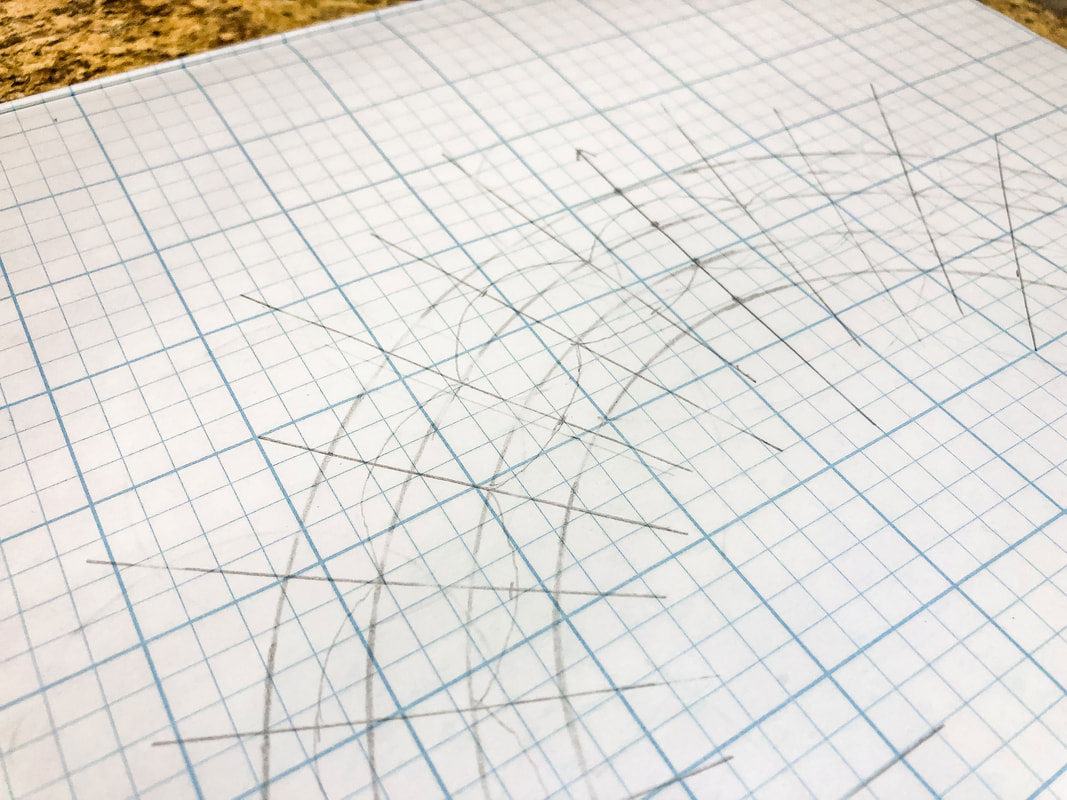 Step 9: Lightly connect the top and bottom arcs with diagonal lines. This gives you a pretzel shape and the spine of the braid. 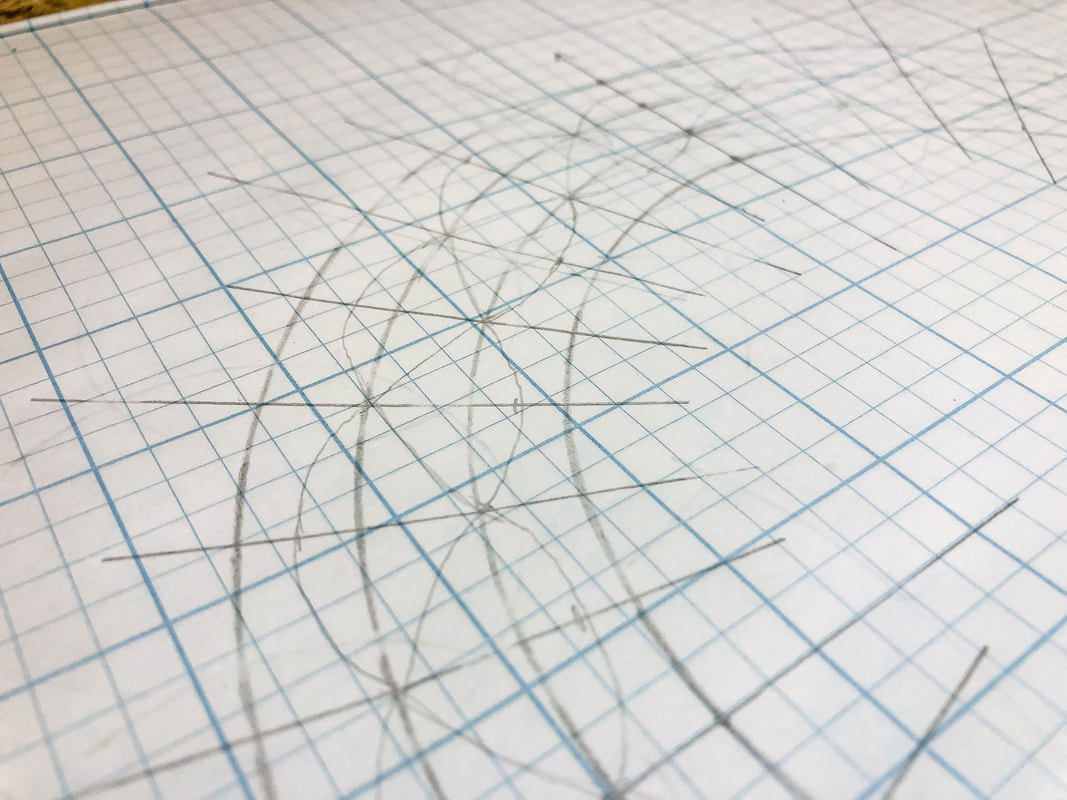 Step 10: Draw slightly darker lines on either side of this spine, parallel to each other, as seen below. Keep the distance between the lines consistent. 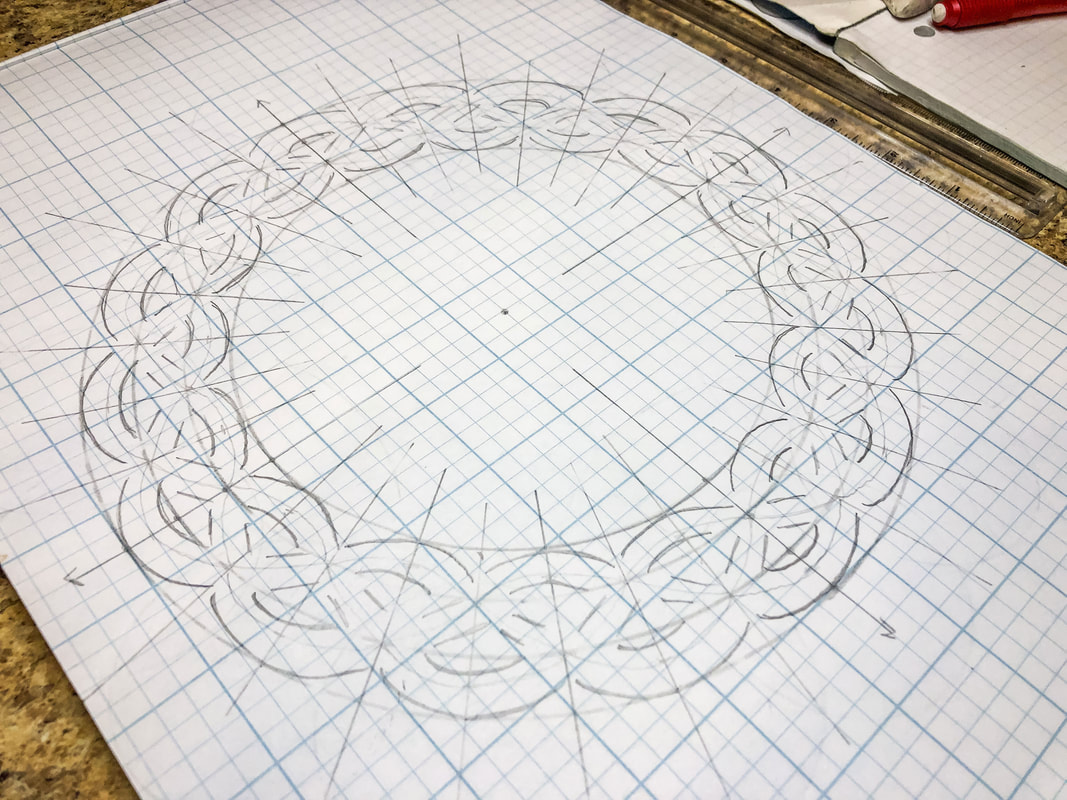 Step 11: Erase the inner line (the spine). 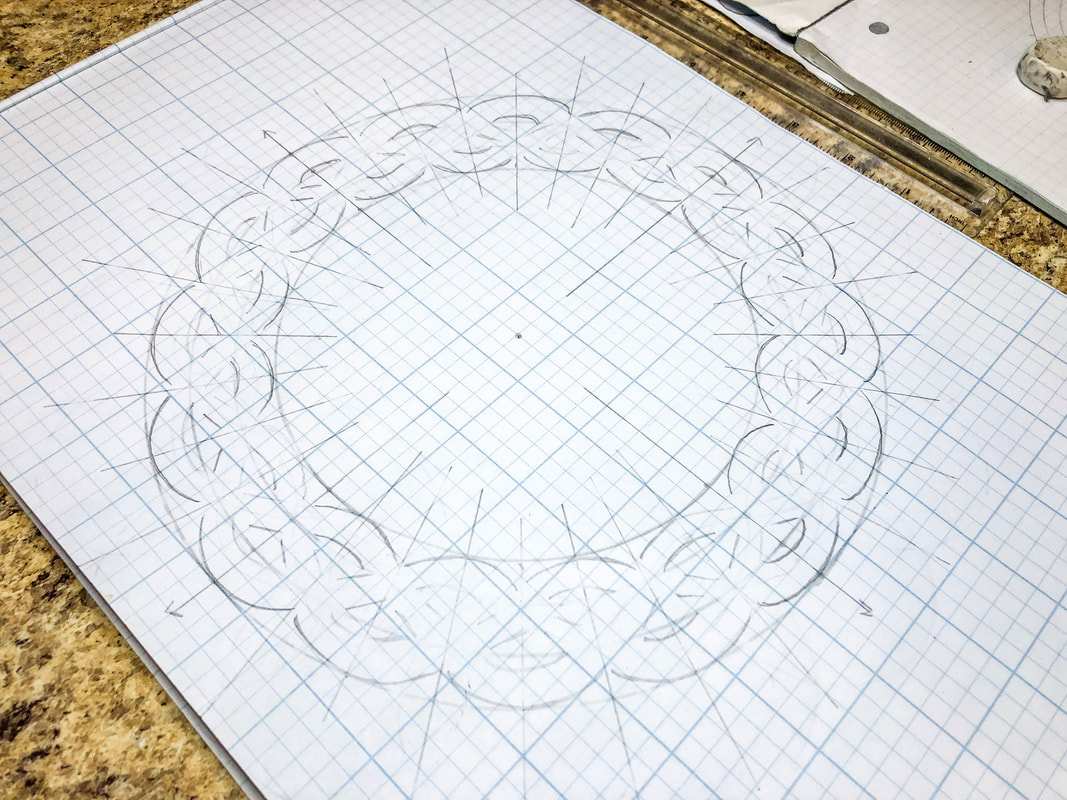 Step 12: Pick a place where two threads intersect. Start at this spot, drawing one thread crossing over another, erasing any unnecessary lines. 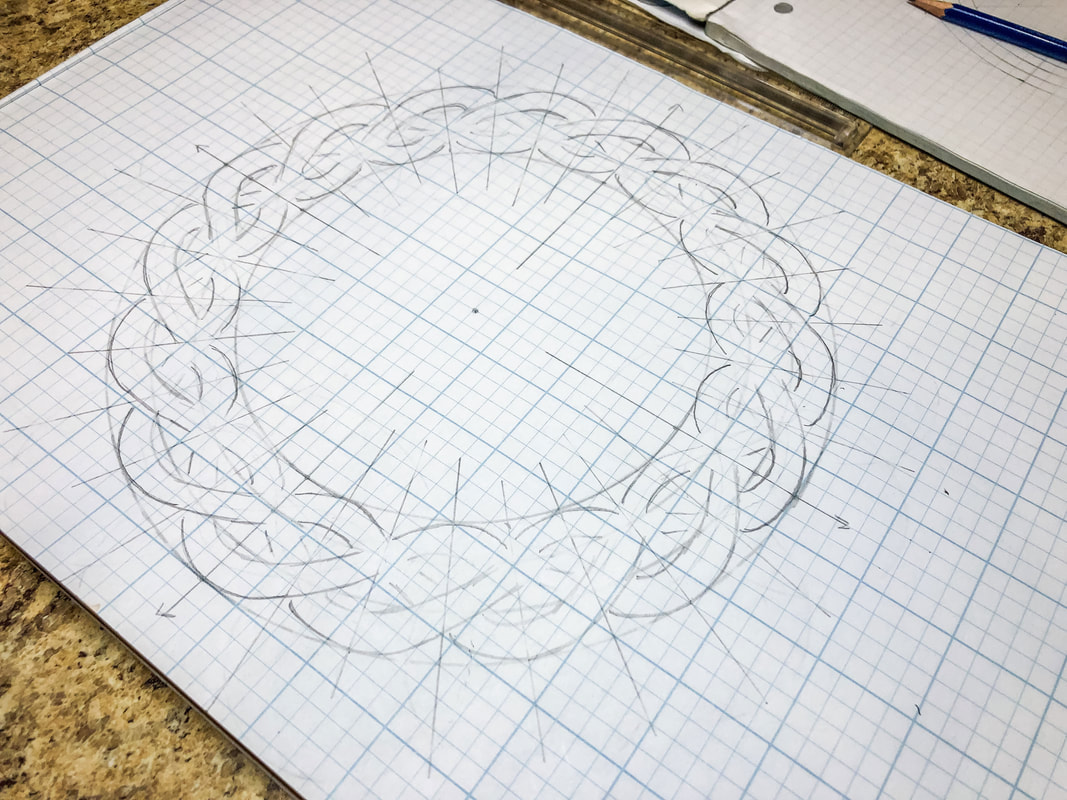 Step 13: Moving from this point, follow the thread that crossed OVER to the very next spot where there is an intersection and draw that thread crossing UNDER the next thread. Follow this pattern, working around the circle until you return to the beginning intersection. If you did it right, every intersection of your thread should alternate over-under, over-under, over-under, etc., creating a weave pattern. 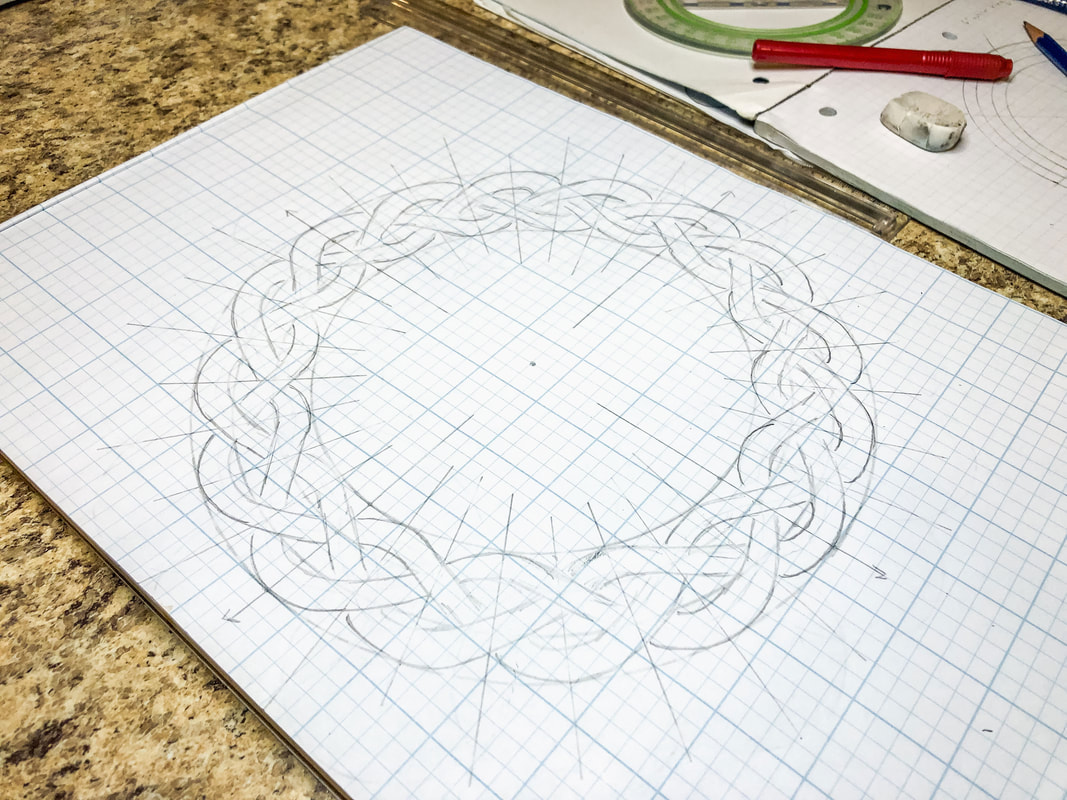 Step 14: Double-check your overs and unders, then erase any unnecessary guidelines and start adding shading where the threads intersect to add depth. 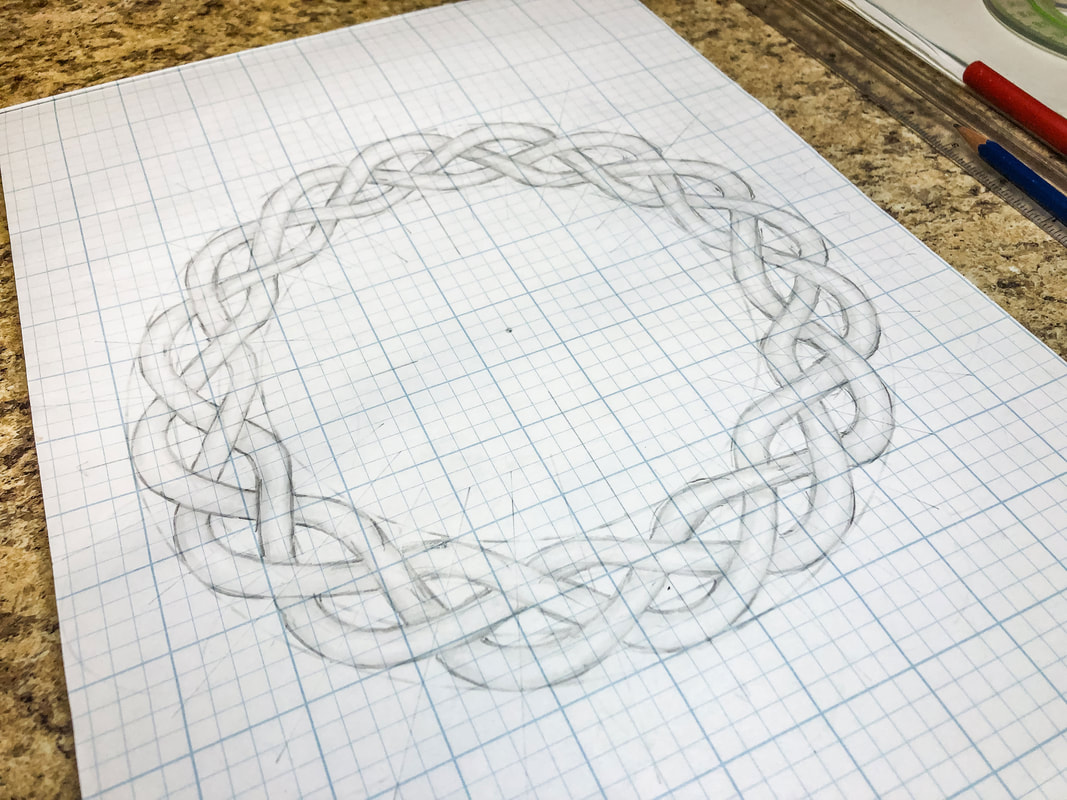 Step 15: Darken your lines using a pencil or marker and stylize as you wish. And you’re done! 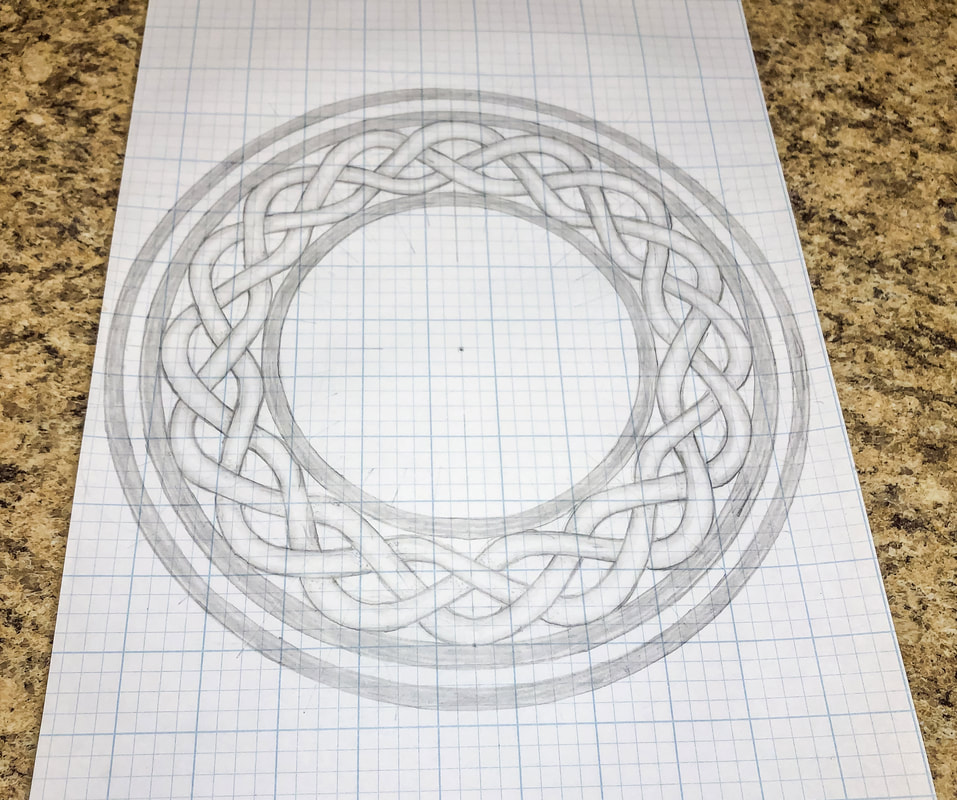 How did it go? I hope you enjoyed this project and are encouraged to try more designs of your own! I’ll be creating additional tutorials using this basic braid as a template for making more intricate designs, so stay tuned! I created a YouTube tutorial to go with this blog for those of you who are visual learners like myself! You can view the full video tutorials on my YouTube channel here! Related blogs you may want to read: Basic twist step-by-step drawing tutorial using grid paper Celtic braid step-by-step drawing tutorial Basic border knot with vertical breaks, step-by-step drawing tutorial Basic border knot with horizontal breaks, step-by-step drawing tutorial DIY chalk-painted tray with Celtic border A fun DIY project with paint and a thrifted mirror part 2 The Celtic Motherhood Knot, a symbol of love Celtic Tree of Life Basic Celtic Knot Tutorial Part 1 Celtic Knot Tutorial Part 2 Some of the posts in this article contain affiliate links. If you click on the link and purchase the item, I will receive an affiliate commission at no extra cost to you. I will only recommend products or services I use personally and/or believe will add value to my readers, so there is no conflict of interest. Get into the Halloween spirit with these 11 home accents from Amazon! 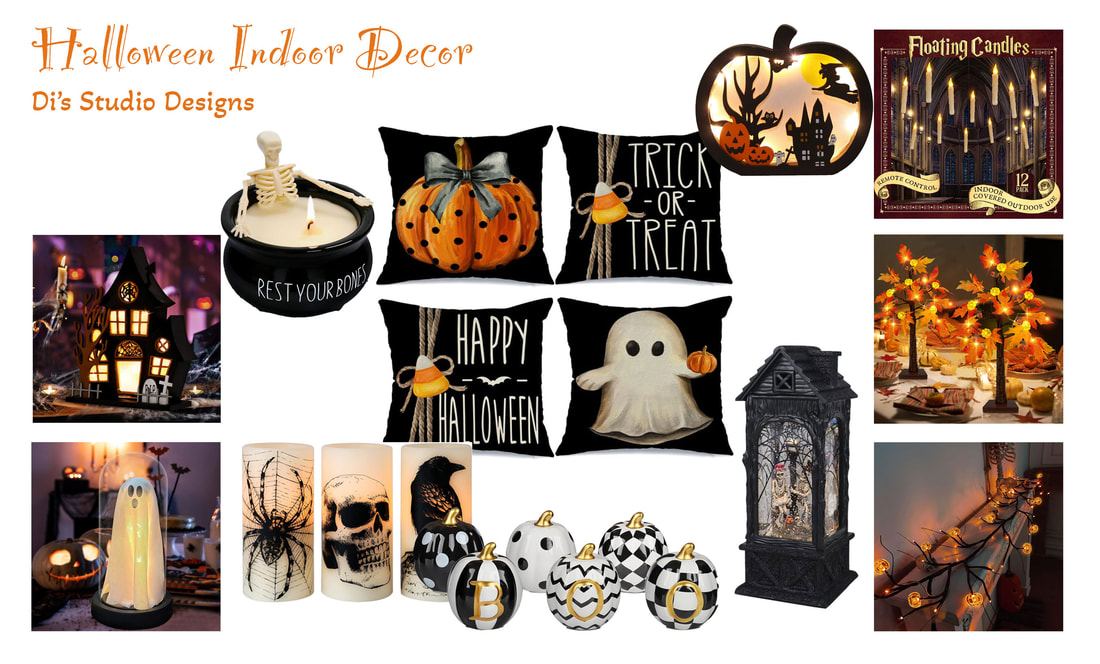 Images from Amazon.com. Click the links below to view or purchase. Some of the posts in this article contain affiliate links. If you click on the link and purchase the item, I will receive an affiliate commission at no extra cost to you. I will only recommend products or services I use personally and/or believe will add value to my readers, so there is no conflict of interest. October is upon us, and if you haven’t started your Halloween decorating yet…well…what are you waiting for?! Maybe you just need a bit of inspiration…So here are some unique indoor Halloween decor items to infuse the Halloween spirit into those tables, mantles, counters, and other interior spaces. Whether you are just looking for a few simple pieces of decor or you’re one of those who go full-on Halloween in your home, this list has something for everyone! And now that I’ve inspired you, I need to get back to my OWN Halloween decorating! Item 1—Prelit Battery Operated Maple Fall Tree Decor 20” by TURNMEON We’re kicking off the list with this prelit tabletop tree with vibrant orange maple leaves. The silk leaves are accented with acorns and battery-operated pumpkin lights. The branches are adjustable, allowing you to tweak the look of your tree. Doesn’t this adorable little tree just scream fall?! 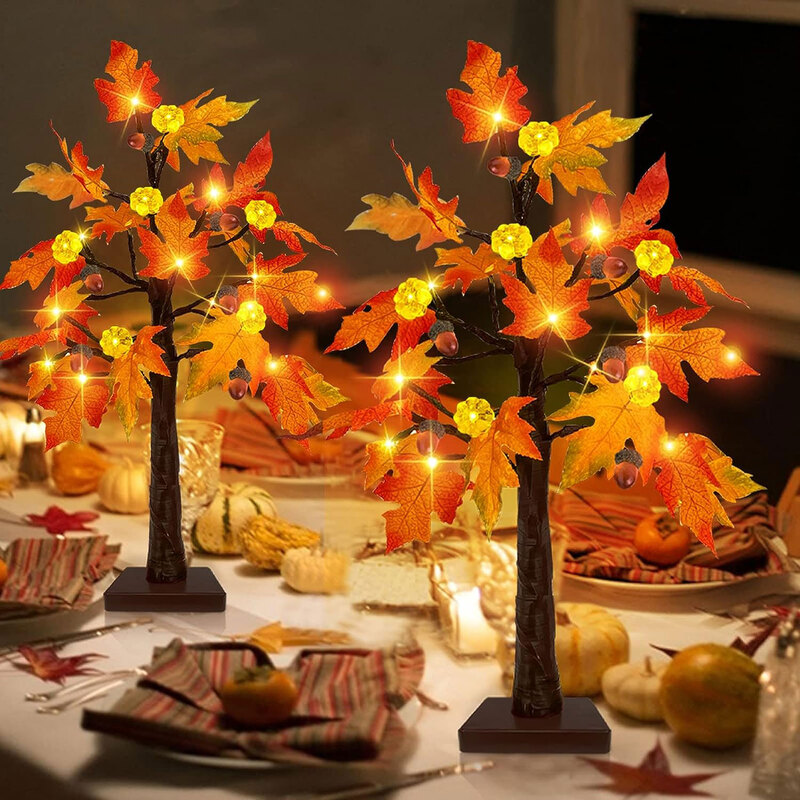 Item 2—Light-Up Ghost in Glass Cloche by FestalMart Everyone needs a cloche this season! How about this spooky light-up ghost with an adjustable light? This is such a unique handmade product! 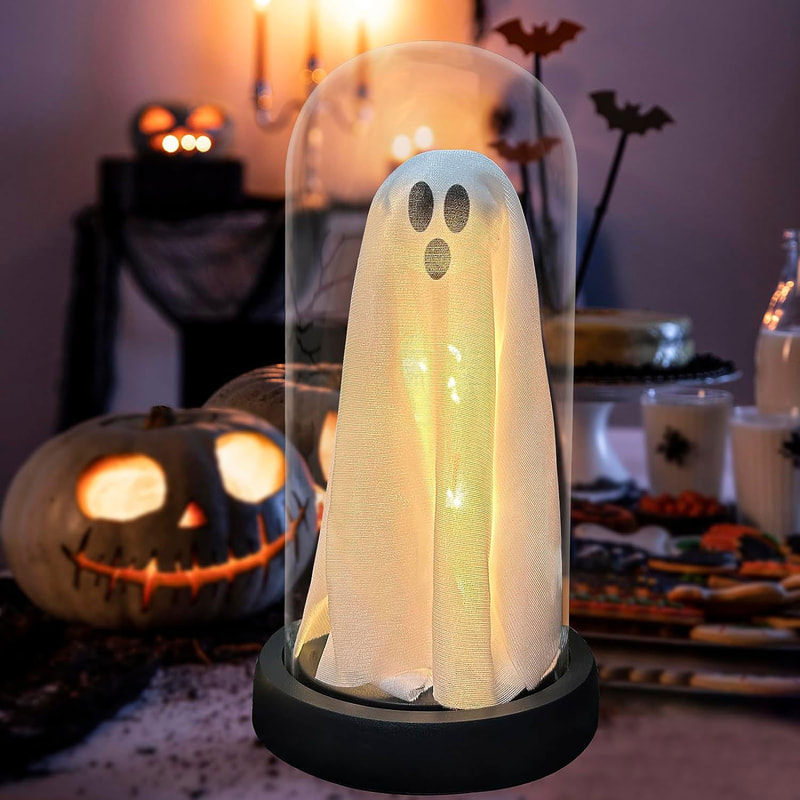 Item 3—Lighted Wooden Haunted House with Ghost Tree by Bunny Chorus Store Check out this gothic-looking haunted house! The house is lit by built-in white string lights that create a spooky silhouette to spruce up your Halloween mantle or table. 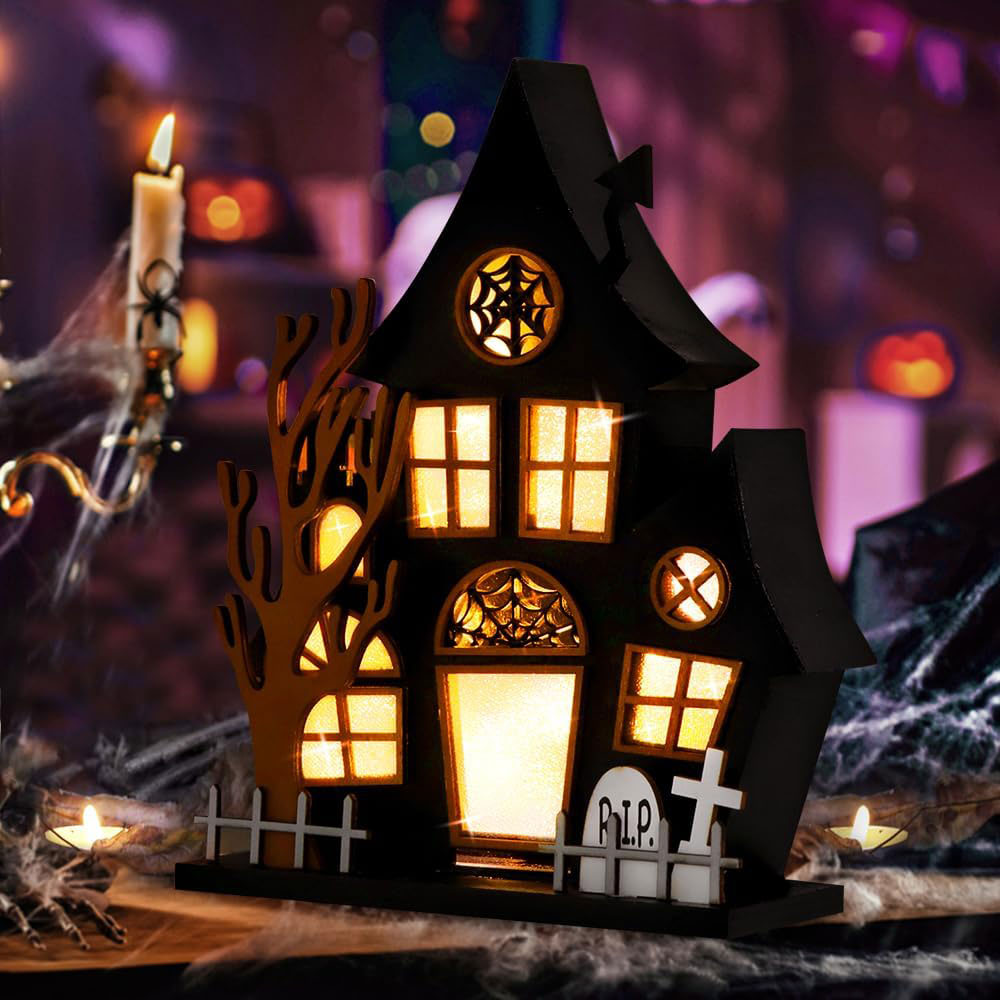 Item 4—Ceramic Black and White Halloween Pumpkins Set of 6 by DAZONGE These black, white, and gold ceramic pumpkins come in a pack of six for multiple vignette options. The colors will complement any fall or Halloween decor scheme, whether your decor is simple and bright or dark and creepy! 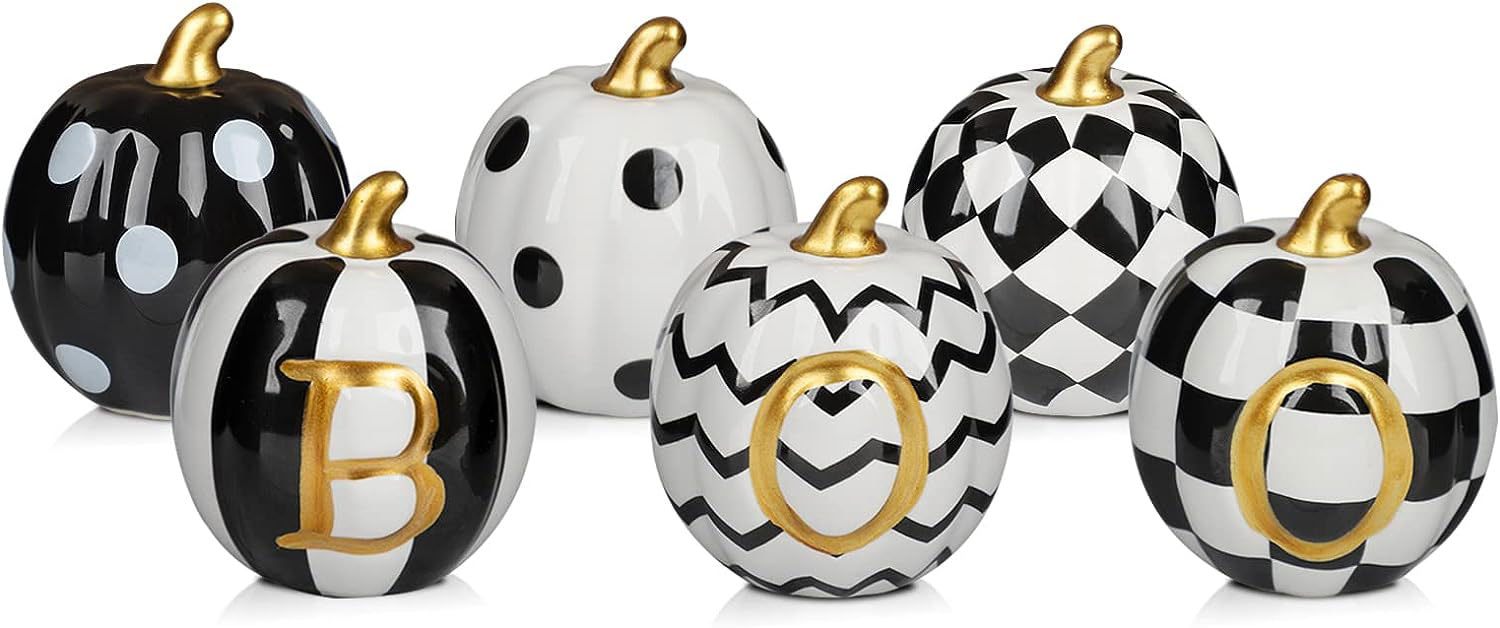 Item 5—Willow Vine Battery Operated Twig Decor Garland by TURNMEON The willow vine adjustable garland matches the prelit maple trees mentioned earlier, so you can pull together a cohesive look. The pumpkin light branch has a variety of lighting settings and is perfect for a wall, mantle, or dining room table. 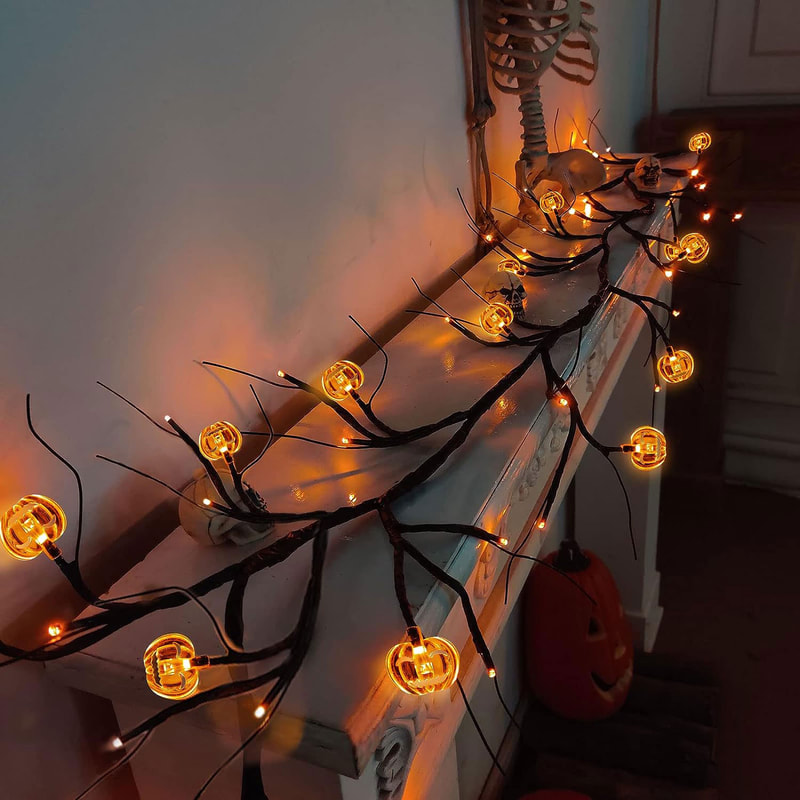 Item 6—Trick or Treat Halloween Pillow Covers Set of 4 18 x 18 by CORINTH How about these whimsical rustic pillow covers for Halloween?! This set of 4 pillow covers is durable and machine washable. 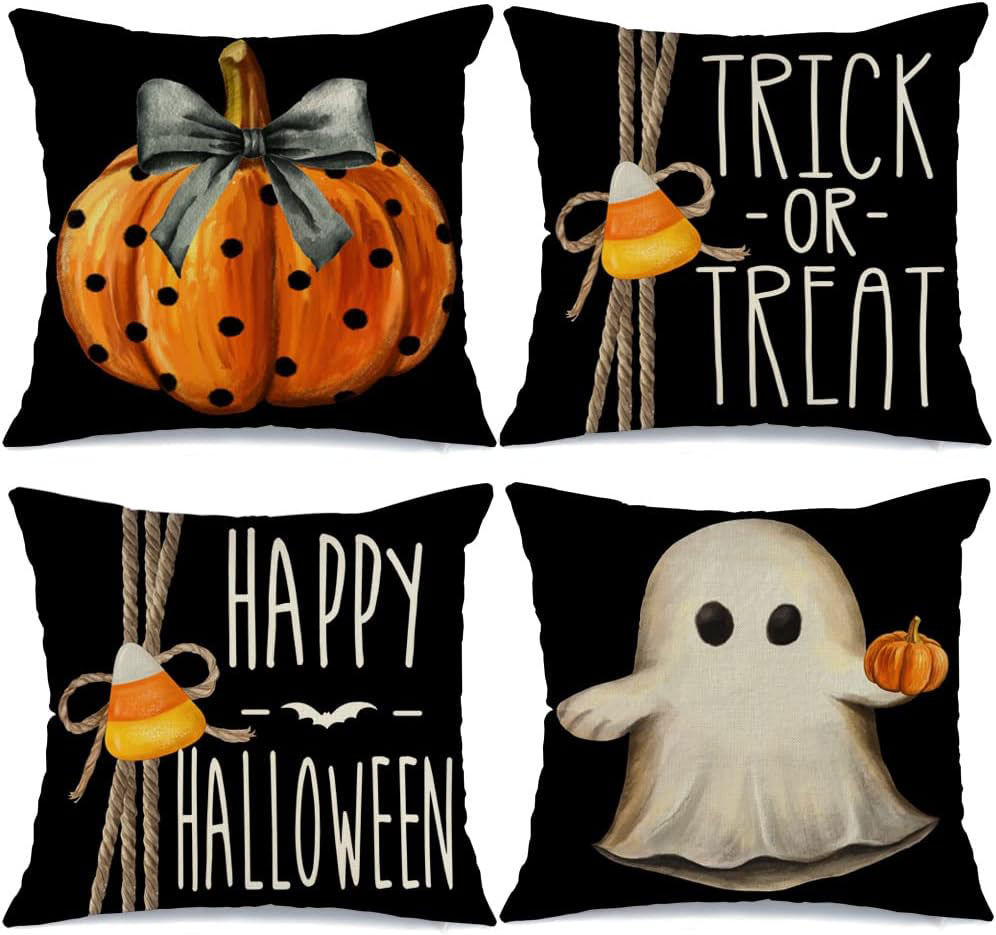 Item 7—Light Up Wooden Pumpkin Table Centerpiece by FOIMAS If you need something to take your Halloween table or vignette to the next level, this wooden frame with a haunted Halloween scene might fit the bill! Lights inserted into the frame illuminate the scene from behind, creating a spooky silhouette. 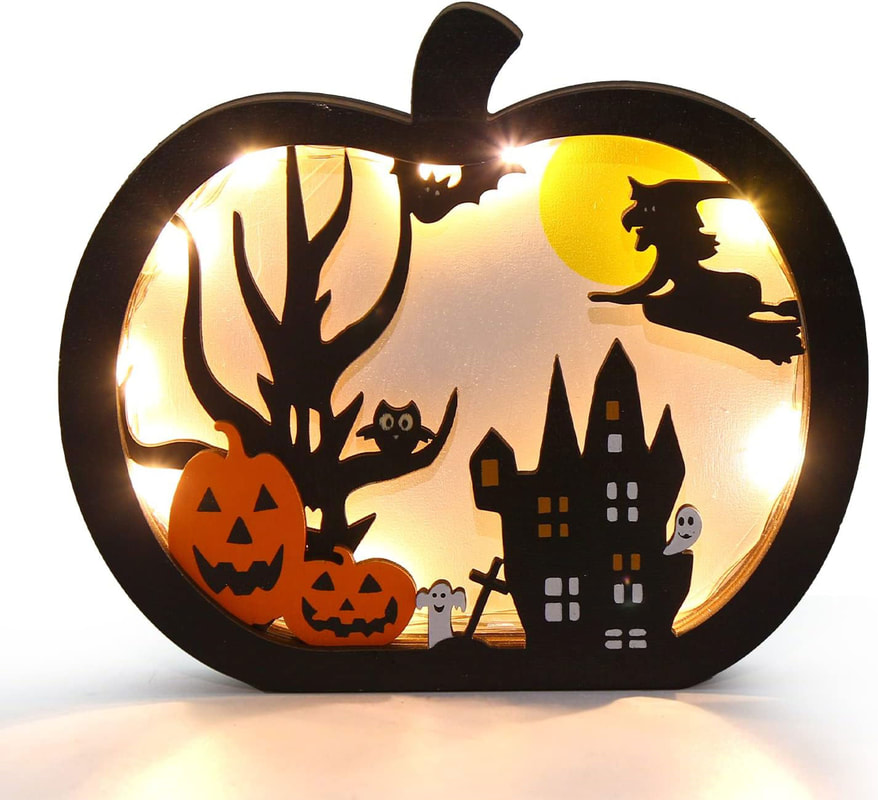 Item 8—Halloween Ghost Projection Snow Globe Lantern by Eldnacele This spooky Halloween lantern snow globe featuring skeletons in a graveyard is a unique find! The creepy scene is lit with an LED light, creating an eerie glow. 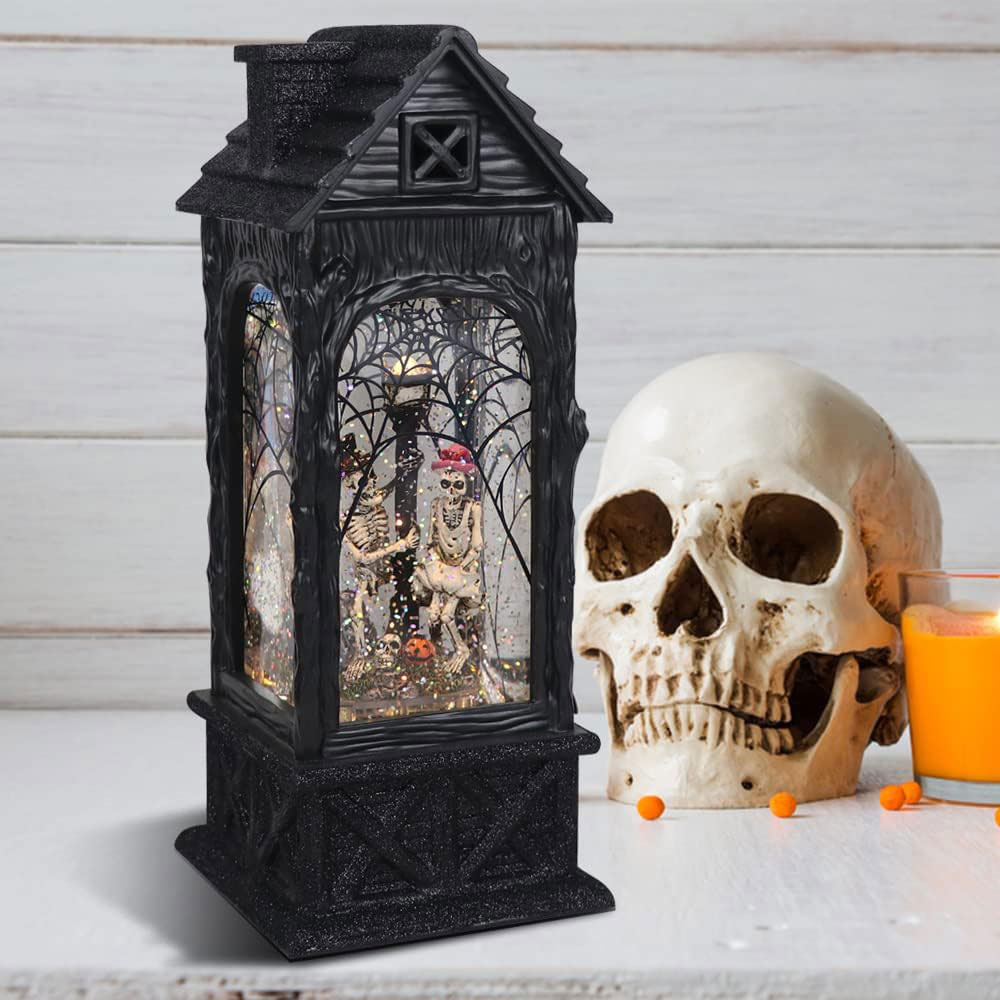 Item 9—Halloween Flickering Candles Set of 3 by Eldnacele Your Halloween vignette needs this set of three LED wax pillar candles with spooky Halloween decals! The flameless candles have flickering lights for a realistic eerie effect. These candles work well in this simple Halloween decor scheme but would also look right at home in a Dark Academia setting! 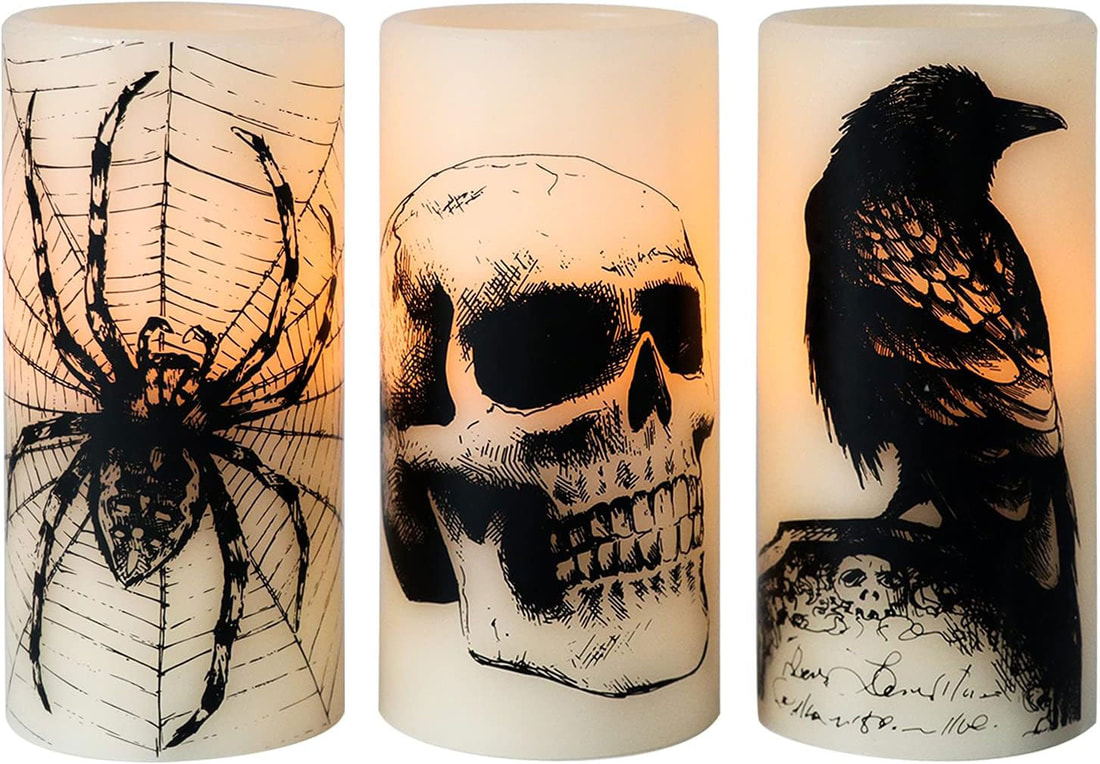 Item 10—Halloween Skeleton Candle by ORIENTAL CHERRY This skeleton in a cauldron candle is a must-have! The soy wax candle burns for up to 50 hours—so your bony friend can take a long bath! 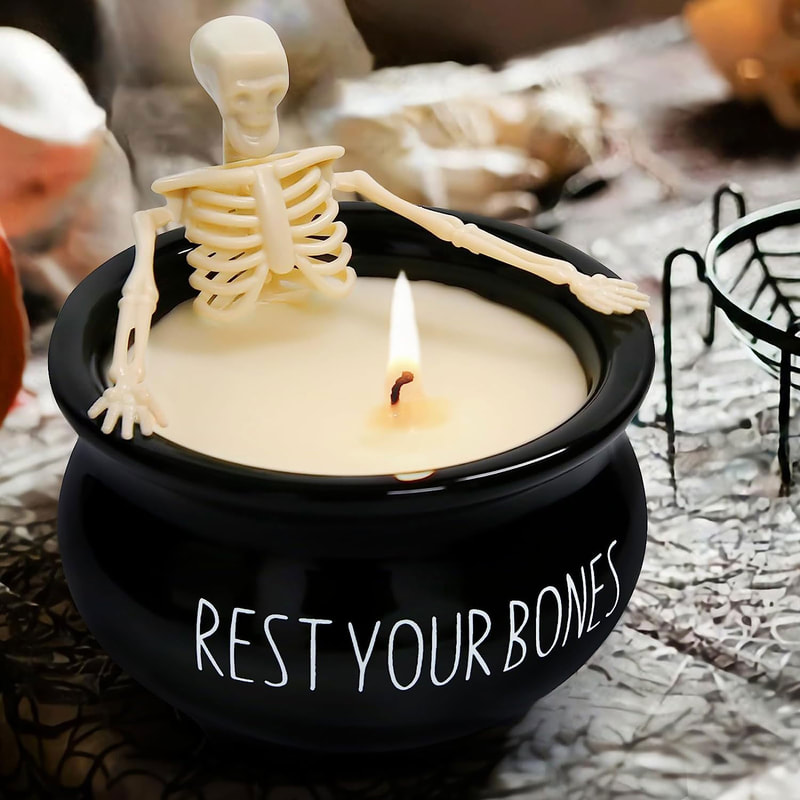 Item 11—Floating LED Candles by ORIENTAL CHERRY Give your home the Hogwarts treatment with these floating LED candles! Hang the candles from the ceiling and let the mesmerizing flickering lights set the tone for a spooky Halloween experience!  Related blogs you may want to read: Halloween lawn decor ideas Dark Academia for the Fall Create a cozy relaxing interior space this fall with neutral colors Brighten up your autumn decor with these items Pastel decorating ideas for autumn Need ideas for incorporating the color blue into your fall decor? Inspirational ideas for creating that cozy boho style Nine hygge decor ideas Winter color palette ideas for your home decor Design concept for a dreamy coastal interior Let’s talk Bohemian Surround yourself with these 12 dark and cozy items from Amazon this fall! 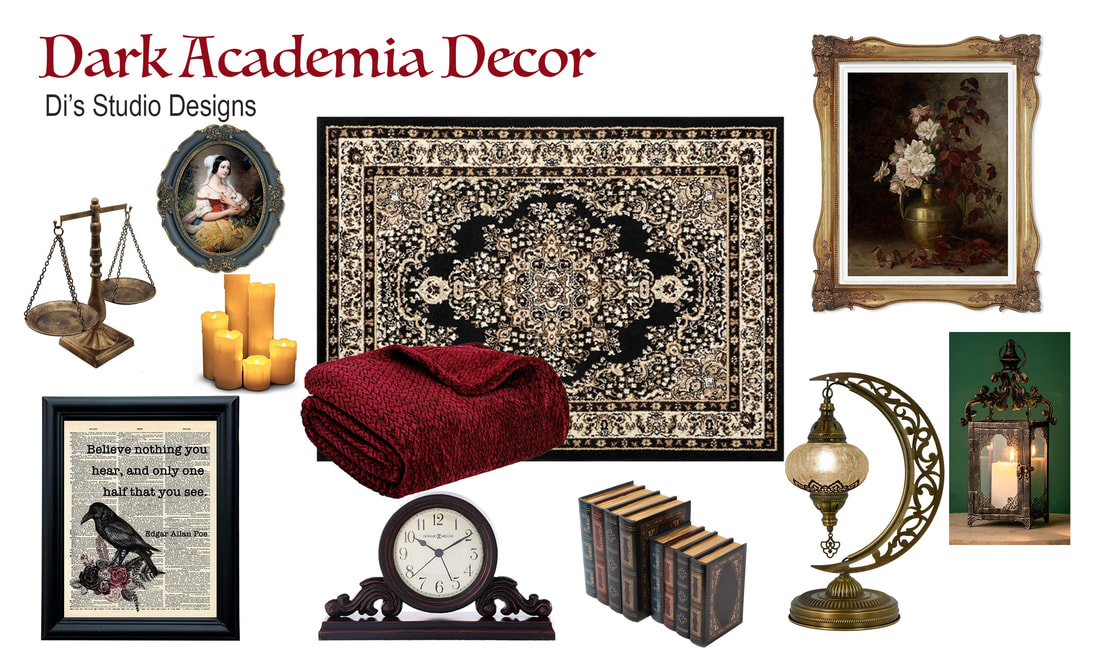 Images from Amazon.com. Click the links below to view or purchase. Some of the posts in this article contain affiliate links. If you click on the link and purchase the item, I will receive an affiliate commission at no extra cost to you. I will only recommend products or services I use personally and/or believe will add value to my readers, so there is no conflict of interest. What is this Dark Academia decor style that is all the rage right now? It’s certainly not a new aesthetic, having been around since Victorian times. This dark and broody decor style has now been “rediscovered” by a new generation looking for a mature design style that feels like an escape from our hectic modern world. The look can be achieved with dark woods, Victorian furniture, antique ornate frames, and bookshelves full of collegiate material and old books. Decorate the space with accents that harken back to the age of discovery, such as botanical prints, species of butterflies in picture frames, scientific equipment like scales, a world atlas or globe, and a few exotic items from around the world. If you’d like to make the space look more Gothic, use black, grey, and deep red colors. Add spookier accents like skeletons, skulls, candelabras, black crows, and books by Edgar Allen Poe. Now you’re all set for Halloween! I scoured Amazon to find a few decorative accents you could use in a Dark Academia space or serve as inspiration for recreating the style in your own home. Let me know in the comments whether you tried any of these! What do you think of this design aesthetic? Is it your cup of tea? I’d love to hear your thoughts! Item 1—Wine Red Fleece Sofa Throw 60 x 80 by PAVILIA Curl up in a cozy wingback chair and wrap yourself in this dark burgundy fleece blanket! The luxurious velvety texture and moody red color perfectly complement the Dark Academia aesthetic. This microfiber polyester blanket is machine washable and won’t pill. 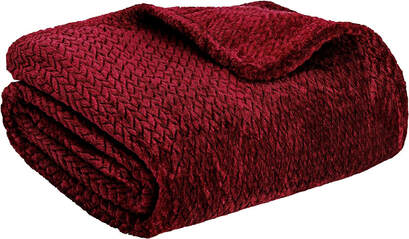 Item 2—Blue Oval Frame with Gold Trim 8 x 10 by SIMON’S SHOP This deep blue picture frame with gold trim looks aged and antique, perfect for a Dark Academia vignette or wall space. 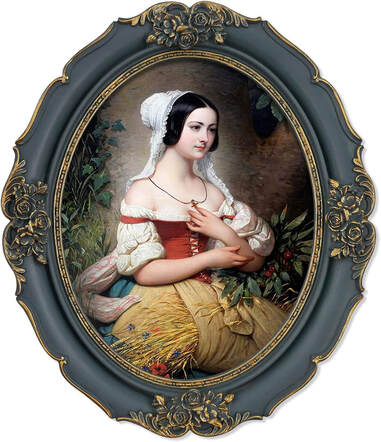 Item 3—Gold Picture Frame 11 x 14 by SIMON’S SHOP Need an antique-looking frame for a botanical print or wall mirror? This ornate gold frame looks Victorian and vintage and would complement the Academia style. 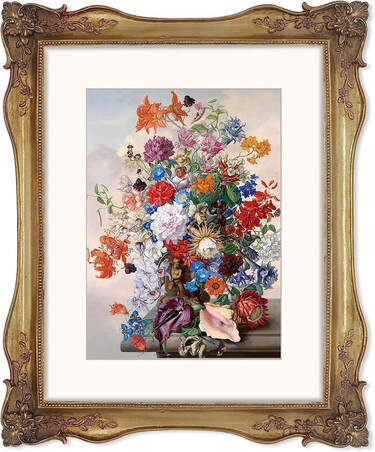 Item 4—Indoor/Outdoor 16” Decorative Lantern by DECORKEY This ornate metal lantern has a bronze finish that makes it look aged. Put a candle inside to create a moody ambiance in the room. The lantern can be hung or placed on a fireplace mantel or table with the rest of your decor. 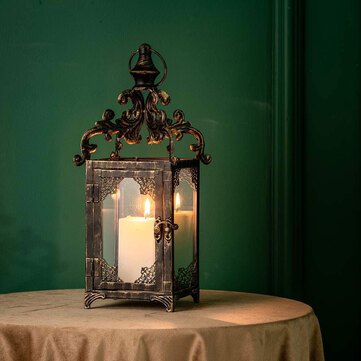 Item 5—Edgar Allen Poe Spooky Decor by insovita Are you an Edgar Allen Poe fan? Add a little spooky academia to your space with this vintage-inspired book page with a crow inside a black frame. Perfect gothic touch for Halloween!  Item 6—Dark Academia Botanical Wall Art 12 x 16 by AWTJIS This moody botanical print is a must-have for your Dark Academia space! Set the artwork inside a vintage-looking frame and hang it on a dark wall, and you’re all set!  Item 7—Turkish Clear Glass Moon Shape Table Lamp by mozaist Conjure up a worldly aesthetic in your space with this exotic desk lamp with Turkish glass! The arabesque style hints at a well-traveled person who appreciates a broody academic style…or someone who loves the mysterious! 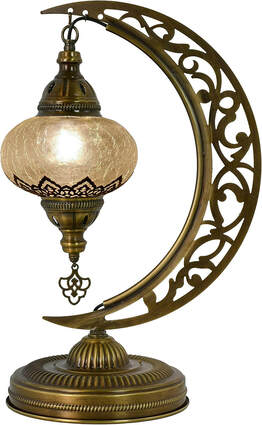 Item 8—Bishop Table Clock with Worn Black Finish by Howard Miller This clock with dark red wood undertones would make quite a statement on a fireplace mantel or a kitchen counter! The quality and style of this mantel clock make it a good candidate for a space with dark and vintage furnishings. 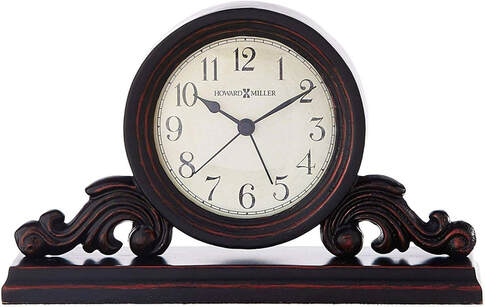 Item 9—LED Flickering Wax Halloween Candles by LED Lytes These LED flickering candles with realistic melted wax can be used any time of year but are perfect for a spooky Halloween vignette! Dark Academia and Halloween make an ideal combination, right?!  Item 10—Vintage Style Metal Libra by Owlgift One must-have accent for any academic style space is a set of scales. This antique-style scale with a bronze finish makes an intriguing room accent that hints at science and learning. Or, if you’re going for a more mystical aesthetic, use it for storing small trinkets such as jewelry or potpourri.  Item 11—Decorative Wooden Book Boxes 2 pack by Tosnail A proper academic-style space has to have books! Bring a collegiate feel to your room with these antique-looking book boxes. Not only do they add the necessary element of knowledge to a space, but they double as storage! They may not be authentic books, but who would know?!  Item 12—Oriental Area Rug 5 x 7 Black and Beige by Antep Rugs And finally…Any Dark Academia-style room is incomplete without an ornate Turkish rug, such as this beauty with its dark black and cream design! This oriental rug creates a moody space with an air of mystery.  Related blogs you may want to read: Create a cozy relaxing interior space this fall with neutral colors Brighten up your autumn decor with these items Pastel decorating ideas for autumn Need ideas for incorporating the color blue into your fall decor? Inspirational ideas for creating that cozy boho style Nine hygge decor ideas Winter color palette ideas for your home decor Design concept for a dreamy coastal interior Let’s talk Bohemian  This drawing tutorial is the fourth in a short series of lessons to teach you how to draw a few variations of Celtic border knots. In the previous lesson, we added vertical breaks to a basic braid pattern to create a different knot style. In this tutorial, we will add horizontal breaks to the basic braid pattern to create yet another knot style with a different look. Below is a list of supplies you may want on hand (Amazon affiliate links are included), but you certainly don’t have to have all of these supplies to do this tutorial. Just find yourself a piece of paper, a pencil, and an eraser, and let’s get to drawing! Gather your supplies: Drawing pencils Markers Blending stumps Eraser Click eraser Ruler Horse hair brush Grid paper Sketch pad Step 1: Draw a grid of 9 squares across and 2 squares down. Use a ruler If drawing the grid by hand so all the squares end up the same size. 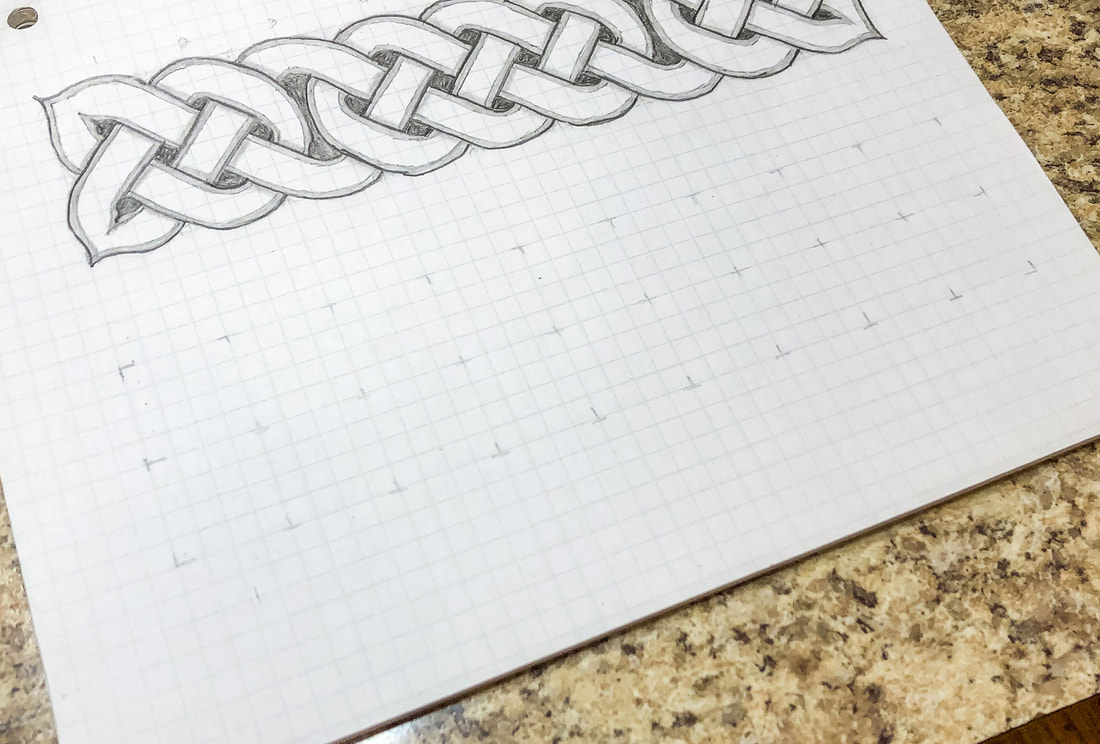 Step 2: Draw circles at the intersections of each corner and then in the middle of each square. Keep the circles the same size. Small circles will give you a thicker thread, while large circles will allow you to create a thinner thread. 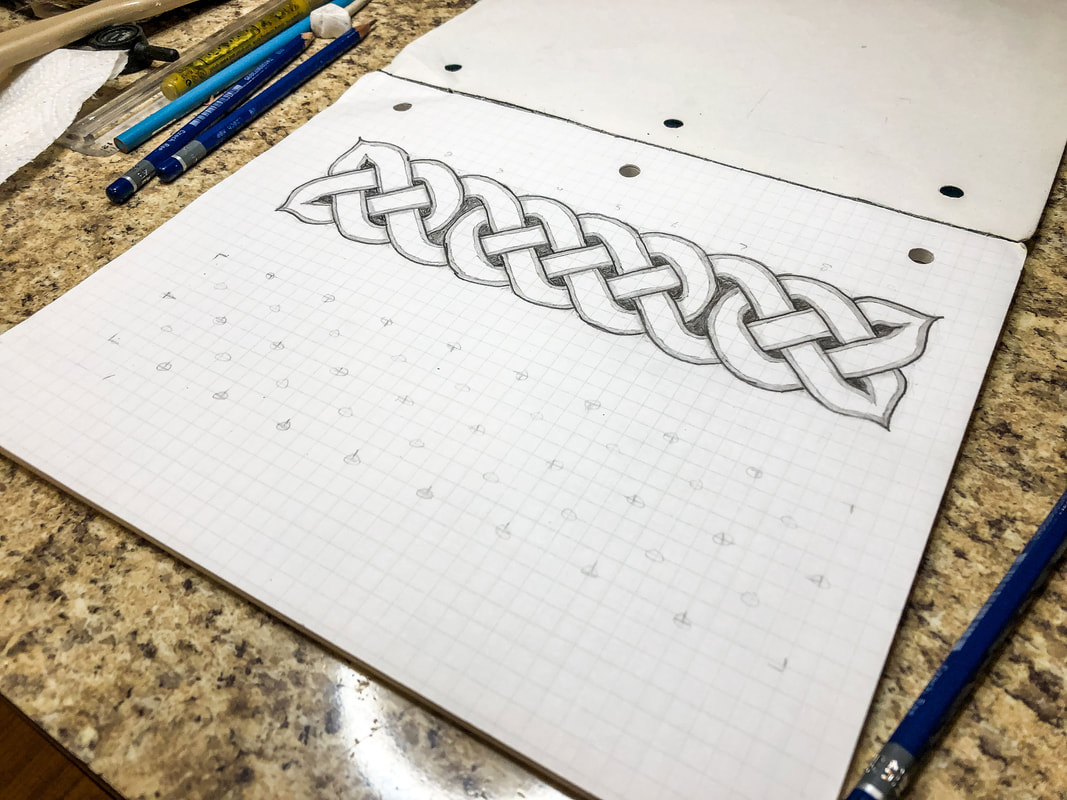 Step 3: Starting from the left, draw a pair of parallel lines touching the inside edges of the first four circles. Find the set of four circles above that first pair of lines, and draw a second set of perpendicular lines. Return to the first pair of lines and create another pair of perpendicular lines to the side, as shown. This sets up an alternating pattern of lines that you will continue across the grid to create a weave. Ignore any places where you only have three circles for now. 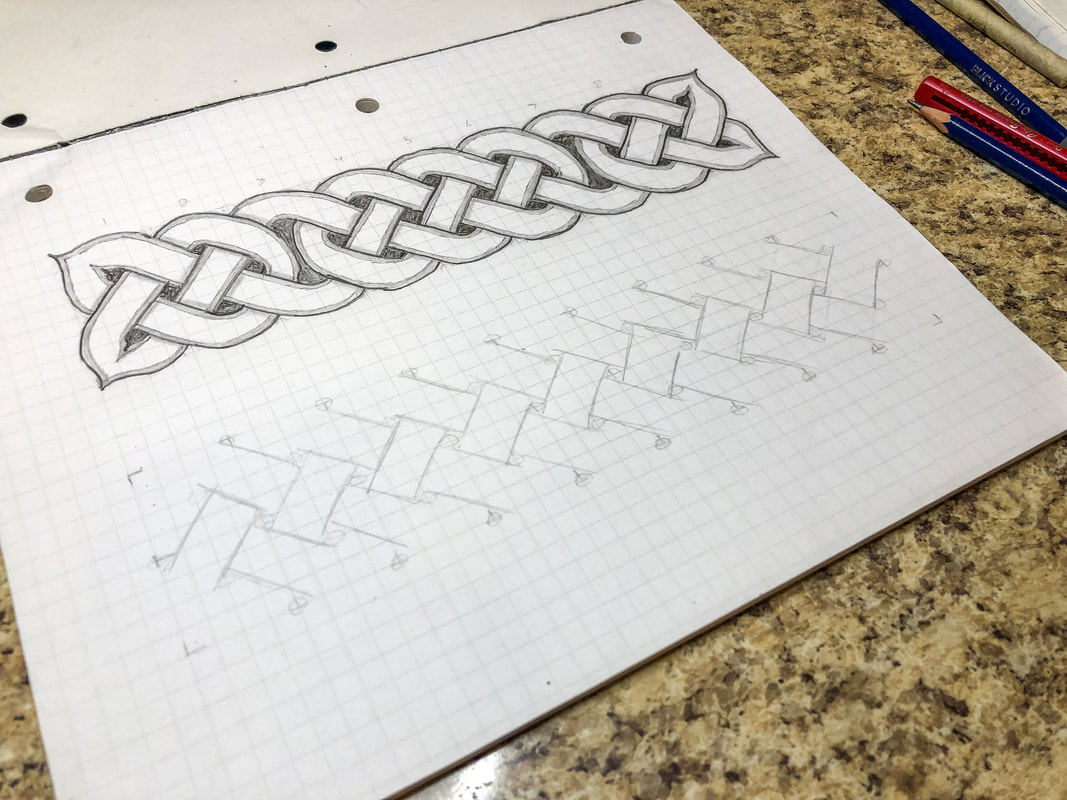 Step 4: Draw two horizontal lines across columns 2 & 3 and 7 & 8, as shown. 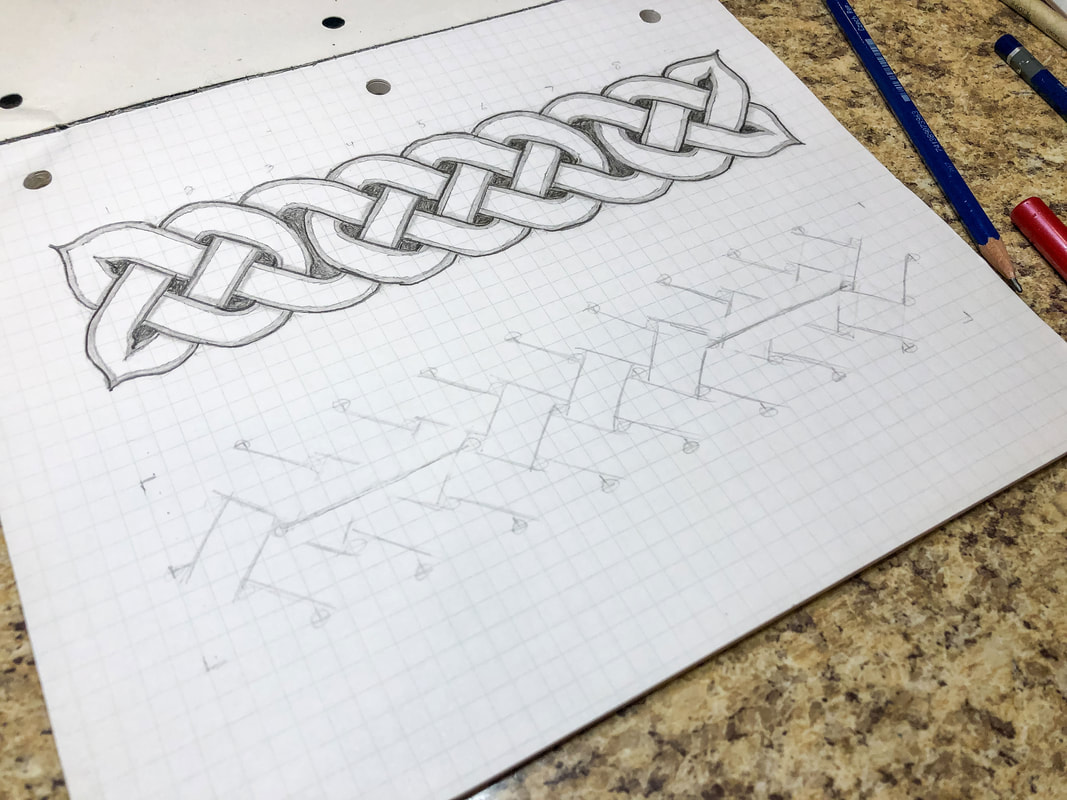 Step 5: Erase any lines that cross over those two new horizontal lines, looping them back around to link up with the threads as shown. 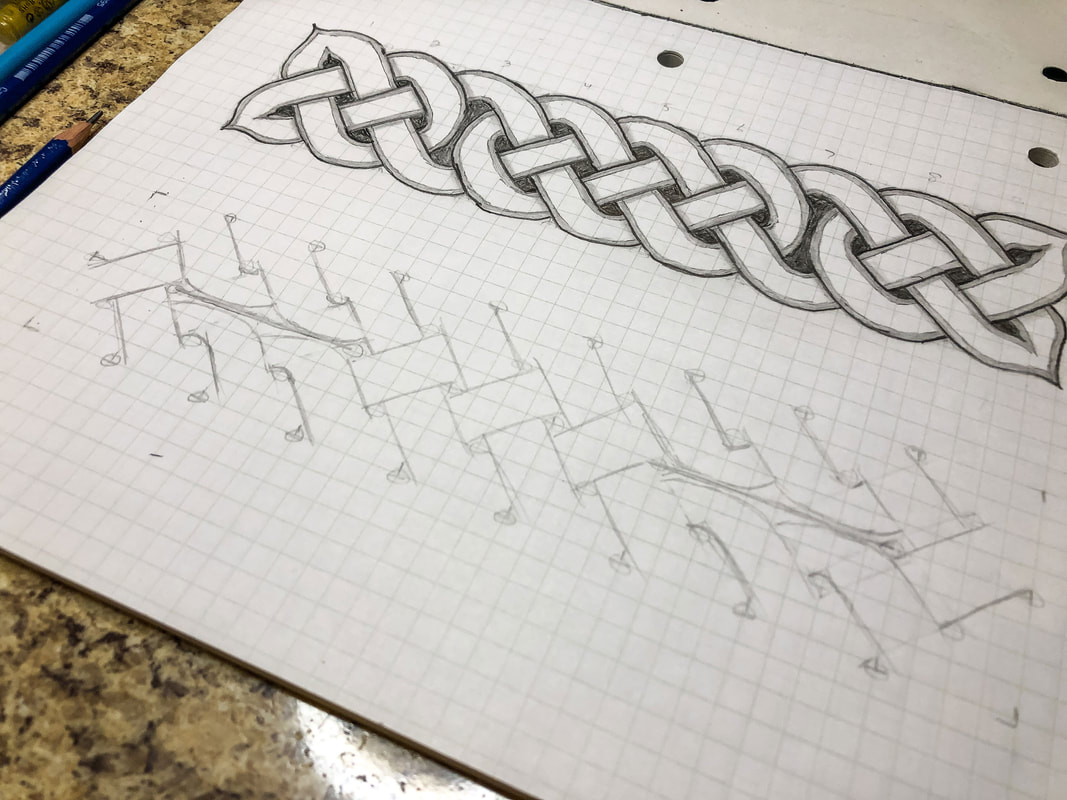 Step 6: Sketch in the top and bottom edges of the loops as shown. 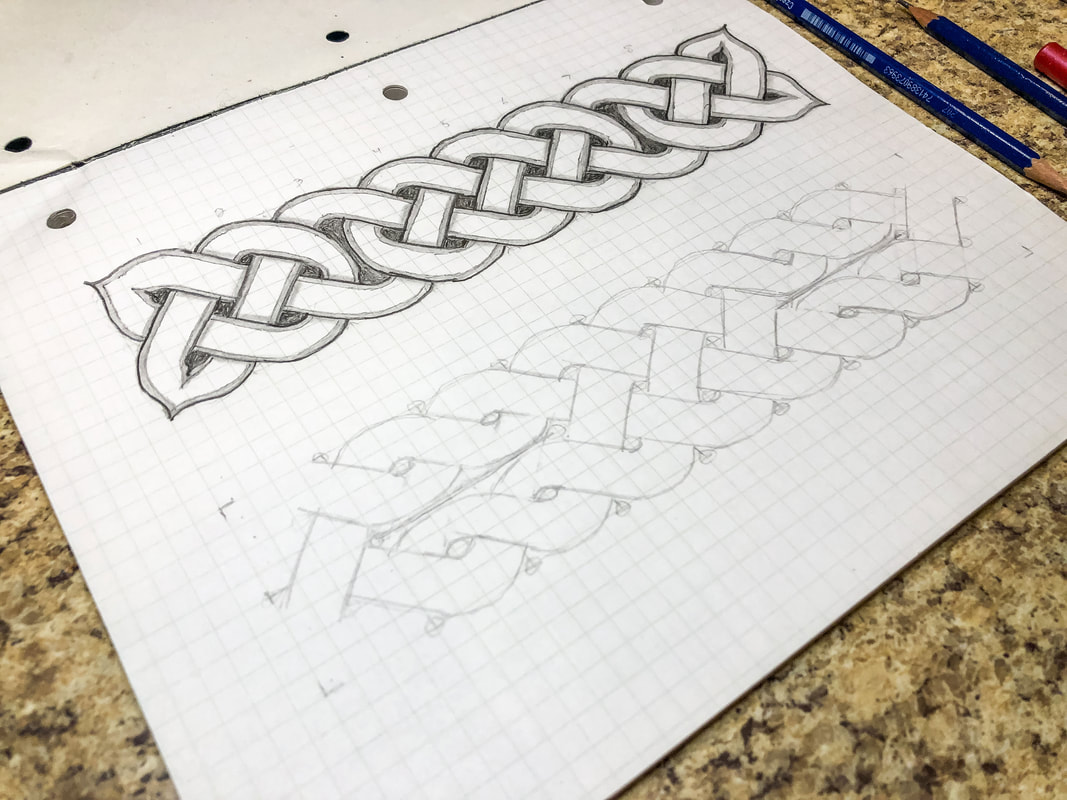 Step 7: Create the loops at each end of the grid. For this design, there will be a loop at each corner. 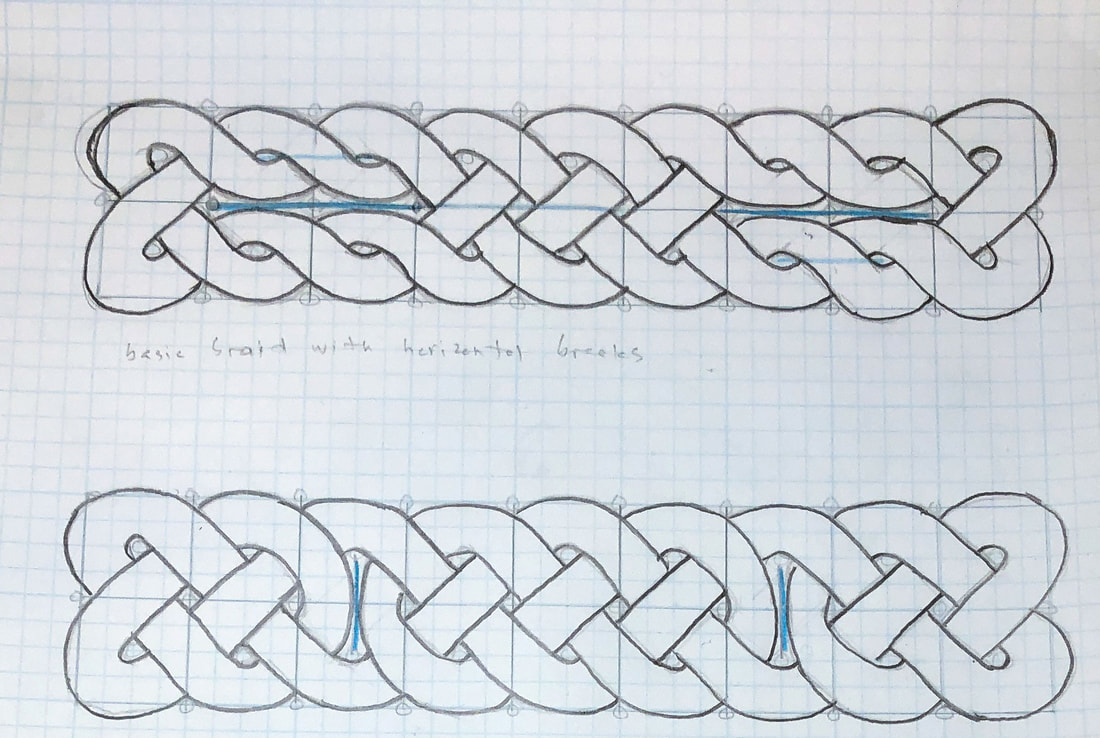 Step 8: Erase any guidelines and trace over the pattern with a darker pencil, creating any stylistic changes you may want. 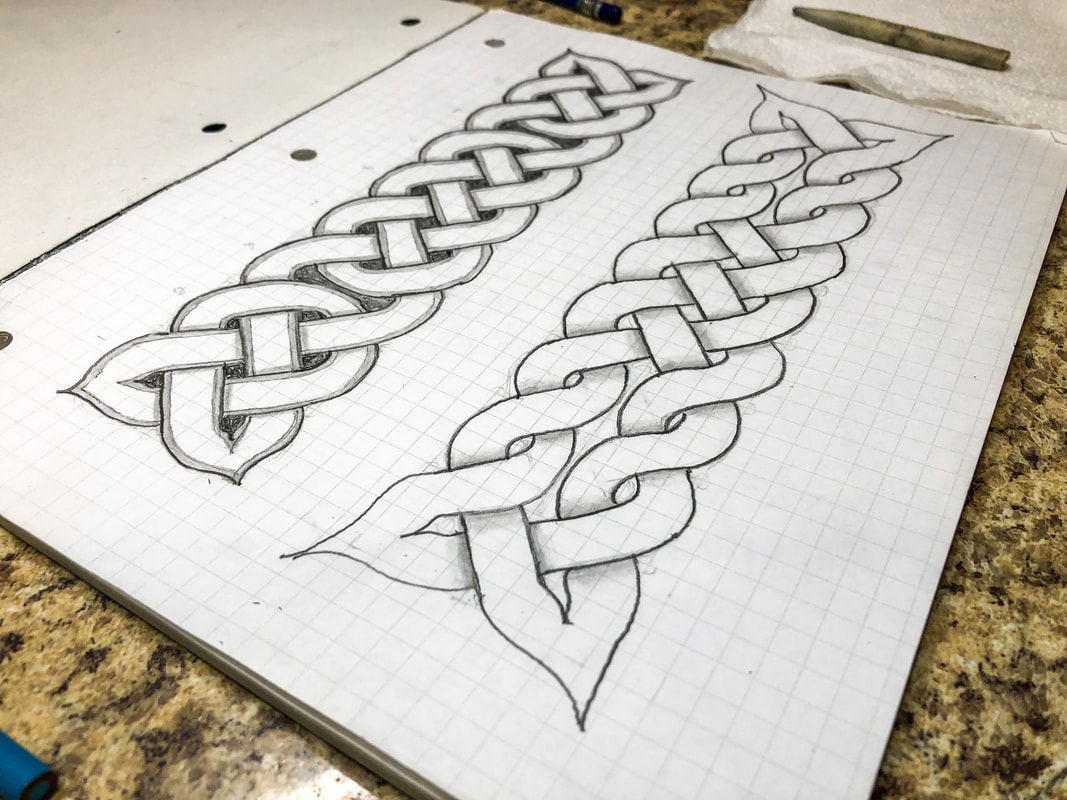 Step 9: Add in the shadows for a 3D effect, blend, and add final details. Go over your finished design with markers if desired. I hope you enjoyed this project and are encouraged to try more designs! I created a YouTube tutorial to go with this blog for those of you who are visual learners like myself! You can view the full video tutorial on my YouTube channel here! Related blogs you may want to read: Basic twist step-by-step drawing tutorial using grid paper Celtic braid step-by-step drawing tutorial Basic border knot with vertical breaks, step-by-step drawing tutorial DIY chalk-painted tray with Celtic border A fun DIY project with paint and a thrifted mirror part 2 The Celtic Motherhood Knot, a symbol of love Celtic Tree of Life Basic Celtic knot tutorial part 1 Celtic knot tutorial part 2 Some of the posts in this article contain affiliate links. If you click on the link and purchase the item, I will receive an affiliate commission at no extra cost to you. I will only recommend products or services I use personally and/or believe will add value to my readers, so there is no conflict of interest. 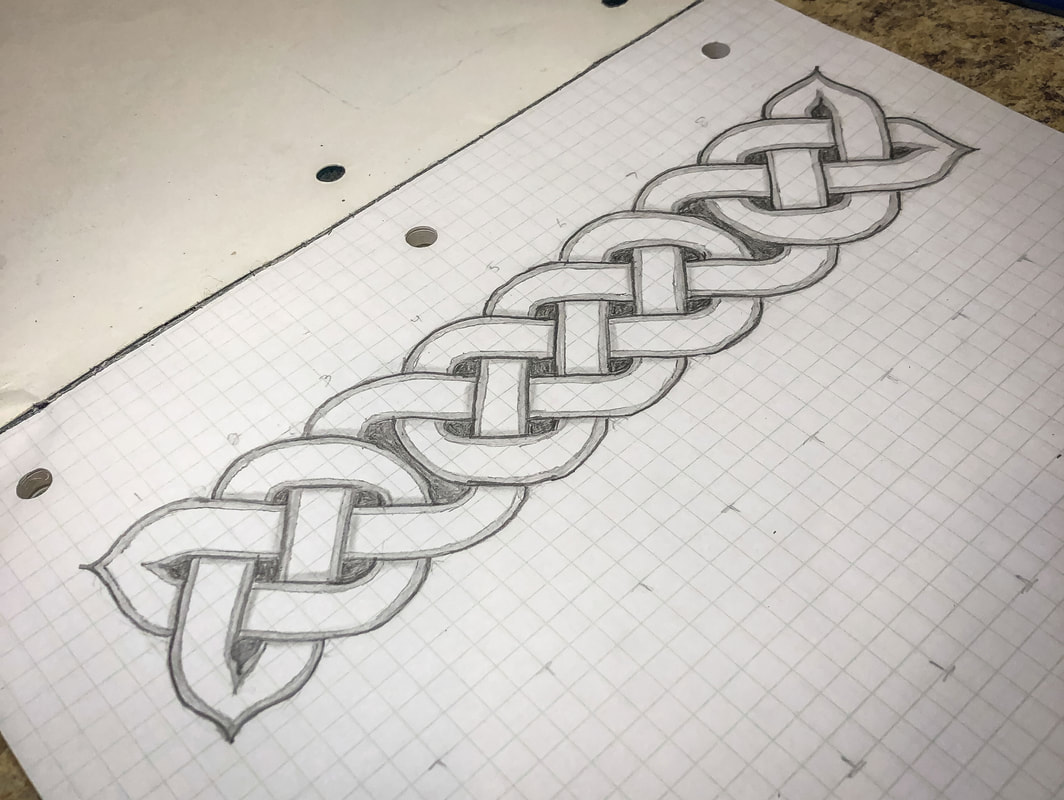 This drawing tutorial is the third in a short series of lessons to teach you how to draw a few variations of Celtic border knots. In lesson one, we learned how to draw a simple twist. In lesson two, we used a grid system to draw a basic braid pattern. In this third tutorial, we will build on what we have learned to create a variation using vertical breaks. Breaks introduce a level of complexity to the design that adds visual interest. There are many ways to add breaks to a border pattern, but today’s lesson will show you how to add two simple vertical breaks to the braid we have previously drawn. Below is a list of supplies you may want on hand (Amazon affiliate links are included), but you certainly don’t have to have all of these supplies to do this tutorial. Just find yourself a piece of paper, a pencil, and an eraser, and let’s get to drawing! Gather your supplies: Drawing pencils Markers Blending stumps Eraser Click eraser Ruler Horse hair brush Grid paper Sketch pad Step 1: Draw a grid of 9 squares across and 2 squares down. Use a ruler If drawing the grid by hand so all the squares end up the same size. 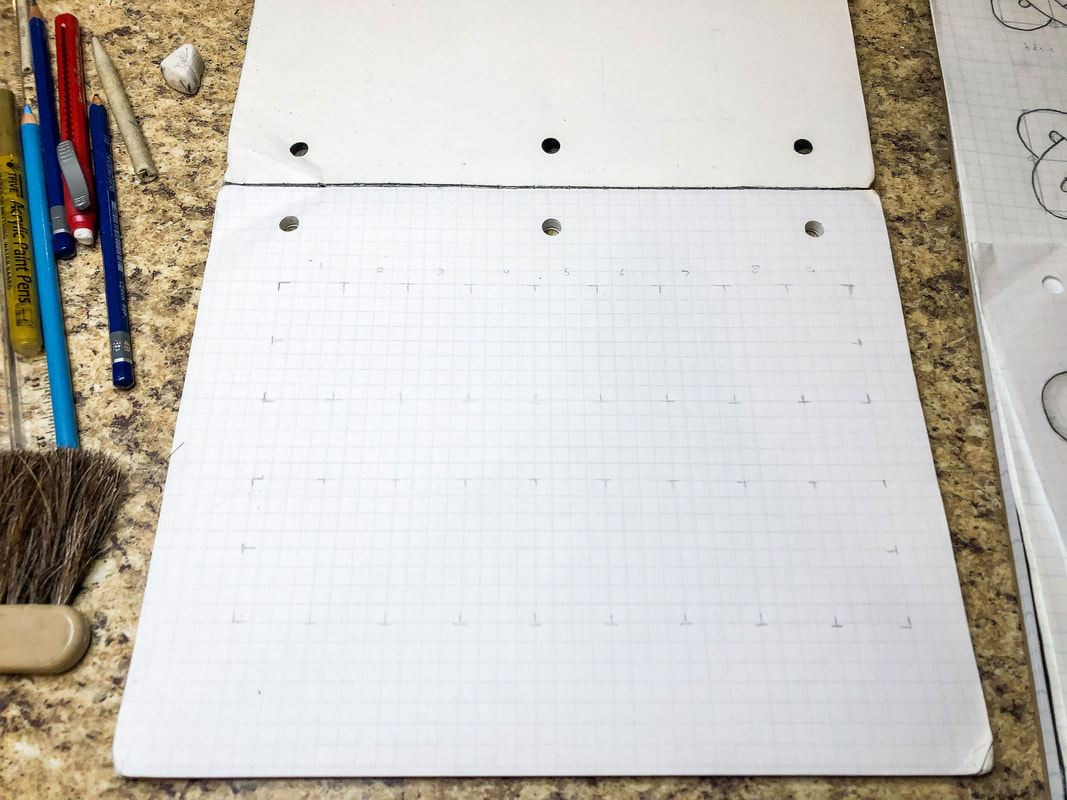 Step 2: Draw circles at the intersections of each corner and then in the middle of each square. Keep the circles the same size. Small circles will give you a thicker thread, while large circles will allow you to create a thinner thread. 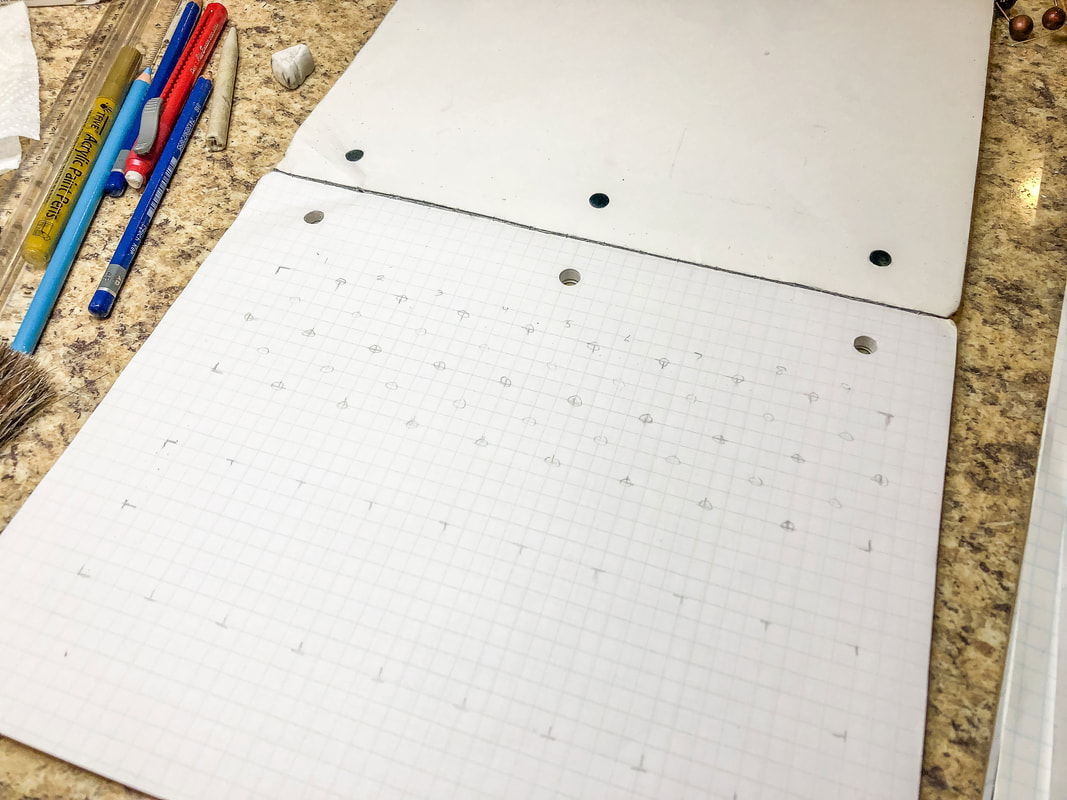 Step 3: Starting from the left, draw a pair of parallel lines touching the inside edges of the first four circles. Find the set of four circles above that first pair of lines, and draw a second set of perpendicular lines. Return to the first pair of lines and create another pair of perpendicular lines to the side, as shown. This sets up an alternating pattern of lines that you will continue across the grid to create a weave. Ignore any places where you only have three circles for now. 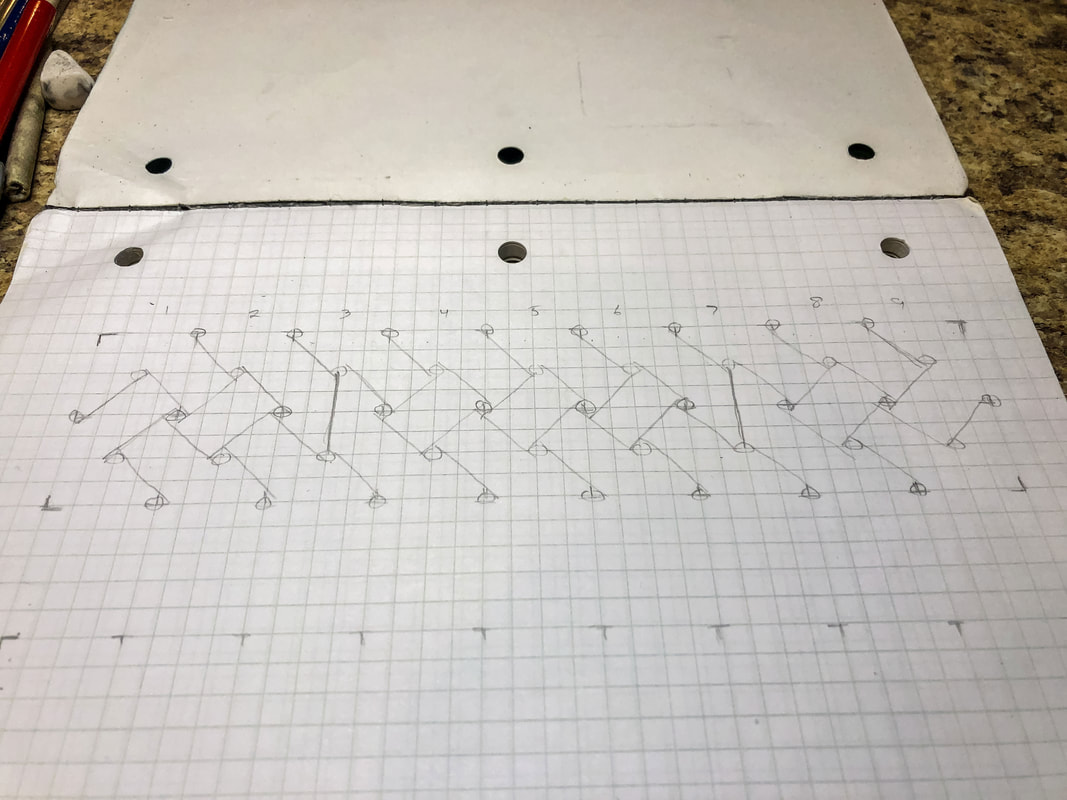 Step 4: Draw a vertical line connecting the two circles in columns 3 and 7, as shown. 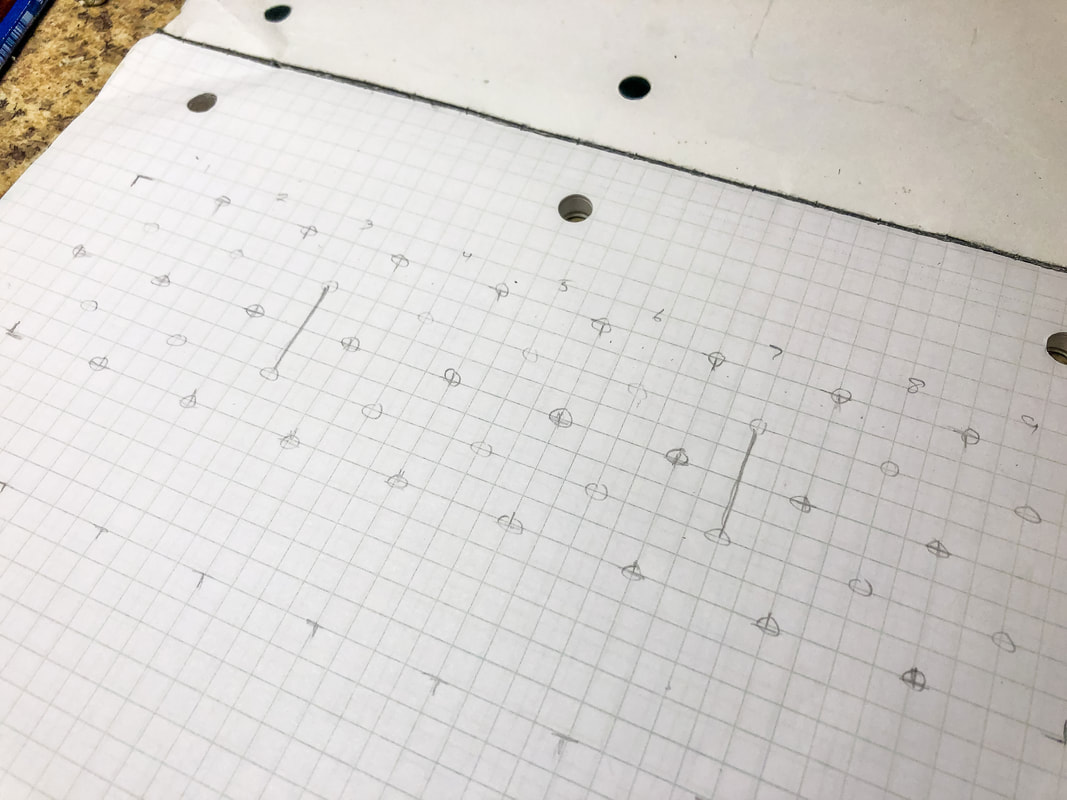 Step 5: Erase any lines that cross over those two new vertical lines, looping them back around to link up with the threads as shown. 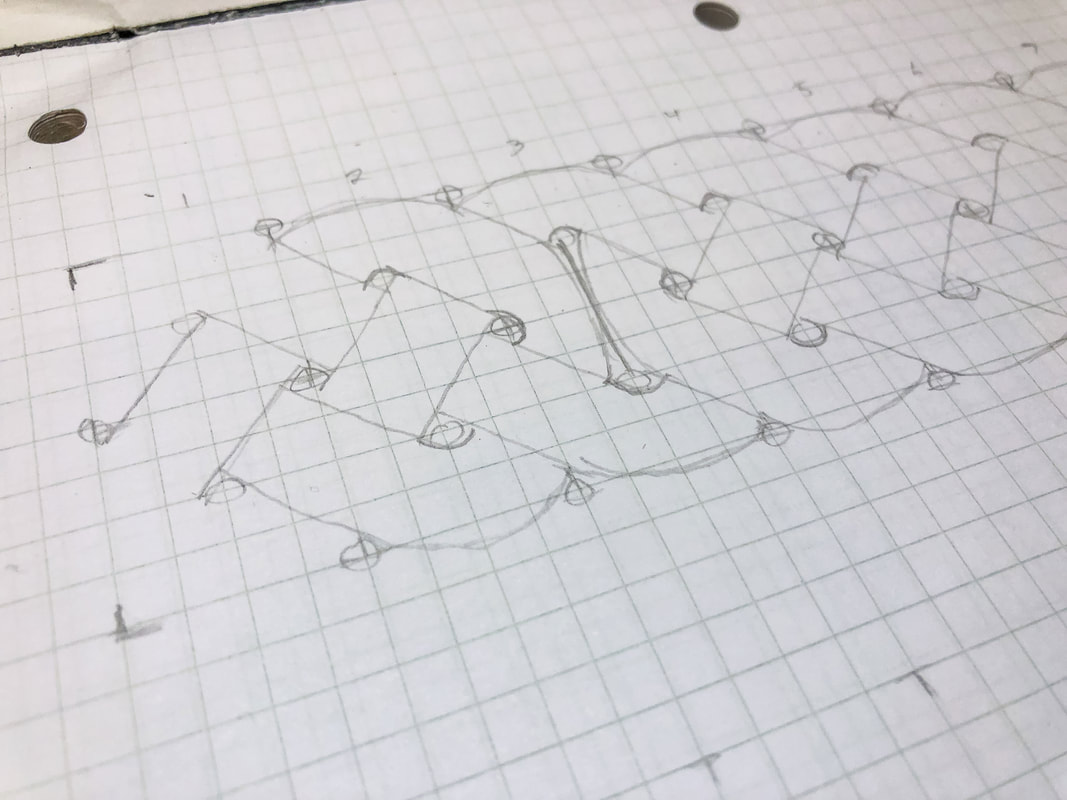 Step 6: Sketch in the top and bottom edges of the loops as shown. 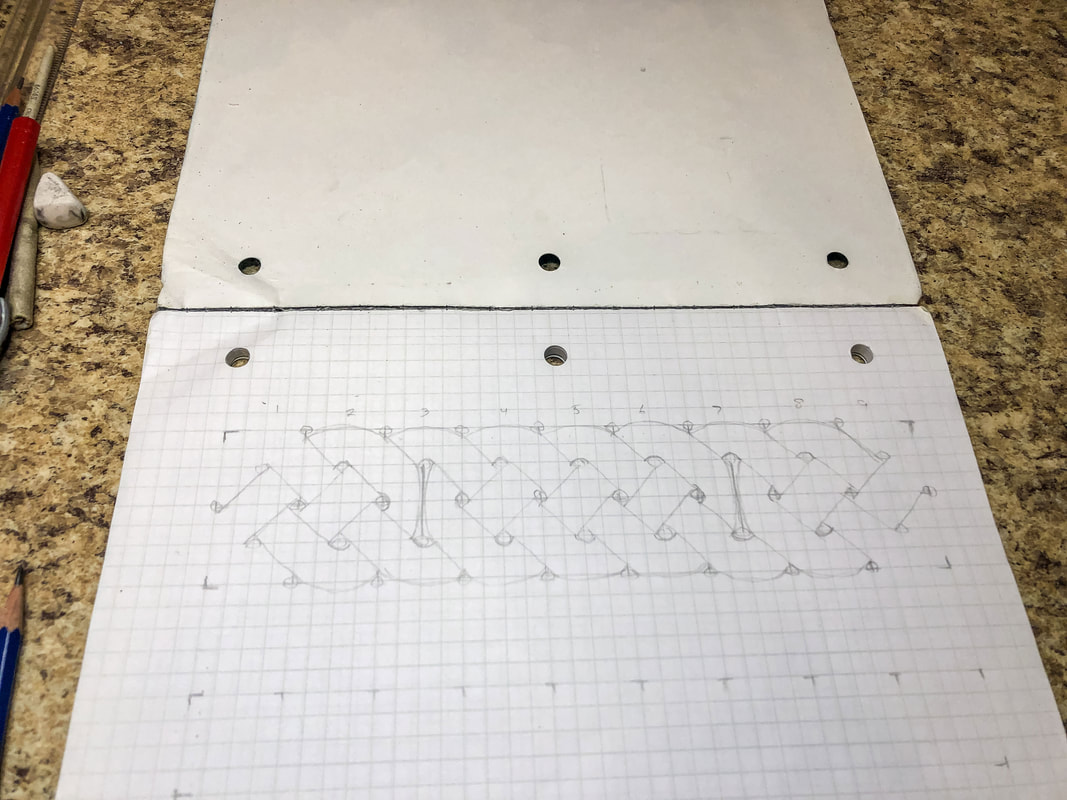 Step 7: Create the loops at each end of the grid. For this design, there will be a loop at each corner. 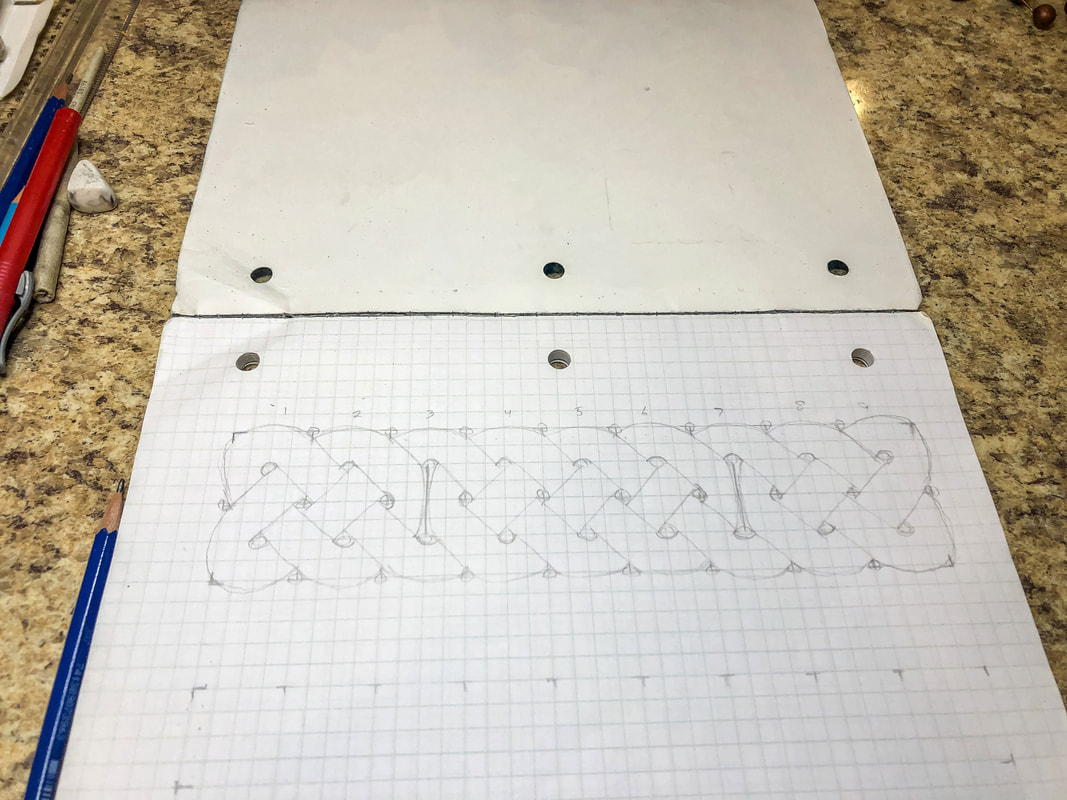 Step 8: Erase any guidelines and trace over the pattern with a darker pencil, creating any stylistic changes you may want. 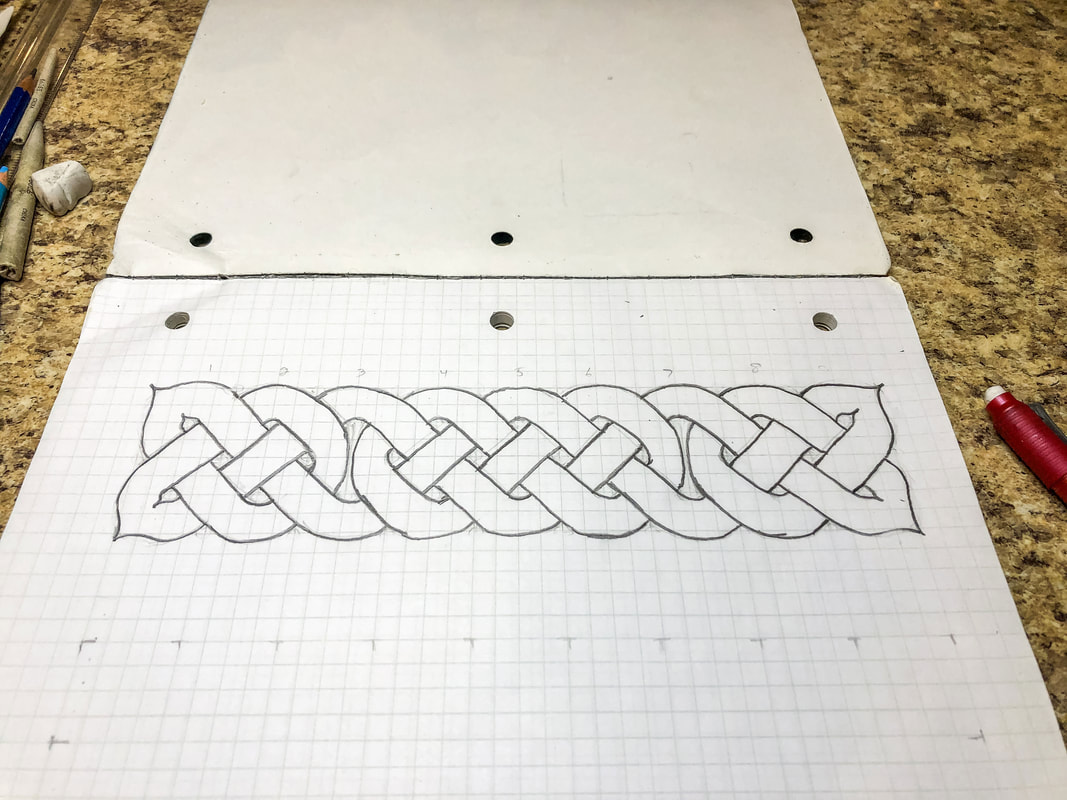 Step 9: Add in the shadows for a 3D effect, blend, and add final details. Go over your finished design with markers if desired. I hope you enjoyed this project and are encouraged to try more designs! I created a YouTube tutorial to go with this blog for those of you who are visual learners like myself! You can view the full video tutorial on my YouTube channel here! Related blogs you may want to read: Basic twist step-by-step drawing tutorial using grid paper Celtic braid step-by-step drawing tutorial Basic border knot with horizontal breaks, step-by-step drawing tutorial DIY chalk-painted tray with Celtic border A fun DIY project with paint and a thrifted mirror part 2 The Celtic Motherhood Knot, a symbol of love Celtic Tree of Life Basic Celtic knot tutorial part 1 Celtic knot tutorial part 2 Some of the posts in this article contain affiliate links. If you click on the link and purchase the item, I will receive an affiliate commission at no extra cost to you. I will only recommend products or services I use personally and/or believe will add value to my readers, so there is no conflict of interest. 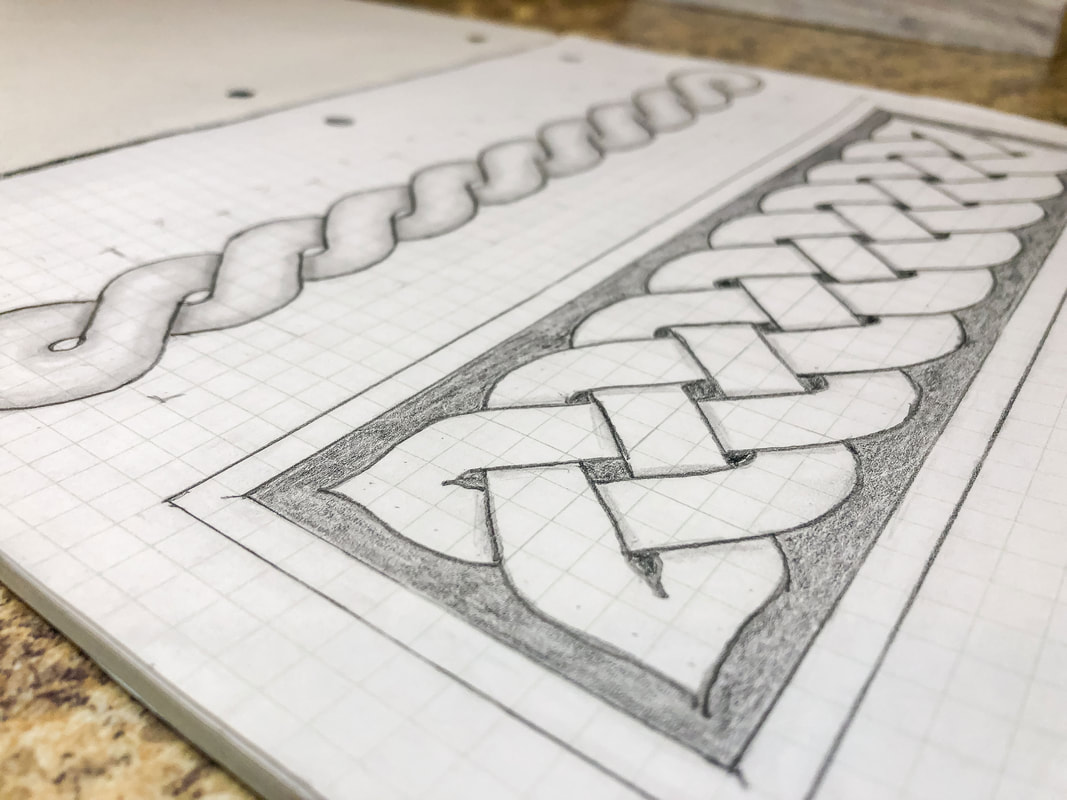 This drawing tutorial is the second in a short series of lessons to teach you how to draw a few variations of Celtic border knots. In the first tutorial, we used a grid system to draw a simple twist. In this blog, we will build on what we have learned in that lesson to create a braid pattern. The braid forms the building block for many Celtic-style borders. Below is a list of supplies you may want on hand (Amazon affiliate links are included), but you certainly don’t have to have all of these supplies to do this tutorial. Just find yourself a piece of paper, a pencil, and an eraser, and let’s get to drawing! Gather your supplies: Drawing pencils Markers Blending stumps Eraser Click eraser Ruler Horse hair brush Grid paper Sketch pad Step 1: Draw a grid of 9 squares across and 2 squares down. Use a ruler If drawing the grid by hand so all the squares end up the same size.  Step 2: Draw circles at the intersections of each corner and then in the middle of each square. Keep the circles the same size. Small circles will give you a thicker thread, while large circles will allow you to create a thinner thread. 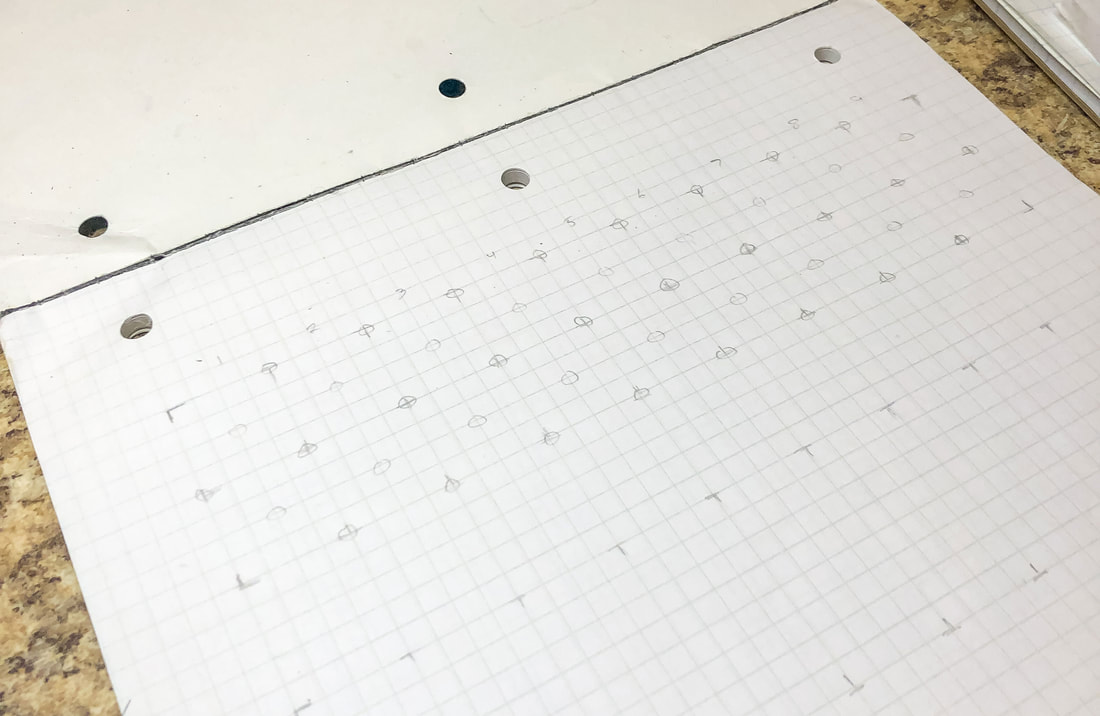 Step 3: Starting from the left, draw a pair of parallel lines touching the inside edges of the first four circles. Find the set of four circles above that first pair of lines, and draw a second set of perpendicular lines. Return to the first pair of lines and create another pair of perpendicular lines to the side, as shown. This sets up an alternating pattern of lines that you will continue across the grid to create a weave. Ignore any places where you only have three circles for now. 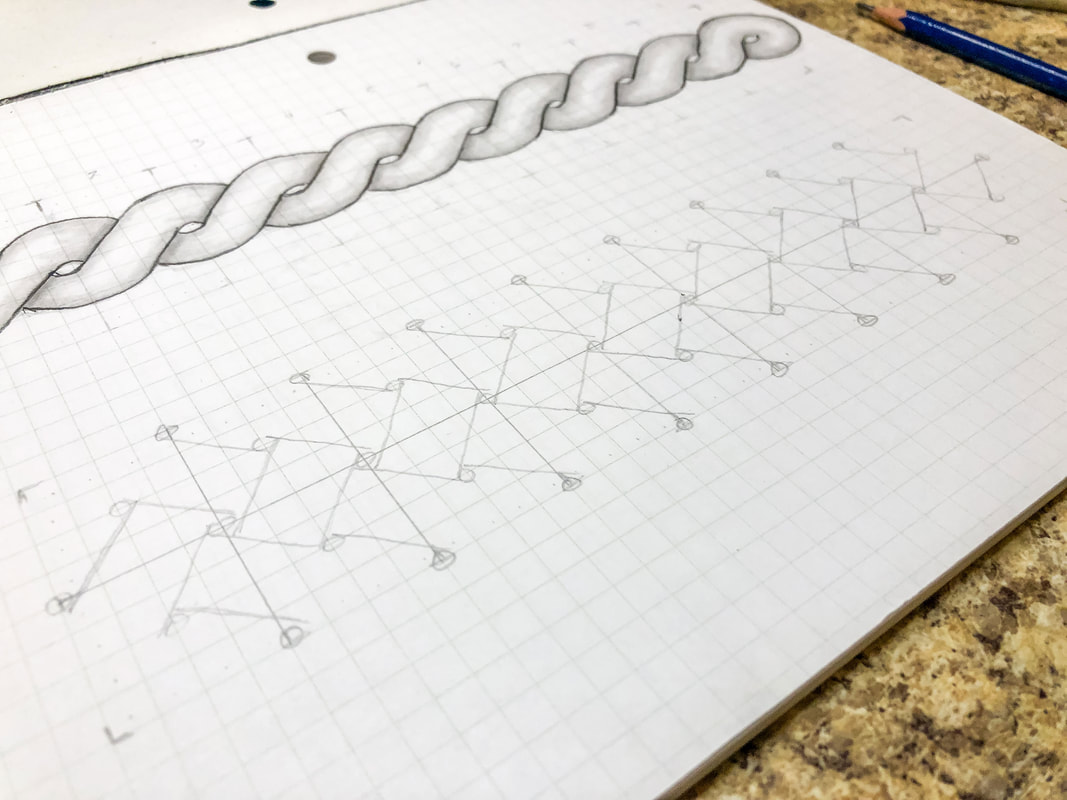 Step 4: Sketch in the top and bottom edges of the loops as shown. 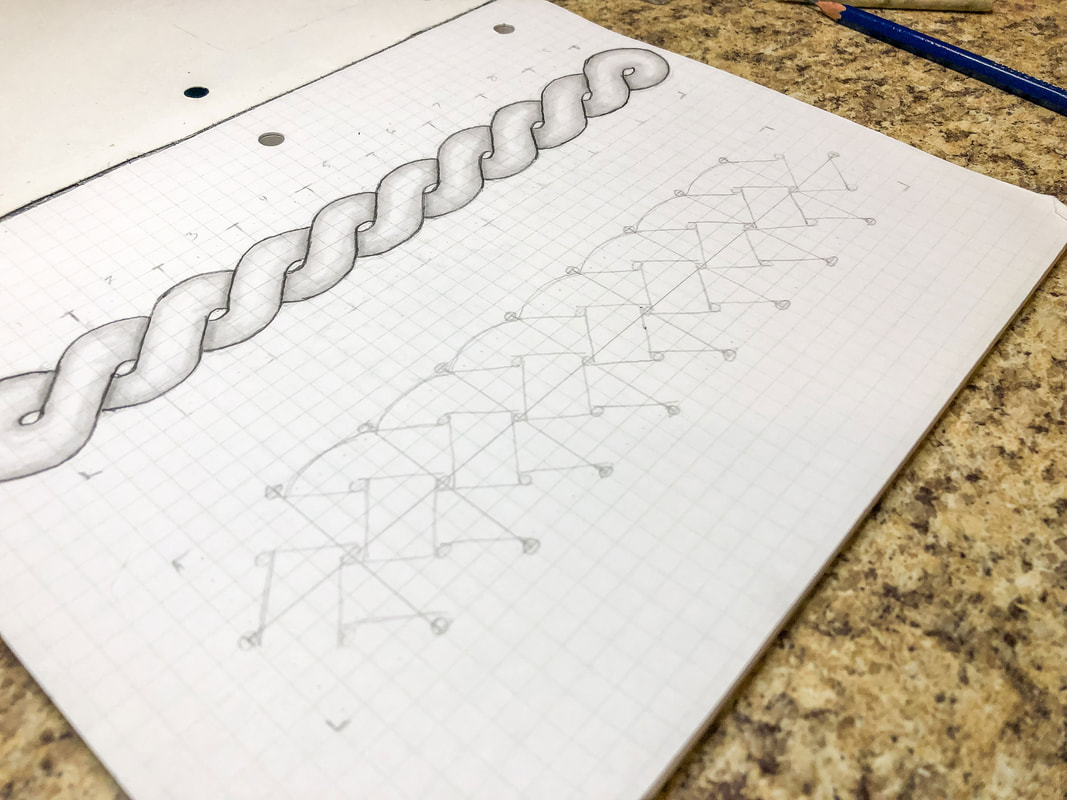 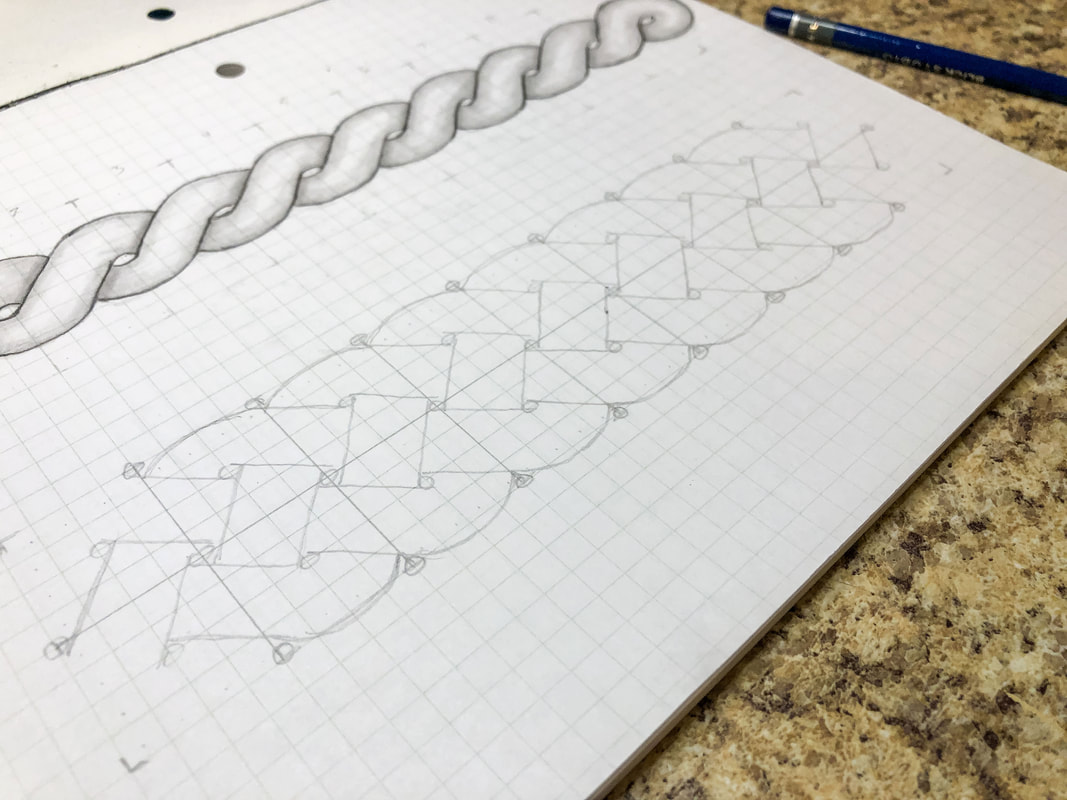 Step 5: Create the loops at each end of the grid. For this design, there will be a loop at each corner. 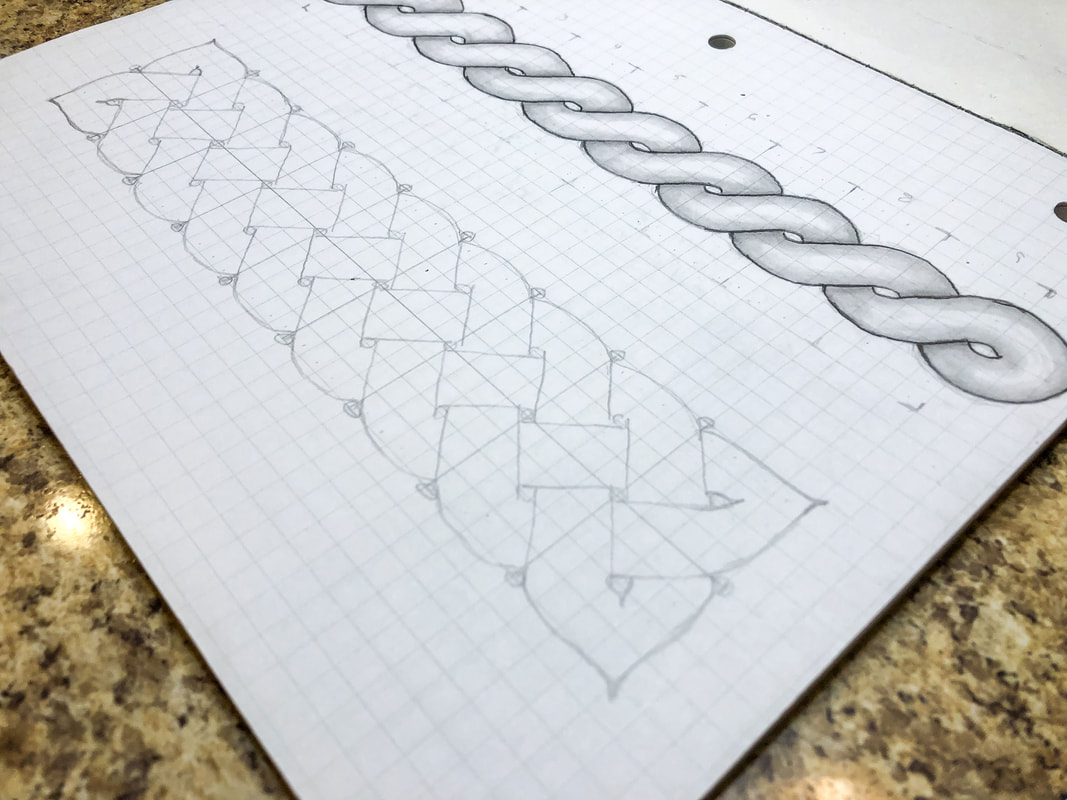 Step 6: Erase any guidelines and trace over the pattern with a darker pencil, creating any stylistic changes you may want. 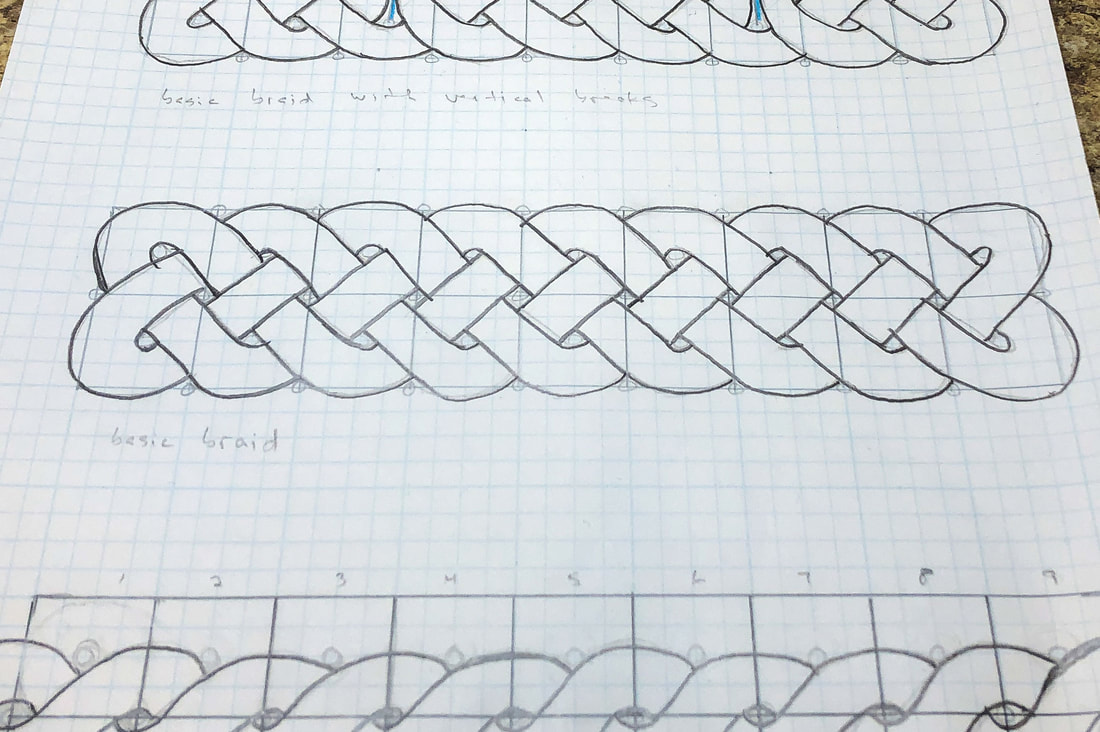 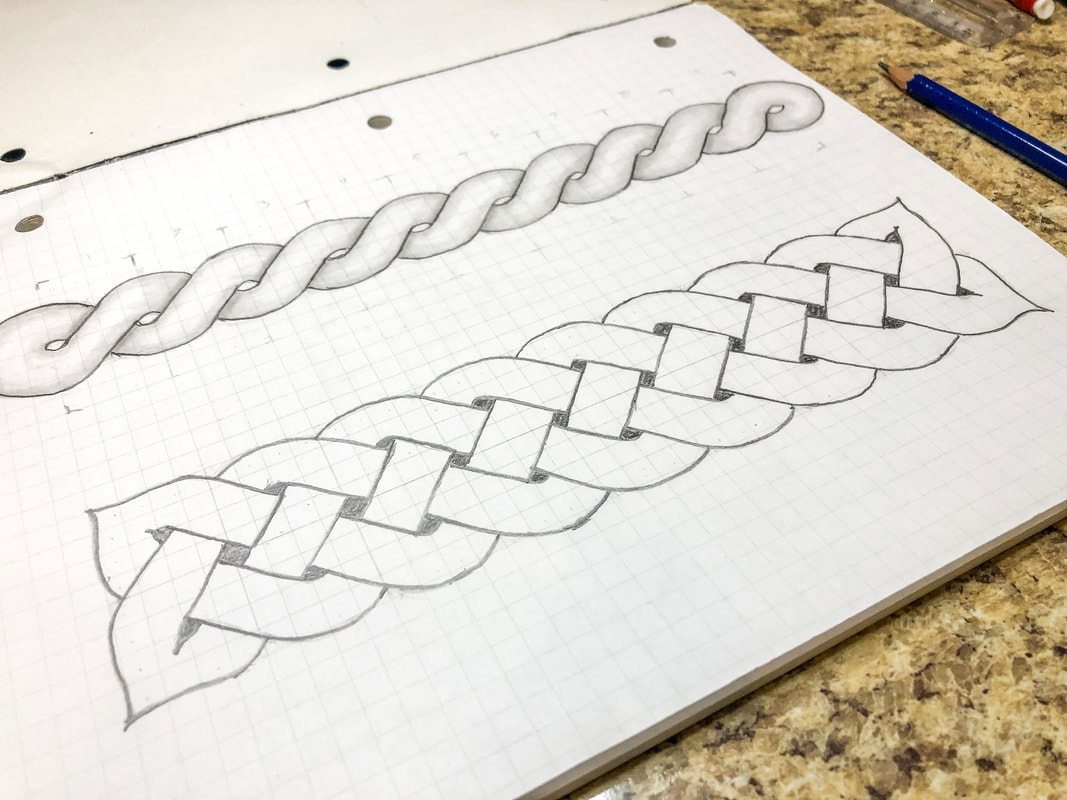 Step 7: Add in the shadows for a 3D effect, blend, and add final details. Go over your finished design with markers if desired. I hope you enjoyed this project and are encouraged to try more designs! I created a YouTube tutorial to go with this blog for those of you who are visual learners like myself! You can view the full video tutorial on my YouTube channel here! Related blogs you may want to read: Basic twist step-by-step drawing tutorial using grid paper Basic border knot with vertical breaks, step-by-step drawing tutorial Basic border knot with horizontal breaks, step-by-step drawing tutorial DIY chalk-painted tray with Celtic border A fun DIY project with paint and a thrifted mirror part 2 The Celtic Motherhood Knot, a symbol of love Celtic Tree of Life Basic Celtic knot tutorial part 1 Celtic knot tutorial part 2 Some of the posts in this article contain affiliate links. If you click on the link and purchase the item, I will receive an affiliate commission at no extra cost to you. I will only recommend products or services I use personally and/or believe will add value to my readers, so there is no conflict of interest. 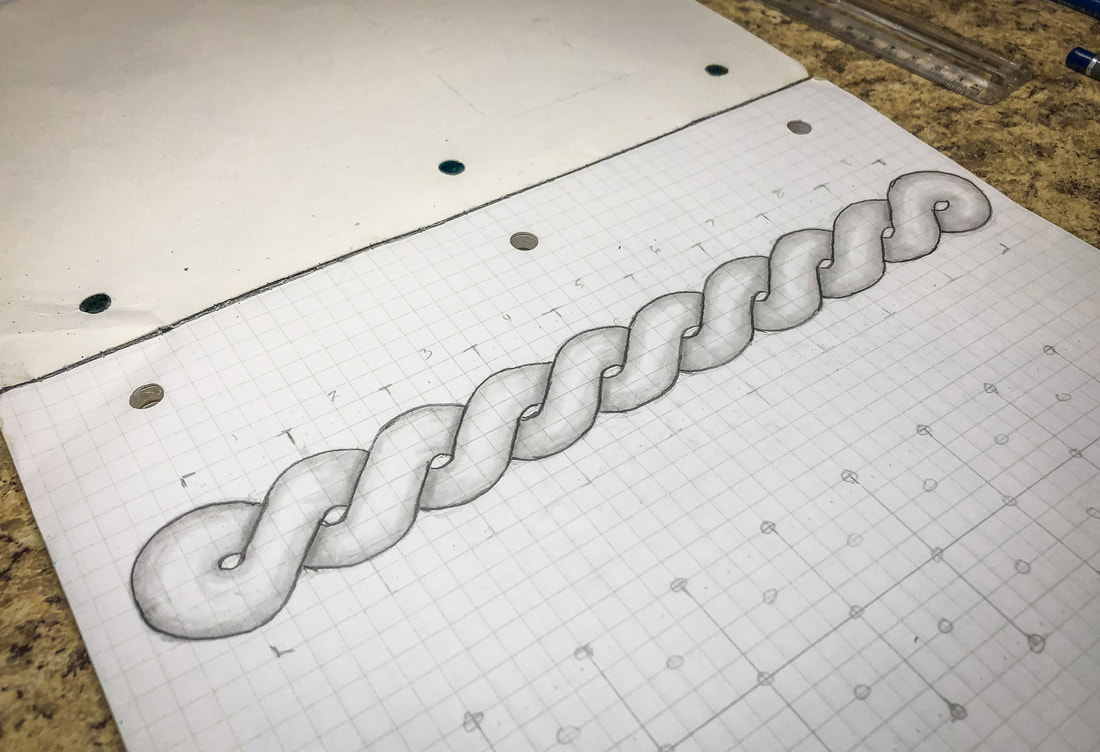 This drawing tutorial is the first in a short series of lessons to teach you how to draw a few variations of Celtic border knots. This first tutorial will show you how to draw a simple twist. The twist is not a Celtic style, but the tutorial series will build on this simple pattern, creating more complex weave patterns as we go. Twist borders can be found in many ancient art forms, such as Roman mosaics, and are easy to draw. If you use grid paper—or draw out a grid with guidelines—you will get a perfectly symmetrical twist every time! Below is a list of supplies you may want on hand (Amazon affiliate links are included), but you certainly don’t have to have all of these supplies to do this tutorial. Just find yourself a piece of paper, a pencil, and an eraser, and let’s get to drawing! Gather your supplies: Drawing pencils Markers Blending stumps Eraser Click eraser Ruler Horse hair brush Grid paper Sketch pad Step 1: Draw a grid of 9 squares across and 2 squares down. Use a ruler if drawing the grid by hand so all the squares end up the same size.  Step 2: Draw circles at the intersections of each corner and then in the middle of each square. Keep the circles the same size. Small circles will give you a thicker thread, while large circles will allow you to create a thinner thread. 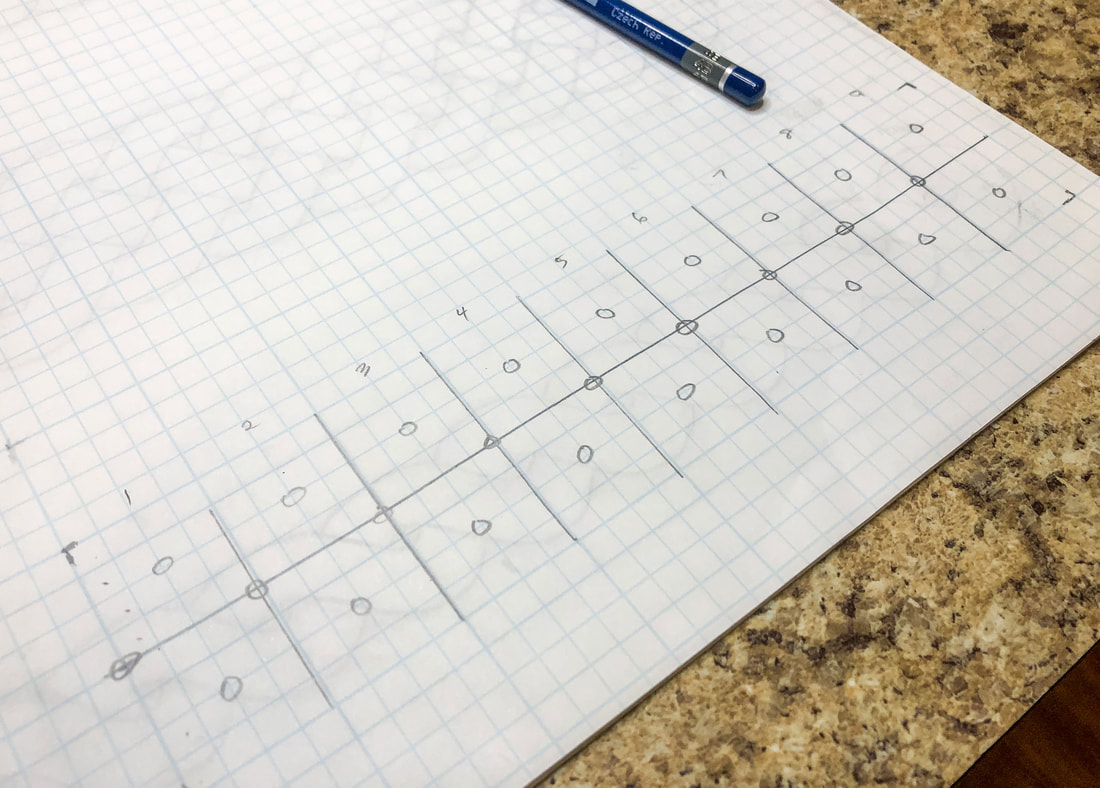 Step 3: Starting from the left, draw a pair of parallel lines touching the inside edges of the first four circles. Do this for each set of four circles across the grid. 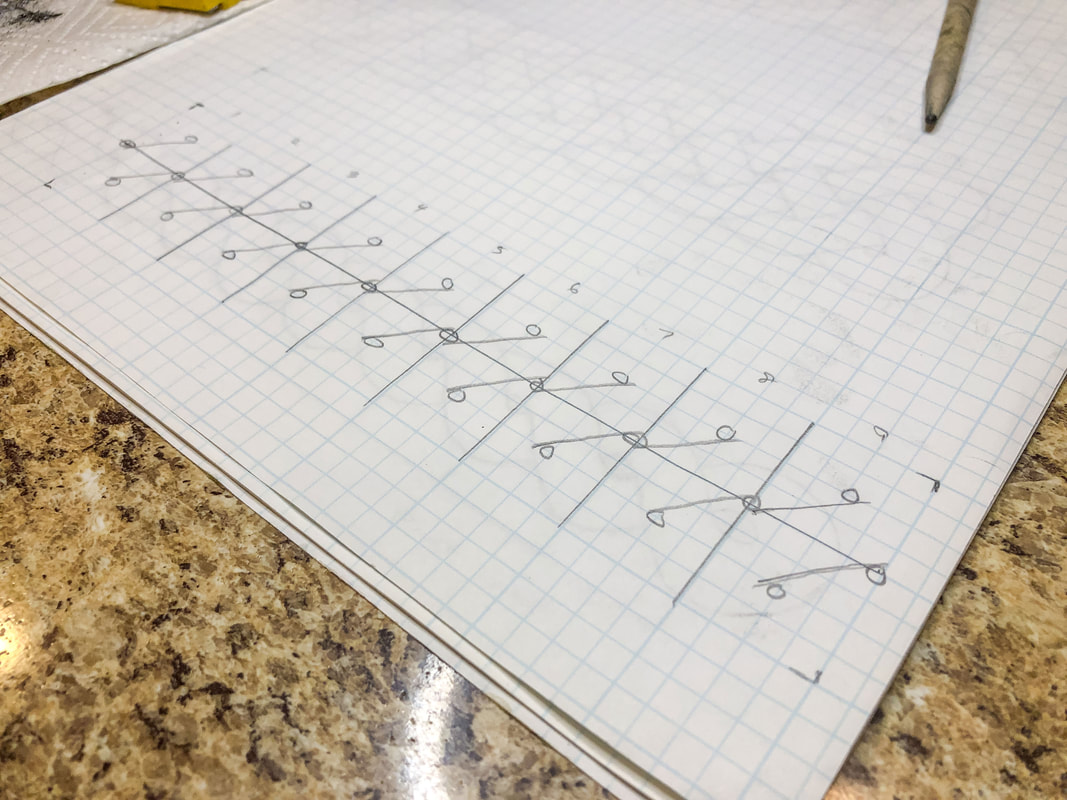 Step 4: Sketch in the top and bottom edges of the loops as shown. 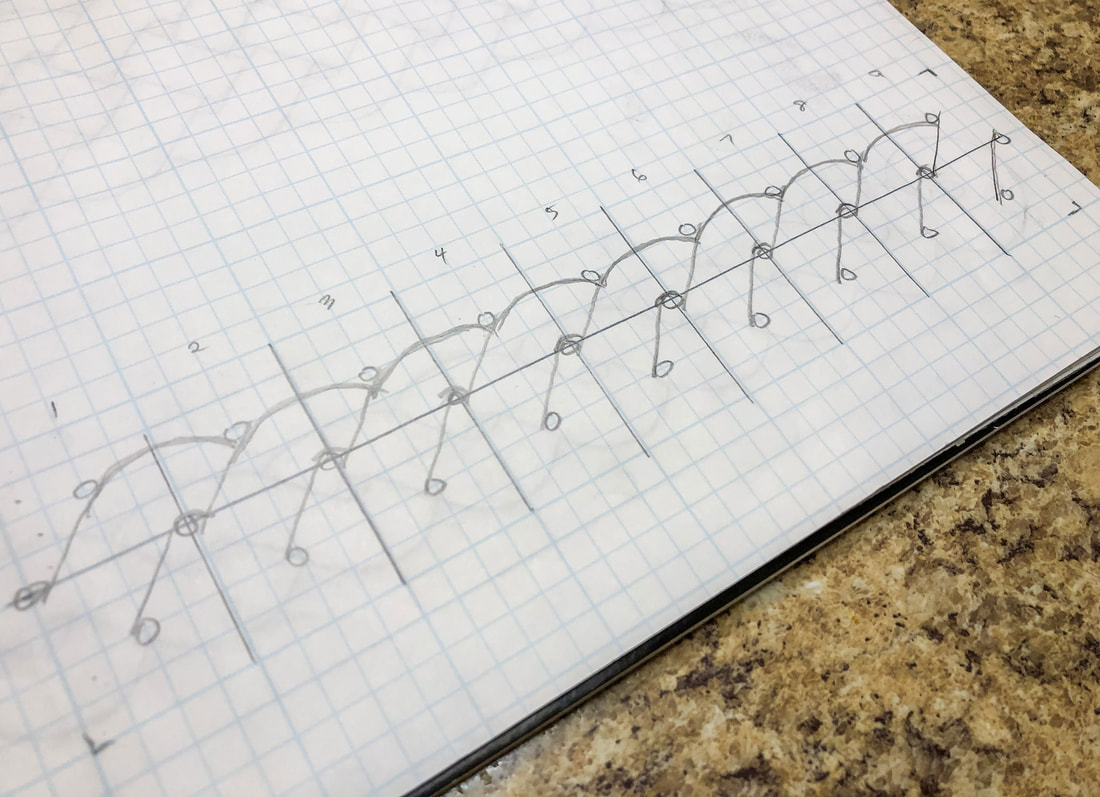 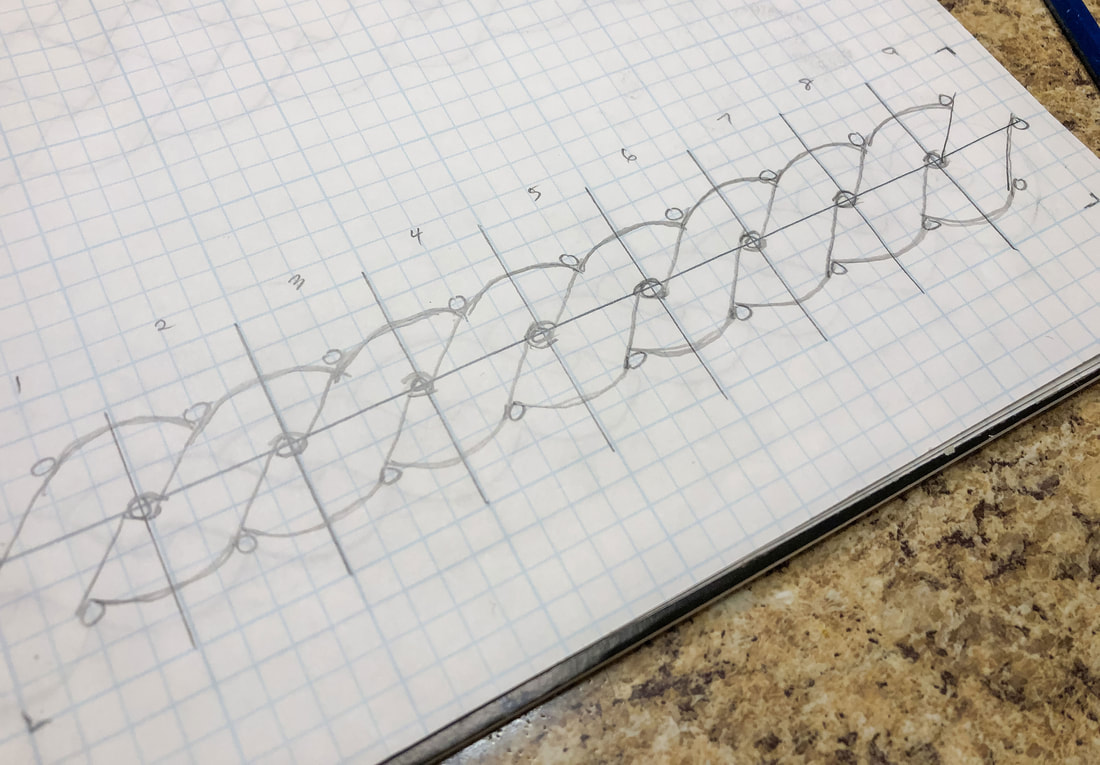 Step 5: Connect the loops at the two ends as shown. 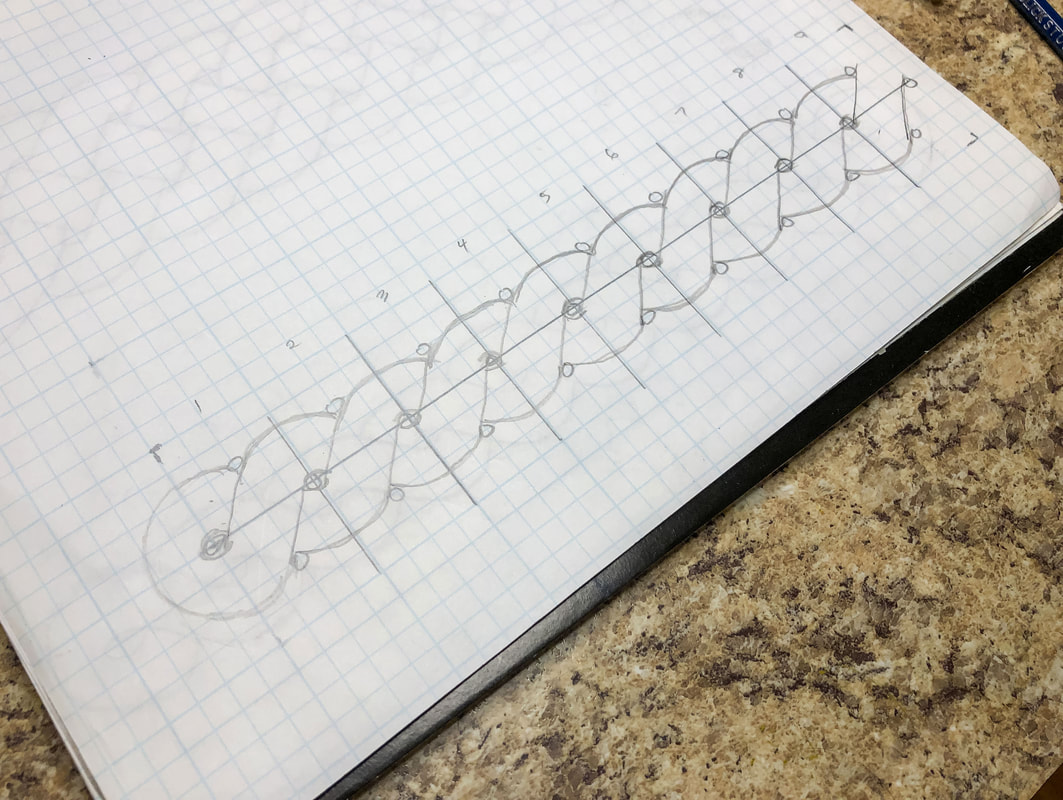 Step 6: Erase any guidelines and trace over the twist pattern with a darker pencil, creating any stylistic changes you may want. 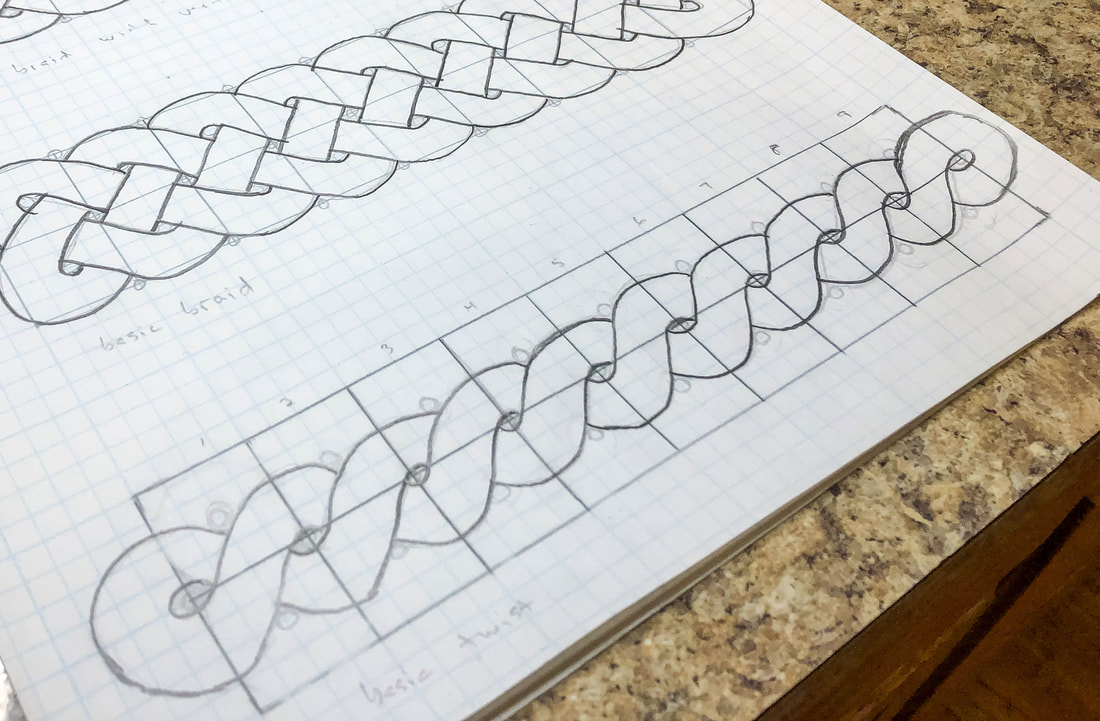 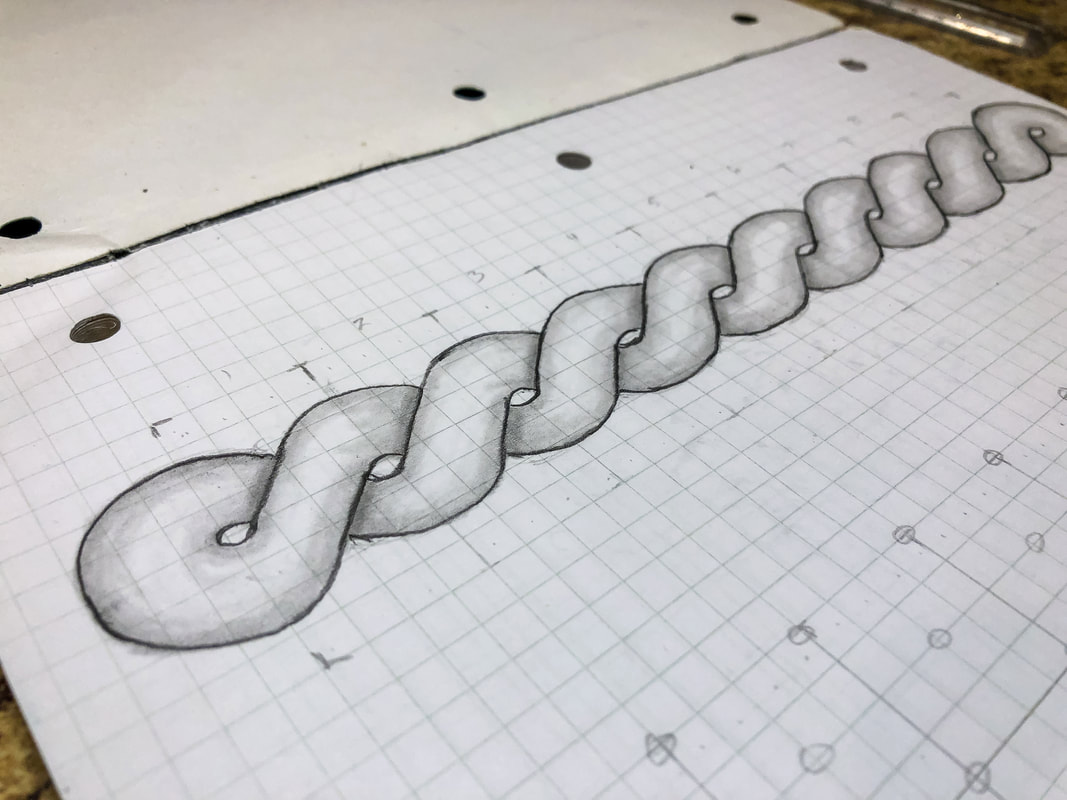 Step 7: Add in the shadows for a 3D effect, blend, and add final details. Go over your finished design with markers if desired. I hope you enjoyed this project and are encouraged to try more designs! I created a YouTube tutorial to go with this blog for those of you who are visual learners like myself! You can view the full video tutorial on my YouTube channel here! Related blogs you may want to read: Celtic braid step-by-step drawing tutorial Basic border knot with vertical breaks, step-by-step drawing tutorial Basic border knot with horizontal breaks, step-by-step drawing tutorial DIY chalk-painted tray with Celtic border A fun DIY project with paint and a thrifted mirror part 2 The Celtic Motherhood Knot, a symbol of love Celtic Tree of Life Basic Celtic knot tutorial part 1 Celtic knot tutorial part 2 Some of the posts in this article contain affiliate links. If you click on the link and purchase the item, I will receive an affiliate commission at no extra cost to you. I will only recommend products or services I use personally and/or believe will add value to my readers, so there is no conflict of interest. Check out these 10 decor items from Amazon for inspiration! 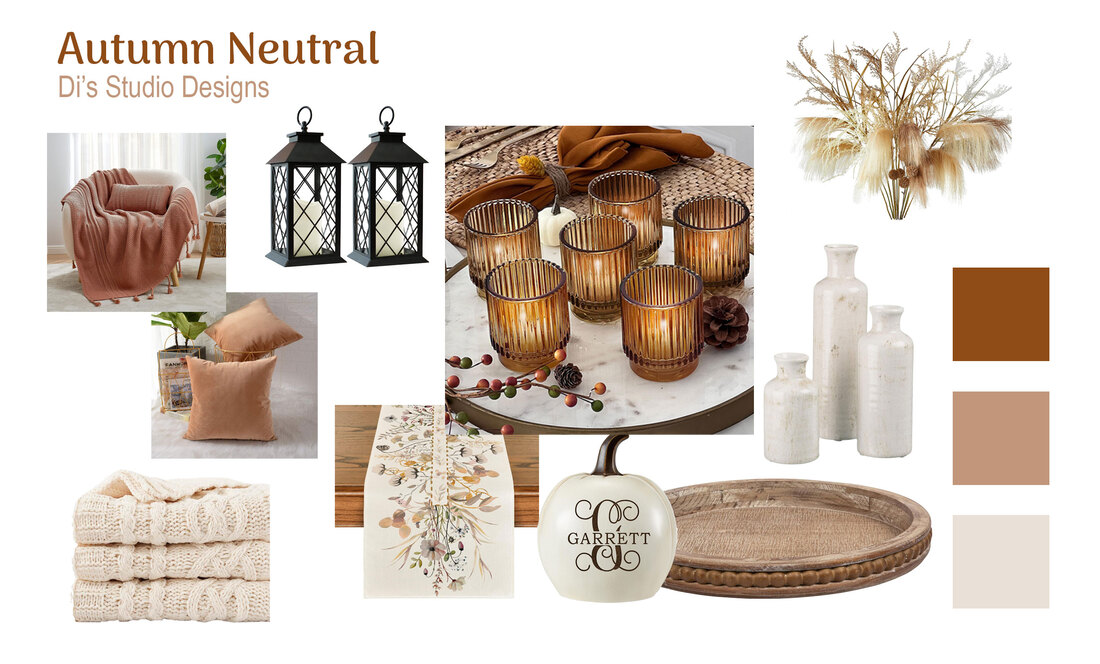 Images from Amazon.com. Click the links below to view or purchase. Some of the posts in this article contain affiliate links. If you click on the link and purchase the item, I will receive an affiliate commission at no extra cost to you. I will only recommend products or services I use personally and/or believe will add value to my readers, so there is no conflict of interest. Fall is the perfect time to bring a little hygge into your home! This decorating season can be an opportunity to create a warm, cozy interior space that lasts through the fall and winter months. Neutral earthy colors—like camel, cream, khaki, off-white, tan, taupe, beige, and white—create an interior space that is relaxed and understated for a place to unwind and retreat from the hectic rush of life. Check out these items from my mood board for inspiration! Item 1—Vintage Candle Lantern with LED Pillar Candle by Bright Zeal Lanterns are a perfect opportunity to introduce cozy candles into your space. These black lanterns with LED pillar candles can be hung or set on a mantle or tabletop. Use as is or decorate with faux florals for the season or holiday. 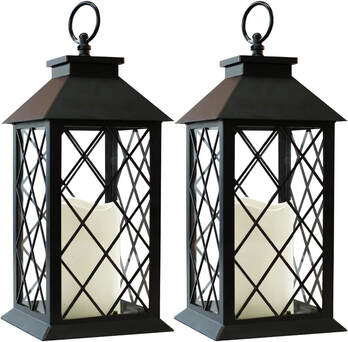 Item 2—Honeycomb Knit Throw Blanket by Cozy Bliss This rust-colored blanket feels warm and organic with its unique tassels. The honeycomb knit texture provides texture and visual interest to a neutral color scheme. 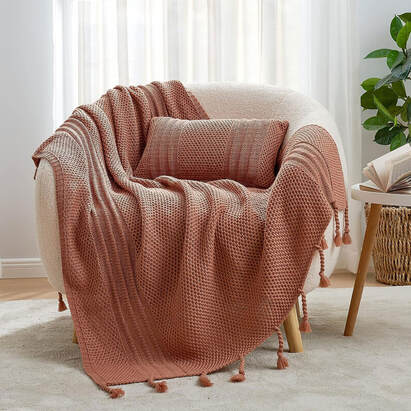 Item 3—Velvet Soft Decorative Square Throw Pillow Covers by MERNETTE How about these luscious pillow covers?! The velvet finish is luxurious, cozy, and inviting, and the neutral light brown color reminds me of a hot winter beverage! 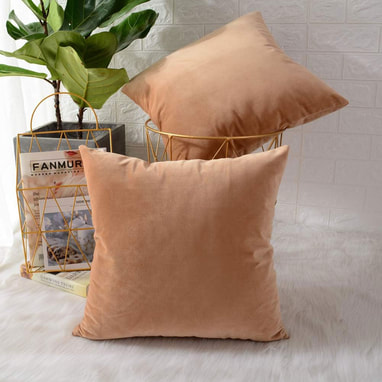 Item 4—Woven Chenille Knit Cream Throw Blanket by Battilo Create more layers of texture with this woven knit chenille cream throw blanket. Use this blanket with the honeycomb throw and light brown pillows on your living room sofa and chairs.  Item 5—Wildflower Leaves Floral Fall Table Runner by Artoid Mode This fall table runner has a soft floral design in neutral brown, green, and rose on a cream background. The pattern breaks up the otherwise solid color scheme by adding visual interest to your dining room table. 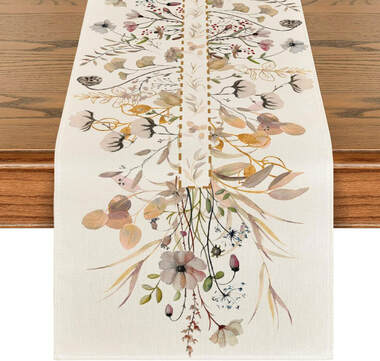 Item 6—Personalized Light Up Pumpkin by Let’s Make Memories These light-up resin pumpkins can be a unique way to personalize your space, and the cream color is perfect for a neutral palette. The pumpkins use remote-operated LED lights. 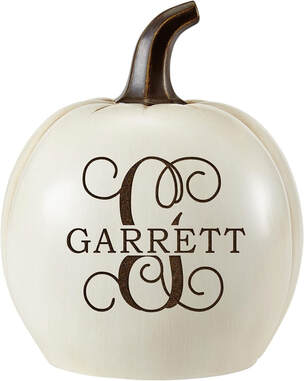 Item 7—Decorative Wood Tray by Creative Co-Op Use this 16”D wood tray to create cozy fall vignettes on a coffee table. The natural wood provides the ideal base for books, flower vases, candles, figurines, or any other cozy decor. 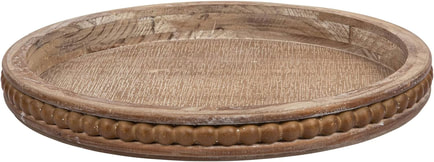 Item 8—Vintage Ribbed Amber Glass Tealight & Votive Candle Holders by Kate Aspen The ribbed glass of these tea light votive holders will undoubtedly radiate a soft, warm glow into your space on a crisp, fall evening. When not lit with candles, the amber votive holders will look right at home with the rest of your earthy, fall decor. 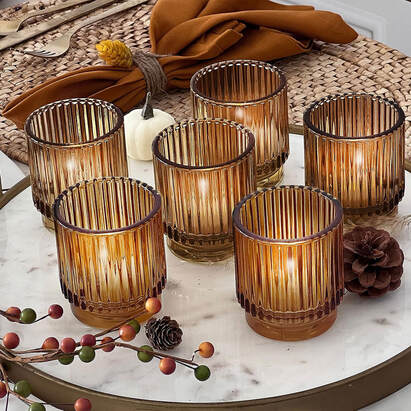 Item 9—White Ceramic Vase Set by Sullivans The distressed finish of these ceramic vases adds to the warm organic feel of the space and provides an excuse to add in seasonal florals. 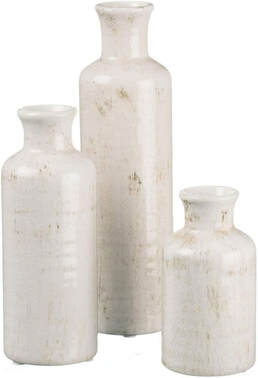 Item 10—Fall Pampas Grass by Anna’s Whimsy Pampas grass is having a moment this year! The whimsical drooping branches and neutral colors of this pampas grass would be right at home in the stone vases mentioned earlier or in any other vase that finishes off your cozy fall space! 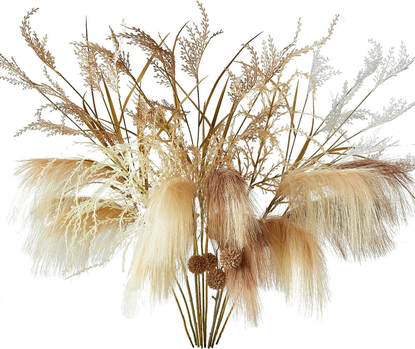 Related blogs you may want to read: Dark Academia Decor for the Fall Brighten up your autumn decor with these items! Pastel decorating ideas for autumn Inspirational ideas for creating that cozy autumn boho style Need ideas for incorporating the color blue into your fall decor? Nine hygge decor ideas Winter color palette ideas for your home decor Design concept for a dreamy coastal interior Let’s talk Bohemian 11 Rustic yet bright decor items for this fall season from Amazon! 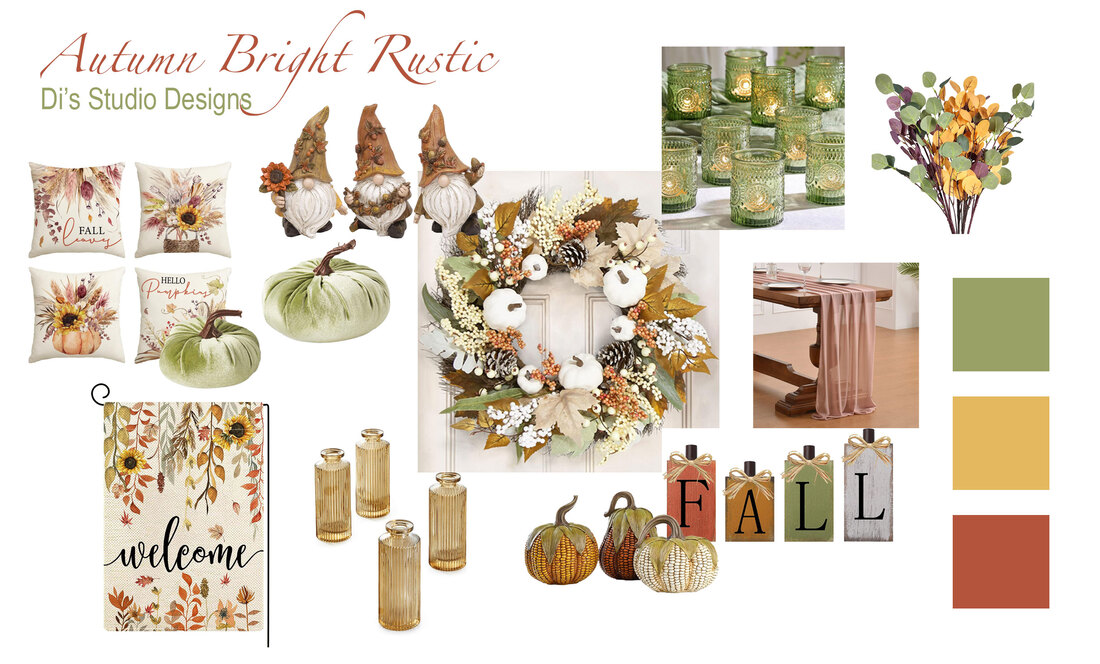 Images from Amazon.com. Click the links below to view or purchase. Some of the posts in this article contain affiliate links. If you click on the link and purchase the item, I will receive an affiliate commission at no extra cost to you. I will only recommend products or services I use personally and/or believe will add value to my readers, so there is no conflict of interest. When August rolls into September, that is the cue for most of us to pull out those fall decorations to make our homes look festive for the season. Some of us love decorating our homes with bold red, orange, and yellow hues that embody the essence of this glorious season of the year. But if that’s a bit much for you, you can still achieve the look and feel of fall with a slightly less bold—but still bright—color palette. The key is to choose muted rustic tones of the typical vibrant fall decor colors to soften the look. Here are a few ideas below to get you started! Item 1—Fall Pumpkin Wheat Cotton Throw Pillow Covers by AVOIN colorlife These dusty rose, pale orange, yellow, and olive green pillow covers work well with a rustic, Farmhouse, or country decor style. 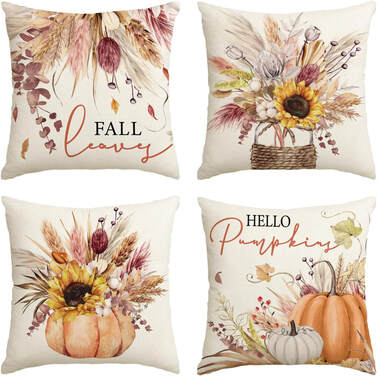 Item 2—Fall Gnomes Resin Figurines by Valery Madelyn Am I the only one who is crushing on gnomes this year?! Check out these resin gnomes with fall leaves and acorns in muted brown, green, orange, and yellow. Group them or use them separately in vignettes. 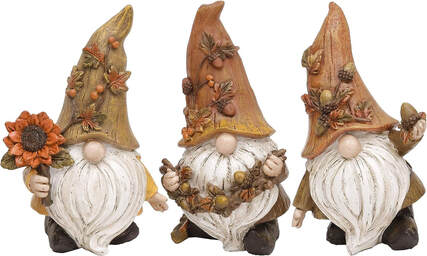 Item 3—Plush Green Velveteen Pumpkins by LampLust Add a little opulence to your autumn decor with these light green pumpkins with luxurious velvet fabric! This pair of pumpkins can sit on a table, mantle, or fireplace hearth. 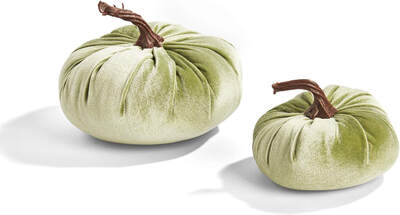 Item 4—Fall Floral Welcome Garden Flag by ORTIGIA Entice visitors into your home with this rustic garden flag! Maple leaves, sunflowers, and strands of fall leaves in muted yellow, orange, and green set the stage for the indoor color scheme. 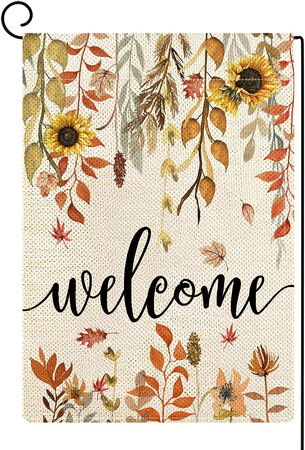 Item 5—Amber Pleated Bud Vases by Serene Spaces Living These glass bud vases come in two sizes, allowing you to create dimension to your table. Mix them with other decorative elements in vignettes and tablescapes to create a rustic but slightly elegant feel to your space. 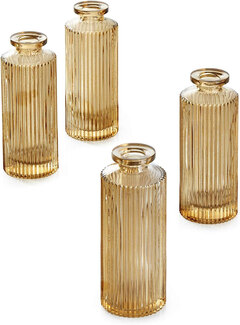 Item 6—18 Inch Autumn Maples Leaf Pumpkin Pine Cone Berry Wreath by ORIENTAL CHERRY This gorgeous door wreath will welcome visitors into your home with maple leaves, white pumpkins, pinecones, and eucalyptus leaves accented with white, cream, and orange berries. 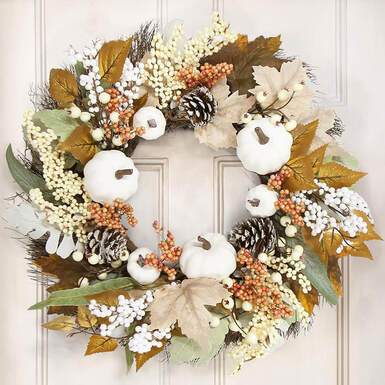 Item 7—Corn Pumpkin Resin Figurines by Valery Madelyn These resin pumpkins with unique corn kernel textures are so unique! The pale orange, rust, and ivory colors are also perfect for a more subtle fall color scheme. 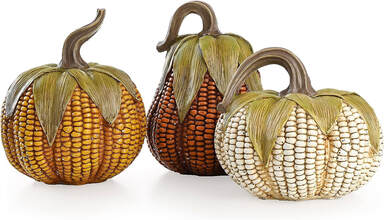 Item 8—Fall Block Sign by CYNOSA Add a handcrafted feel to your fall vignette with this rustic block sign with raffia bows! 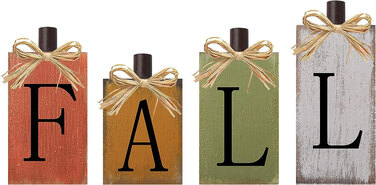 Item 9—Dusty Rose Chiffon Table Runner by LINXTAR The lightweight chiffon fabric in this dusty rose table runner keeps your dining decor light and airy. Stretch this long runner across a large table or gather the fabric to create a unique tablescape.  Item 10—Green Glass Votive Candle Holders by DEVI Combine these green glass tea light holders with the gold glass bud vases for welcoming fall vignettes and tablescapes! 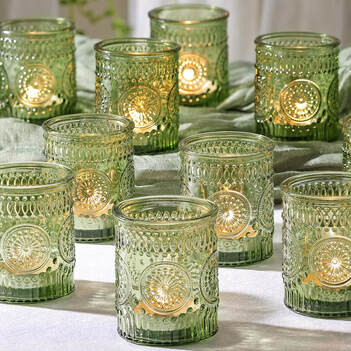 Item 11—Artificial Eucalyptus Stems by QIANYUN The colors in these silk eucalyptus stems work well with a rustic fall decor scheme! Place them in a vase on a mantle or living room coffee table to finish this fall look! 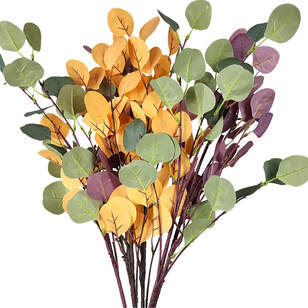 Related blogs you may want to read: Dark Academia Decor for the Fall Create a cozy relaxing interior space this fall with neutral colors Pastel decorating ideas for autumn Inspirational ideas for creating that cozy autumn boho style Need ideas for incorporating the color blue into your fall decor? Nine hygge decor ideas Winter color palette ideas for your home decor Design concept for a dreamy coastal interior Let’s talk Bohemian Keep things soft and understated this fall season with these 10 home decor items from Amazon! 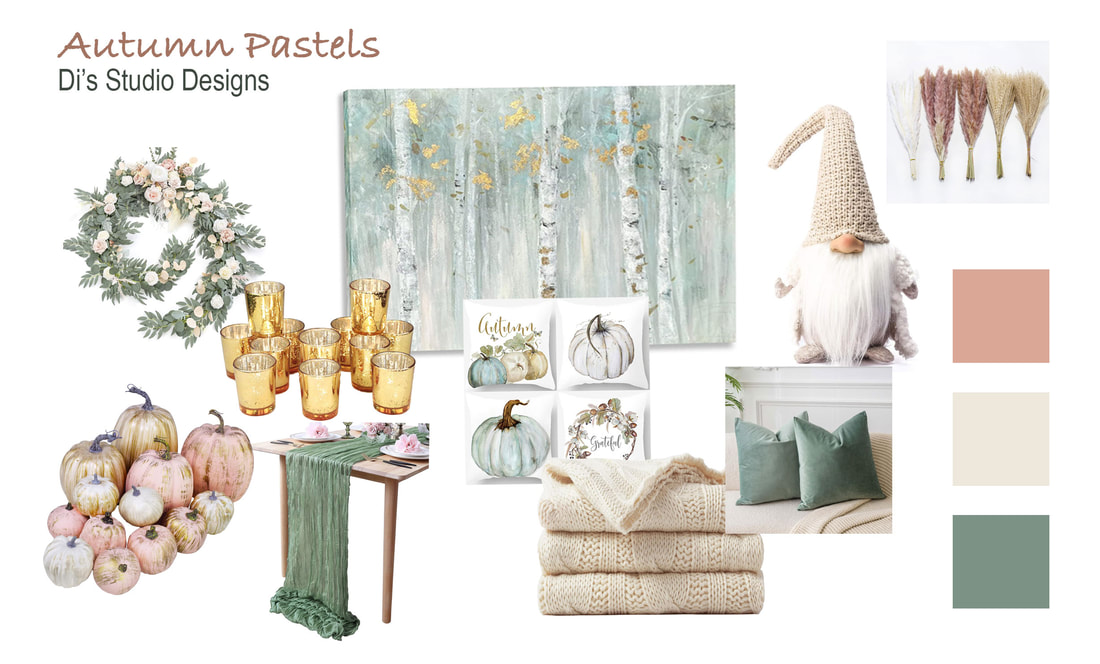 Images from Amazon.com. Click the links below to view or purchase. Some of the posts in this article contain affiliate links. If you click on the link and purchase the item, I will receive an affiliate commission at no extra cost to you. I will only recommend products or services I use personally and/or believe will add value to my readers, so there is no conflict of interest. If experimenting with a softer color palette this fall is on your agenda, this blog article is for you! Most fall home decor and accents in stores and advertising come in the typical vibrant oranges, reds, and yellows or the Farmhouse style that pairs white with black or orange. And there’s nothing wrong with that if that color scheme inspires you or works well with your existing decor. But there are other options… Pastel decor is usually associated with spring and Easter, but Pinterest has opened my eyes to a different way of thinking about seasonal decor. You can absolutely use pastel colors in the fall! I combed through selections on Amazon to put together an inspirational mood board to help you brainstorm a look for your own space. The key is to bring in accent pieces that speak to the season, such as pumpkins, fall leaves, and a few rustic elements that add a touch of coziness to the look. Here are a few items you may want to consider... Item 1—Artificial Gold Brushed White and Pink Pumpkins by Winlyn While you could use simple white pumpkins in this color scheme, why not add a little pink? These white and pastel pink foam pumpkins brushed with gold come in various sizes for use in tablescapes and vignettes. 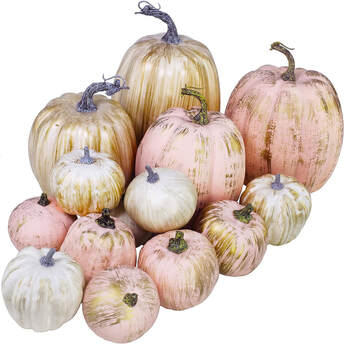 Item 2—Dusty Sage Green Cheesecloth Table Runner by Generic This 13-foot table runner is long enough for multiple styling ideas. Create a rustic or elegant look depending on your overall decor style using creative draping or gathering techniques. The sage green goes well with a pastel color palette and provides the perfect foundation for styling a fireplace mantle or dining room table.  Item 3—Mercury Glass Tealight Candle Holders by Volens Mercury glass tealight candle holders add a touch of shimmer to any decor. The gold glass adds a touch of fall elegance and warm contrast to a pastel color palette. Use LED tealights for a cozy glow in the evenings!  Item 4—9FT Eucalyptus and Willow Leaf Garland by Ling’s Moment Check out this stunning eucalyptus garland with pampas grass and silk pink, peach, and white roses! The 9-foot garland can be paired with the sage green table runner or used separately on a table or mantle.  Item 5—Gold Foil Textured Forest Painting by Yihui Arts This wall art with birch trees is an understated yet unmistakably autumn focal point for any room. The background may be pastel blue-green, but the gold foil leaves are a definite nod to the changing of the seasons and colors of autumn.  Item 6—Pumpkin Pillow Cover Set by PSDWETS These pillow covers with pale blue and cream pumpkins are an inexpensive way to add a soft pastel accent to your living room chairs or sofa. Pair them with different-sized pillows to add more depth to your seating accents.  Item 7—Cream Cable Knit Throw Blanket by Battilo I own a set of these cream cable knit blankets, and I can tell you they are so soft! The throws are made with acrylic yarn and are machine-washable. The cream adds a little balance and contrast to this soft fall color scheme, breaking up the green and pink.  Item 8—Sage 24 x 24 Velvet Throw Pillow Covers by JUSPURBET Add a little luxury with these velvet sage green pillow covers! Pair these slightly larger pillow covers with the pumpkin pillows mentioned earlier to create visual and size contrast.  Item 9—Handmade Swedish Tomte Holiday Gnome by Funoasis I’m falling for this adorable Swedish gnome! This little guy can be used for seasonal or holiday decor. Plunk him down on a mantle or in a fall vignette for a whimsical accent!  Item 10—Dried Pampas Grass by MALIDAK I chose this pampas grass selection for its soft colors, full branches, and fluffy texture. The feathery texture and color work well with the rest of the pastel accents while adding an organic element to the room.  Related blogs you may want to read: Dark Academia Decor for the Fall Brighten up your autumn decor with these items! Create a cozy relaxing interior space this fall with neutral colors Need ideas for incorporating the color blue into your fall decor? Inspirational ideas for creating that cozy autumn boho style Nine hygge decor ideas Winter color palette ideas for your home decor Design concept for a dreamy coastal interior Let’s talk Bohemian We've all experienced the frustration of cleaning windows and mirrors, only to be left with stubborn streaks or cloudy surfaces. In this blog post, we'll walk you through some simple yet effective tips to help you achieve streak-free windows and mirrors. Your windows and mirrors probably have residue from cleaning products you may have used prior. This means the cleaner and materials you use have to cut through residue to reveal streak-free surfaces. So here are some tips to help you get those windows and mirrors clear and shiny!  Image by Lauris Rozitis Arins Wirestock on Adobe Stock. Gather Your Tools Before you dive in, you’ll need to gather the right tools for the job. Having the following items on hand will make your window and mirror cleaning experience much smoother: Microfiber cloths: A soft, lint-free cloth is perfect for achieving streak-free results. Avoid using paper towels or newspapers, as they can leave traces of residue and lint. (Newspapers are often mentioned as a “professional” way to clean mirrors, but many house cleaners recommend not using paper towels or newspapers.) Squeegee: Invest in a good-quality squeegee with a rubber blade. It helps to remove excess water and minimizes streaking. 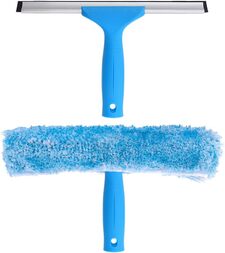 Window cleaning solution: Opt for a commercial window cleaning solution or make your own using a mixture of white vinegar and water. This natural solution is eco-friendly and efficient at cutting through grime and smudges. I have frequently used a vinegar and water solution in my home with good results. Dust the Surfaces Remove dust and loose dirt from the windows and mirrors before applying any cleaning solution. Use a microfiber cloth or a dry duster to wipe away surface debris. This step significantly reduces the chances of creating streaks later on.  Prepare and Apply the Cleaning Solution If using a commercial window cleaning solution, follow the instructions on the label. Alternatively, you can create a homemade cleaning solution by combining equal parts white vinegar and water in a spray bottle. Liberally spray the solution onto the surface, ensuring complete coverage. This homemade vinegar solution has done wonders for my mirrors and glassware! The vinegar and water solution cuts through all the old grime and residue better than anything else I have tried!  Image by alexanderuhrin on Adobe Stock. Wipe with Microfiber Cloth Wipe the surface in a circular or zigzag motion using a clean microfiber cloth. Focus on small areas at a time to prevent the cleaning solution from drying too quickly and causing streaks. Apply gentle pressure to remove stubborn smudges. 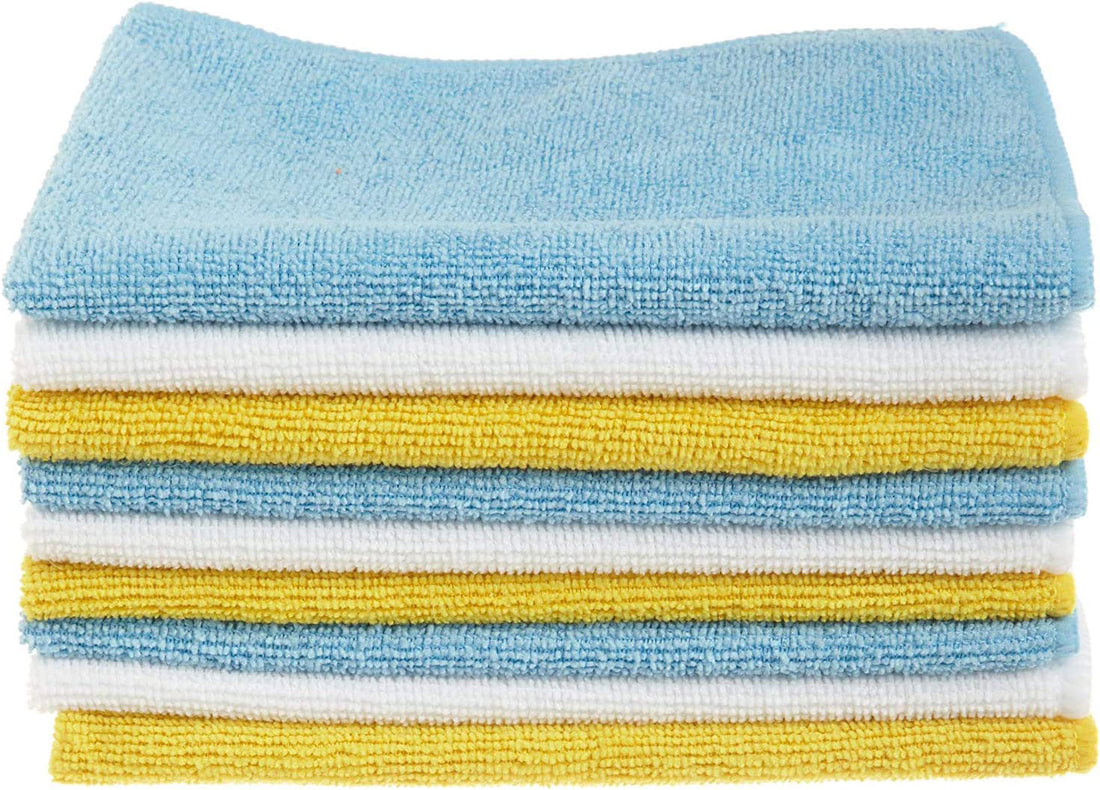 Squeegee Technique for Large Surfaces For large windows, a squeegee can be a game-changer. Starting from the top corner, pull the squeegee down in a straight line overlapping each stroke slightly. Wipe the squeegee blade with a clean cloth after each stroke to avoid transferring dirt or solution. 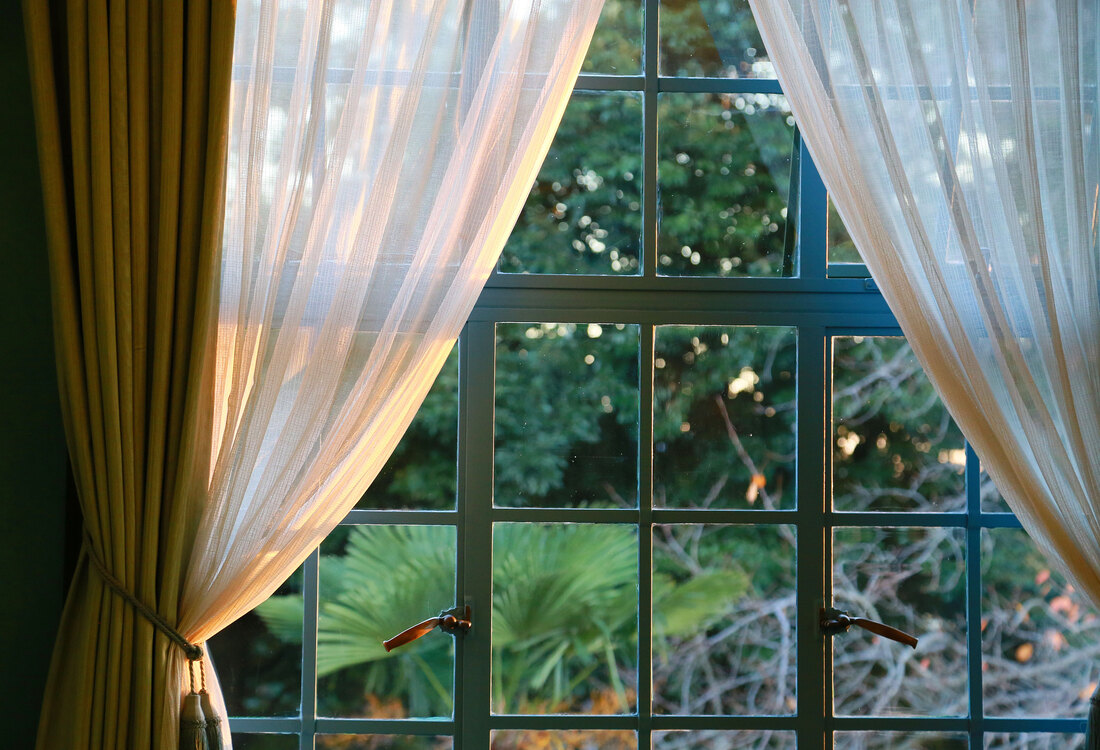 Image by aozora on Adobe Stock. Tips for Mirrors When cleaning mirrors, pay attention to the edges and corners where dust and cleaning solution accumulate. Use cotton swabs or a smaller cloth to reach into those tight areas. Remember to change the fabric regularly to avoid streaking caused by residual dust. Bonus Tip! If you are in a pinch or need to quickly clean a bathroom mirror before some unexpected company shows up, try spraying your mirror with aerosol room spray, then wipe it off in the typical Z pattern with a microfiber cloth. Your room will smell amazing, and your mirror will look clean and shiny! 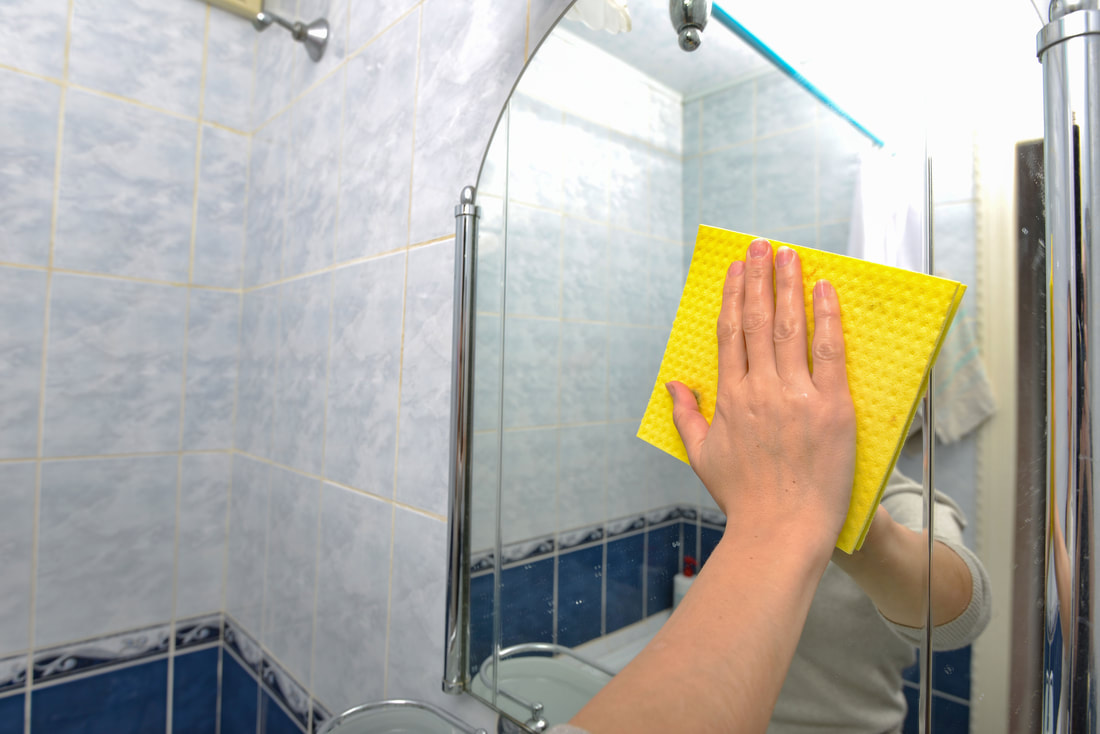 Image by andov on Adobe Stock. Tackle Difficult Stains Stubborn stains—like dried toothpaste or grease splatters—may require more effort. In this situation, apply a small amount of cleaning solution directly to the dirty area and let it sit for a few minutes (but don’t let it dry). Then, gently scrub the area with a soft cloth or a sponge. Rinse the surface thoroughly afterward. Try these tips and techniques to see if you get the streak-free windows and mirrors you’ve been wanting, and let me know your thoughts in the comments. Remember to be patient, work in small sections, and keep plenty of clean, lint-free rags on hand. Happy cleaning! Related blogs you may want to read: How to reupholster dining room chair seats in 9 simple steps A little project with jute twine and an old foot stool DIY refurbishment of a dining room cabinet Comparing DIY upholstery cleaning methods My top thrift finds this year How to replace a clock mechanism How to frame small canvas art How to rewire thrift buy lamps Some of the posts in this article contain affiliate links. If you click on the link and purchase the item, I will receive an affiliate commission at no extra cost to you. I will only recommend products or services I use personally and/or believe will add value to my readers, so there is no conflict of interest. |
Author
Some of the posts on this site contain affiliate links. This means if you click on the link and purchase the item, I will receive an affiliate commission. 
Categories
All
Archives
April 2024
|