|
Bio…what?! Merriam-Webster defines biophilia as “a hypothetical human tendency to interact or be closely associated with other forms of life in nature : a desire or tendency to commune with nature”.  Photo by Diane M. Lilly, 2019. That’s all well and good, you might say…What’s that got to do with interior design? Biophilia is a word I’ve seen floating around a lot lately. It’s become a trendy term that encompasses the significance of how people relate to nature in their everyday environments. Biophilic interior design addresses the human need to engage with nature, especially since modern life finds us spending most of our lives in enclosed artificial spaces, separating us from the natural world. Biophilic interior design tries to incorporate natural elements into these built interior spaces, addressing natural lighting, open and accessible views to the outside, indoor greenery, naturally sourced materials for furniture and finishes, and furniture and finishes that remind us of the features we find in nature. This approach to indoor styling reassesses interior environments, placing more importance on natural aesthetics and lighting and exploring the impact on the occupants’ psychological and physical well-being. A perfect design will blur the line between interior and exterior spaces and create a calm and serene space. 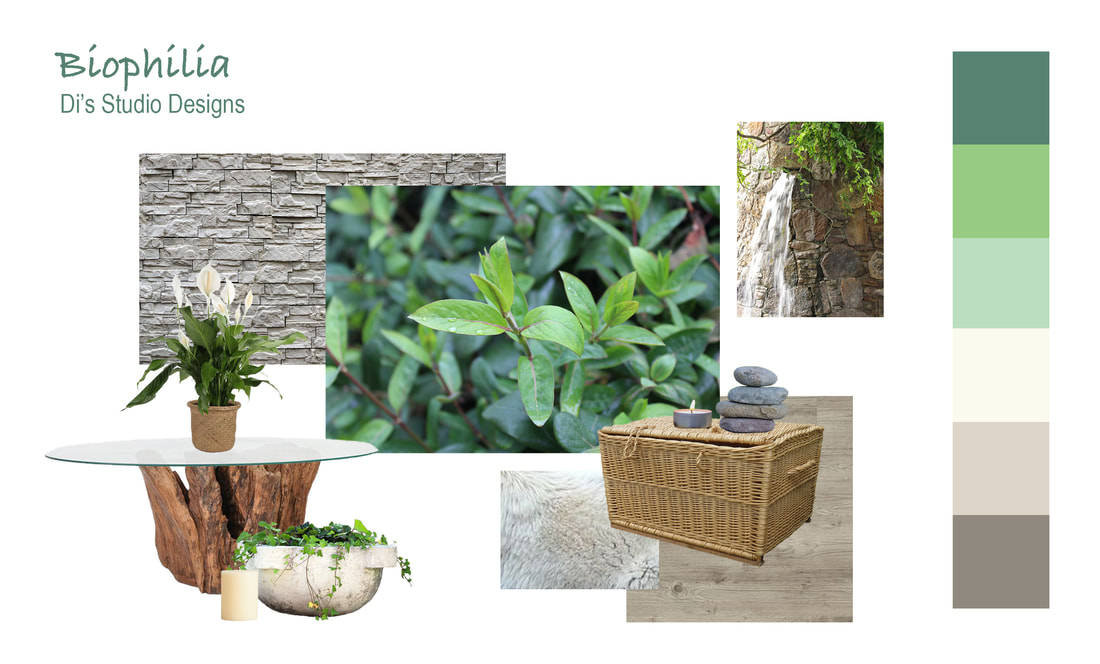 As for effects on mental well-being, it is well known that calm, serene environments promote a sense of healing. We are instinctively drawn to places of healing, like moths to a flame. Human beings have a subconscious reaction--a primal need--to find healing in nature. And our environment—both built and natural—has a direct psychological impact on us. Natural surroundings open up our creativity and give us a sense of comfort and peace. Isn’t this why we all cherish vacations to beautiful places like national parks, the mountains, campgrounds, and the seashore?  Photo by Diane M. Lilly, 2019. But can biophilic design improve our physical health? Research says yes. Just being around natural things—or things that remind us of nature—can lower blood pressure. Calmer, healthier individuals have better cognitive abilities, perform better at work, are more engaged in their surroundings, and get along better with those around them. For those with a green thumb (or “wannabes”), taking care of plants can be therapeutic. And as a bonus, plants help filter the air. People who feel better also tend to take better care of themselves, so I view biophilic design as a more holistic approach to design--thinking about the whole person and how that relates to the space they will occupy. 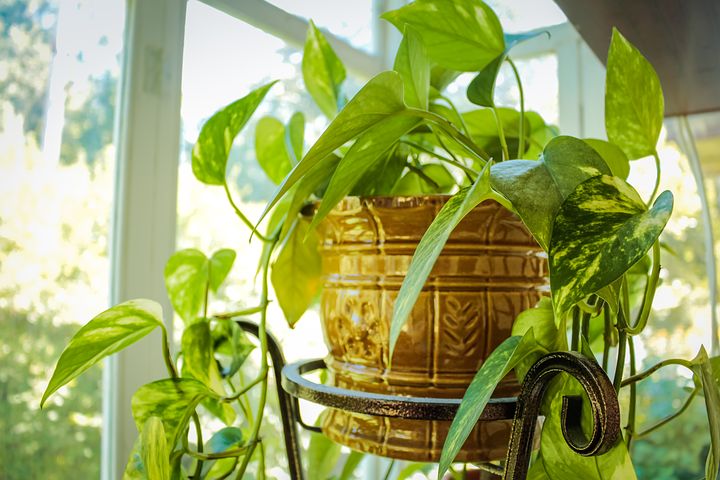 Image from Pixabay. 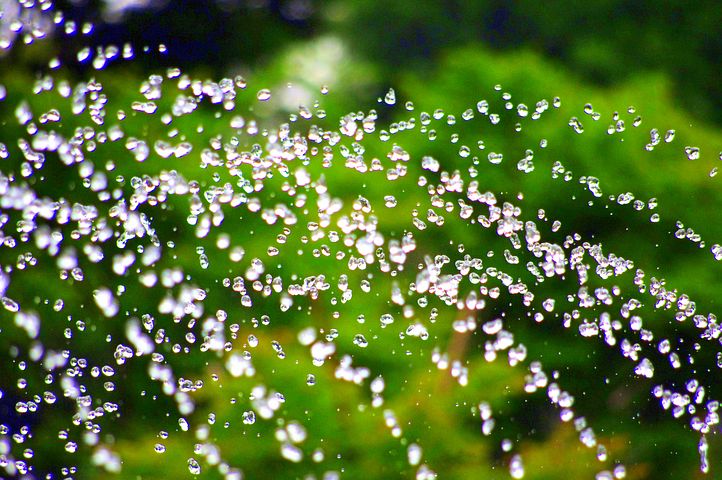 Image from Pixabay. Biophilic design is near and dear to my heart. It’s the reason why I create “nature-inspired” designs. I believe wholeheartedly that it is crucial to surround yourself with things that bring you closer to nature, even while you are trapped indoors. Artists like myself tend to spend more time indoors, making it critical to have access to natural surroundings to stabilize mood and inspire creativity. So, I think it’s just a natural inclination to be interested in how biophilia can be incorporated into an interior space, particularly the more holistic design approaches. What are some design options that will help you embrace this design ideal? There are countless ways to bring the essence of the outdoors into your home, and which way you choose will depend on your tastes and budget. The simplest, most budget-friendly option is to bring greenery and flowers into your space. This approach can be as simple as creating floral arrangements around the room—mixing live and artificial florals in arrangements or including floral candleholders—and complementing these with organic tablescapes. Using actual greenery is essential, as it will bring a necessary vibrance to hanging planters and flower arrangements. You could even go strictly green (with no flowers), creating plant groupings or vertical green walls that combine several types of plants to create a more engaging visual impact.  Image from Pixabay. Bring water into the home--the only thing more soothing than greenery is water. Placing a water feature in a space will create a calm visual and aural space. There are tons of water features to choose from, ranging from cheap tabletop models to full-on floor or wall feature extravaganzas! Place comfortable seating in the space where you can close your eyes, relax, and meditate on the rhythmic sounds. 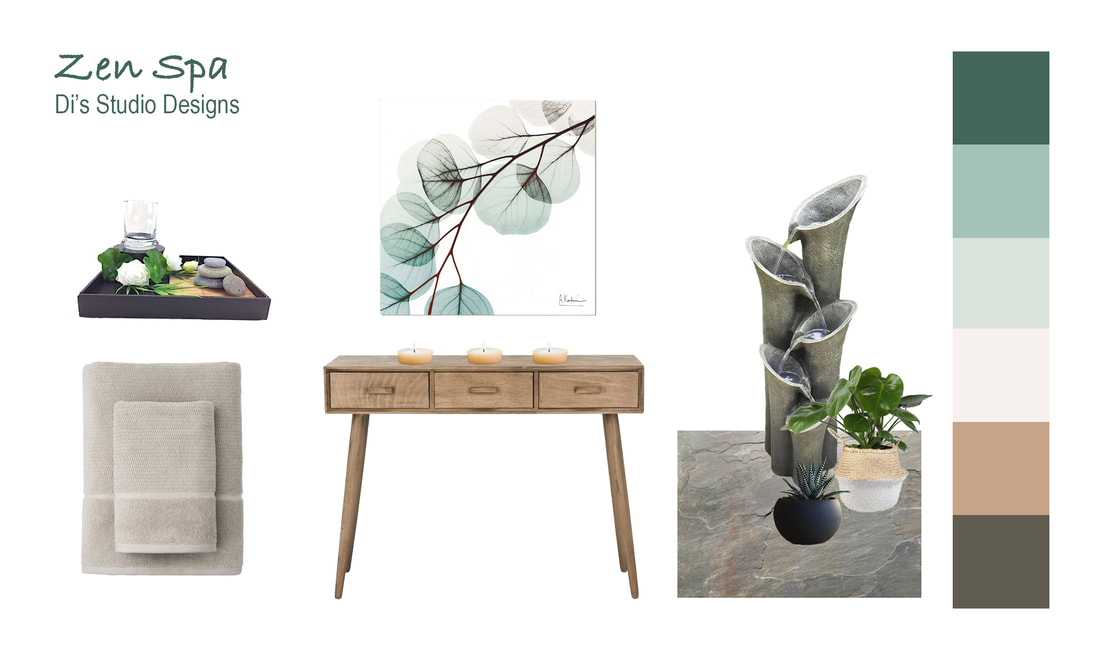 If you have a larger budget, maybe a room makeover—and extra landscaping—is the way to go. Inside finishes—such as floral or textured wallpaper, textured fabrics, wall art with nature scenes, furniture with the look and feel of raw wood, and the use of stone—can go a long way toward establishing a more natural look within your space. But don’t forget the view from the outside! Frank Lloyd Wright created buildings that were deliberately designed with the idea that you could expand the interior space by allowing for ample views of the outside. Exterior views could include interior courtyards filled with lush plant life (my dream) or landscaped gardens outside windows and doorways. 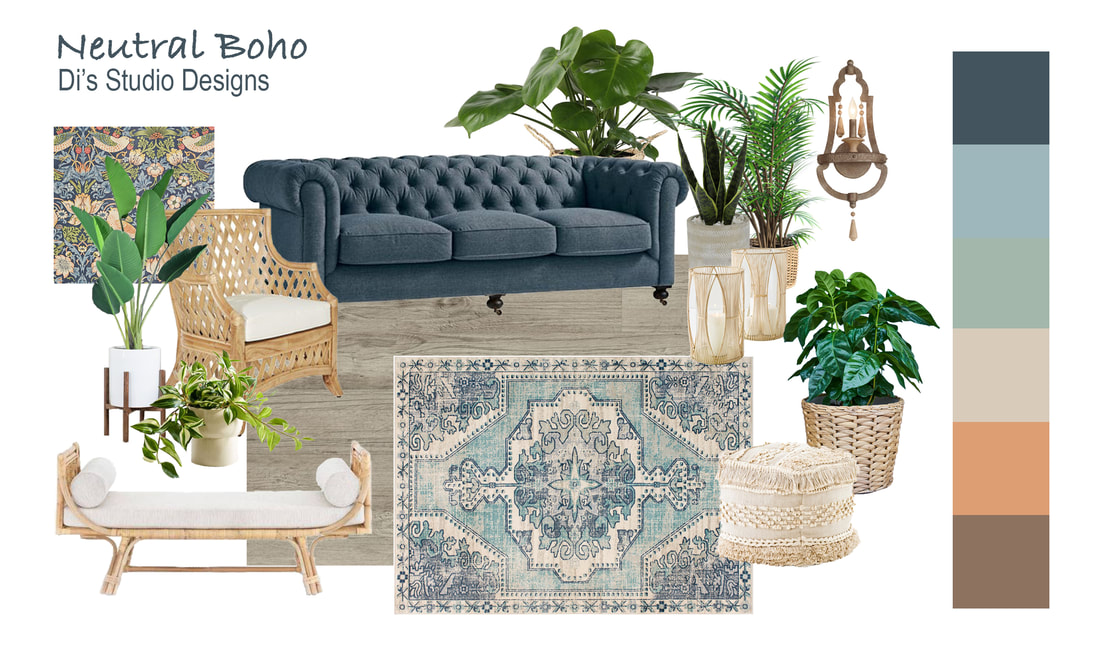 Biophilic design is not just adding a plant or two to a space. The design concept addresses the WHOLE space, how each element works with another, and how the entire finished space ultimately affects you. Here’s the thing…Interior design trends come and go, but biophilia never goes out of style because it is a basic human need to surround ourselves with nature. And it’s nothing new. Frank Lloyd Wright was doing it throughout the 20th century (with the iconic Fallingwater being one of my favorite examples), with his emphasis on creating buildings that are “of” the landscape instead of sitting on the landscape, with interior concepts that reflected the need to expand interior spaces by framing views to the outside. Biophilic design elements are versatile enough to be incorporated into any design trend. The Scandinavian hygge style works well with natural materials like wood or wool blankets. Or the popular coastal design style, with its airiness and white or weathered woods. And especially one of my favorite styles for its use of natural decor and plants--Bohemian. But really, it doesn’t matter what style because there are always ways to incorporate nature into an interior. 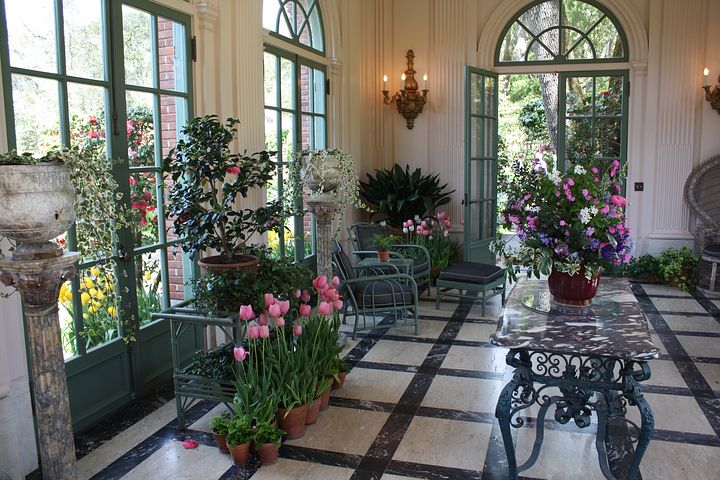 Image from Pixabay. 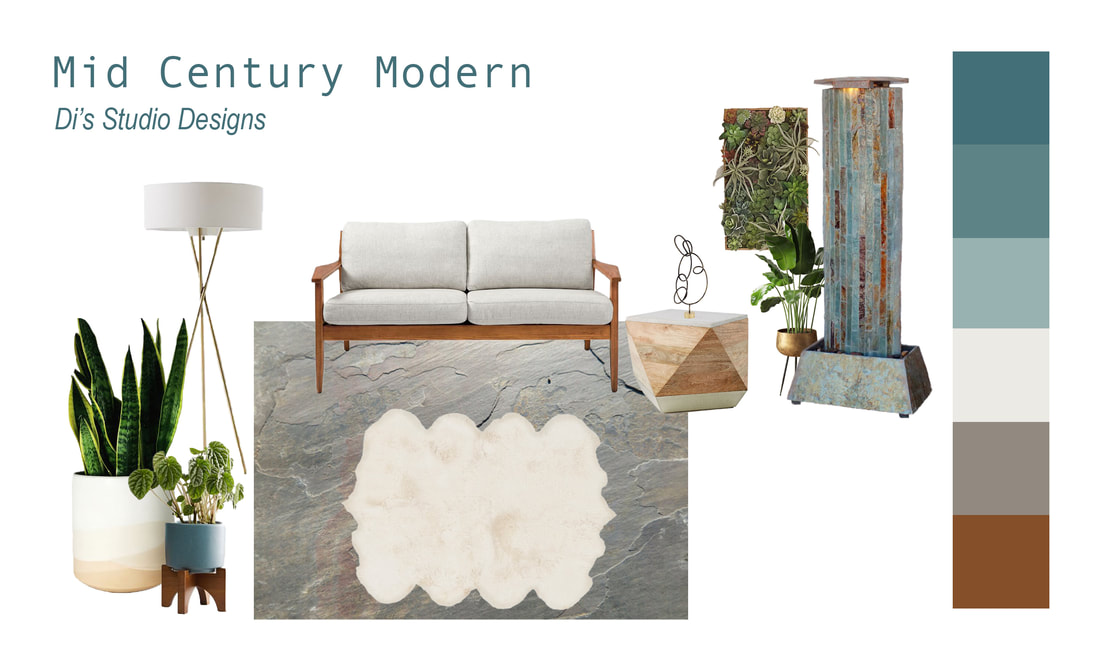 Even a minimal, streamlined style like Mid Century Modern can be easily enhanced by adding organic elements like plants or natural textiles. This particular style works well with biophilic design elements. The orderly lines of modern furniture, lighting, and decor are balanced with the unpredictable nature of plant leaves, water, or natural stone. Juxtaposing a modern wood table with tabletop plants or large leafy plants in metal or ceramic pots introduces a softening element to the space in what could otherwise be a cold, sterile environment. Hopefully, you gleaned something valuable about biophilic design from today’s article. I could go on about biophilic design for days! Have you embraced biophilic design in your own space? Feel free to share your own experiences and thoughts in the comments!  Photo by Diane M. Lilly, 2019. This article contains external links for demonstration purposes only, and are not endorsements for specific products or brands. Related blog posts you may want to read: Design concept for a dreamy coastal interior Let's talk Bohemian
0 Comments
Can you feel summer in the air? It’s hot enough! Today, I thought I’d share a little project from a previous summer that I like to call Tropical Paradise. 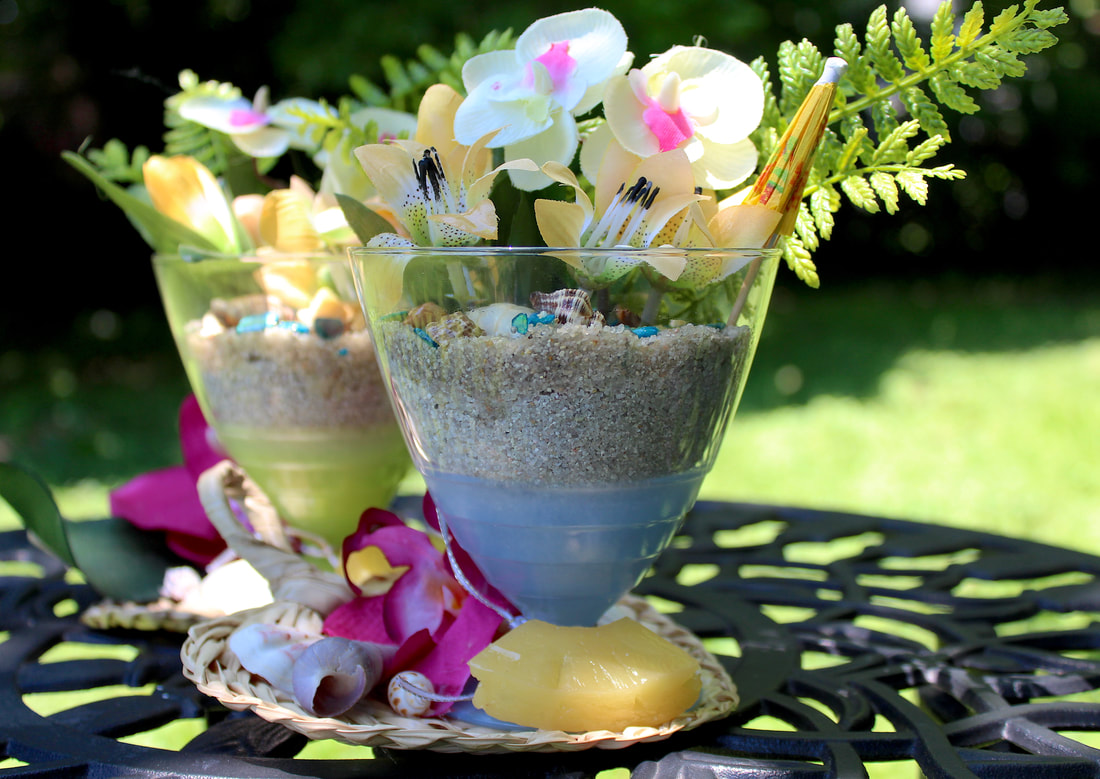 The inspiration for this design came from some unique colored dessert cups I bought at a thrift store. Just like in a previous strawberry-themed project, as soon as I saw these dessert cups, I knew I wanted to do something summer-themed. It took me a while to brainstorm ideas, and I toyed with several potential designs that included drinks and paper cocktail umbrellas. I’d take the cups out of the cabinet, stare at them, try hard to visualize a design, and then put them back in a dark cabinet for an agonizingly long time. 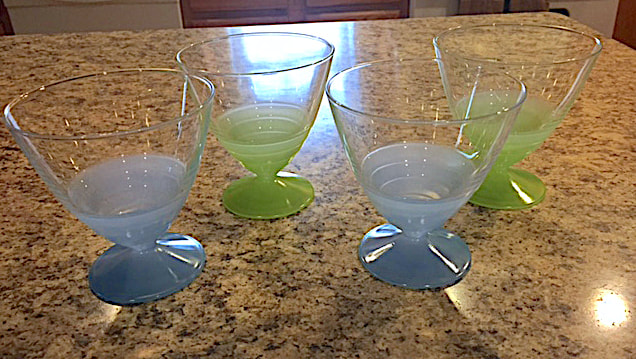 They finally saw the light of day when I saw miniature bamboo mats on my favorite craft site--then the proverbial lightbulb turned on. Once the idea for the base was in place, I settled on a tropical beach design that included sand, shells, tropical flowers, and pineapple slices. The palm fronds (which seemed so perfect for the base) did not want to adhere to the plastic cups, and it took a lot of E6000 glue to keep the two pieces stuck together! But once the glue set and I was sure they were well and truly stuck, I added the shells, faux orchids, and pineapple slice…although I had similar problems getting everything to stick together. 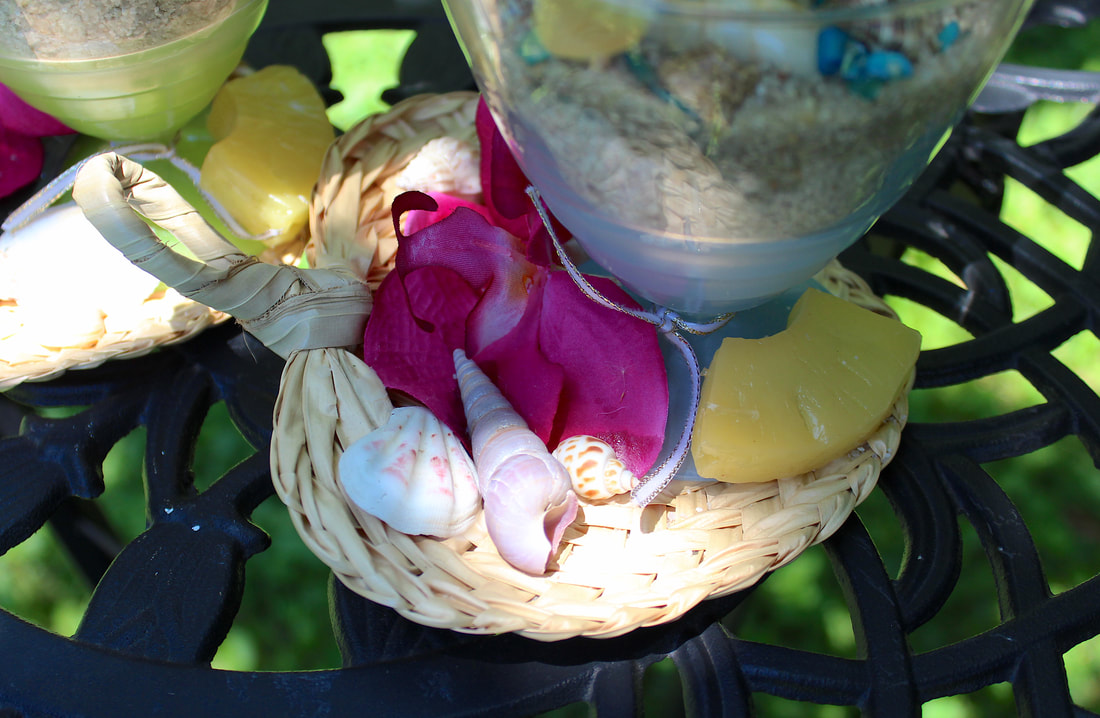 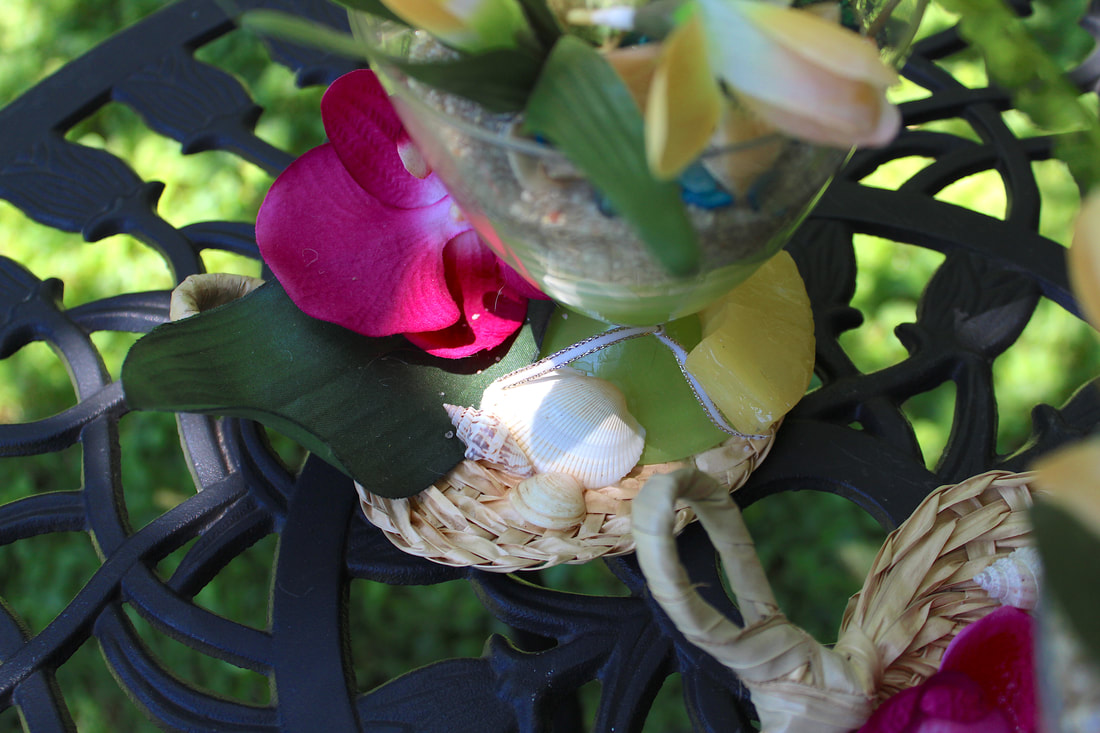 I got the pieces to stay together and moved on to the items inside the cup. Faux orchids and ferns, shells, a drink umbrella (all from FDC), and some sand were carefully arranged in the cup, but I had to work out how to keep the sand—and other decorative elements—from spilling out. I finally decided to use Water Effects (by Woodland Scenics), and that did the trick. It even made my sand look a little wet! 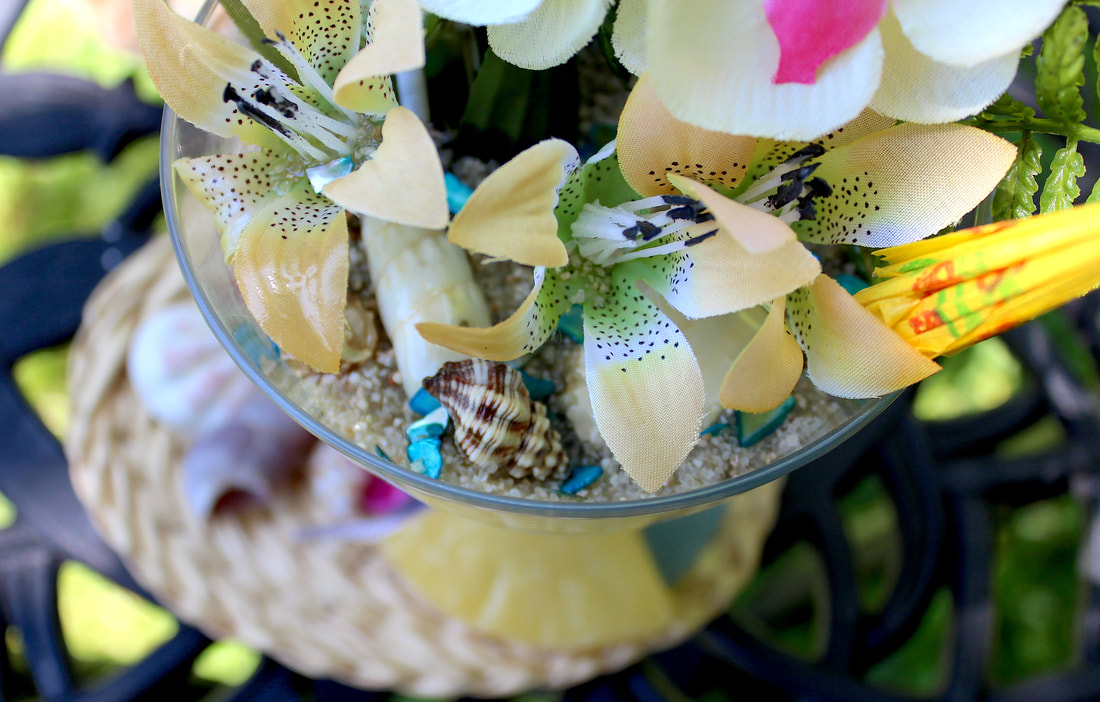 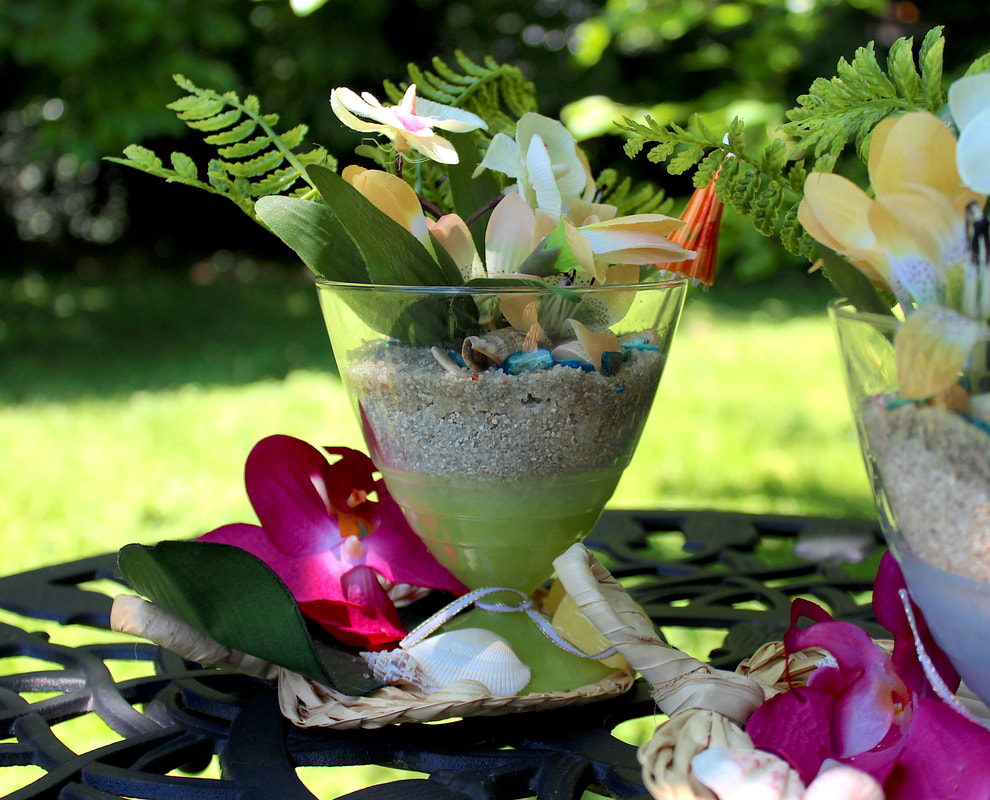 In the end I was happy with this little project. I’d like to make more items with this same tropical theme… someday. But that’s another thrift store trip! Do you have any tropical DIY projects to share? Feel free to drop a line in the comments below! This article contains external links for demonstration purposes only, and are not endorsements for specific products or brands. Related blog posts you may want to read: Strawberry themed projects with repurposed dessert cups Repurposed candy dish and cocktail glasses DIY with faux florals, birds and repurposed thrift store finds Isn’t there something strangely satisfying about creating miniature little worlds? Who doesn’t love tapping into that world of childhood wonder, imagining a world of mystery beyond our reach? If you’ve been following my blog, you will remember the indoor fairy gardens I created last year. (If you missed it, you can read about it here.) That fun—albeit challenging—project resulted in two beautiful displays that now grace my living and dining rooms. 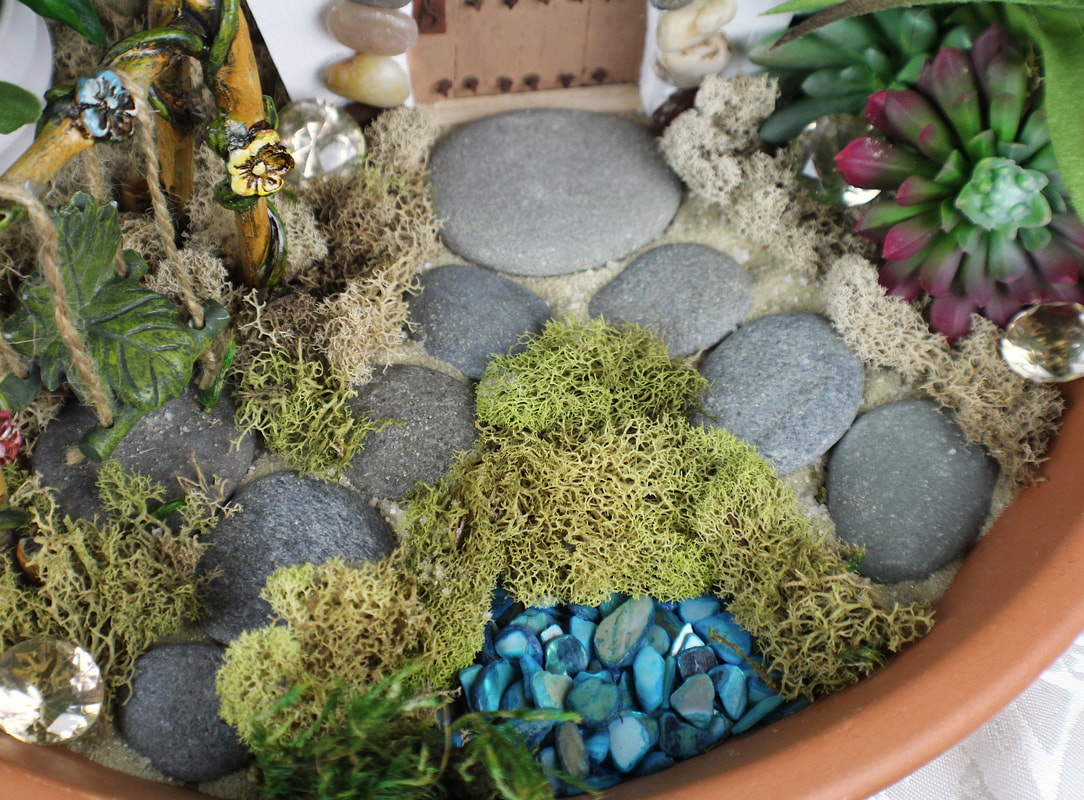 Photo by Diane M. Lilly, 2019. This year (with the onset of warm weather), I thought I’d experiment with an OUTDOOR fairy garden to see if I could spruce up the look of my garden, which I’ll admit was beginning to look neglected. In a previous blog, I showed off my raised flower bed in my backyard, where I grow mint, sage, and chives. I had also attempted to grow rosemary and carrots in the back corner of the flower bed, but neither attempt succeeded, which left me with an awkward space that was crying out for some love. So I thought I’d play around and have fun creating an outdoor fairy garden in that spot because…well, why not?! 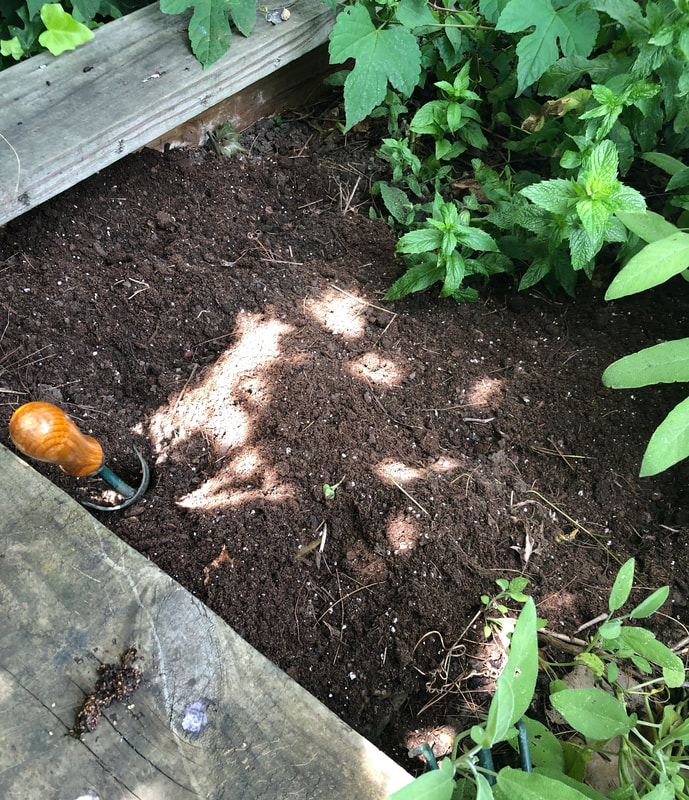 Photo by Diane M. Lilly, 2020. Before beginning, I had to take stock of my supplies to see what I had on hand and what purchases would need to be made for this project. I knew I wanted to reuse my resin mushrooms, a resin bridge, and a resin fairy swing in this outdoor garden—all of which I had previously purchased for the indoor fairy garden versions. (I can’t remember if they were bought from Factory Direct Crafts or Michaels, but both sites have a good selection of resin fairy garden items.) I also knew I wanted a water feature, and found perfect blue/blue-green flat glass gems in my craft drawer. I didn’t want to spend too much money on this project, so I used the Fairy Cottage (which I built for one of my indoor gardens) as a stand-in for a resin cottage (to be purchased later) that will be more suitable for outdoor weather.  Handcrafted Fairy Cottage. Photo by Diane M. Lilly, 2019. 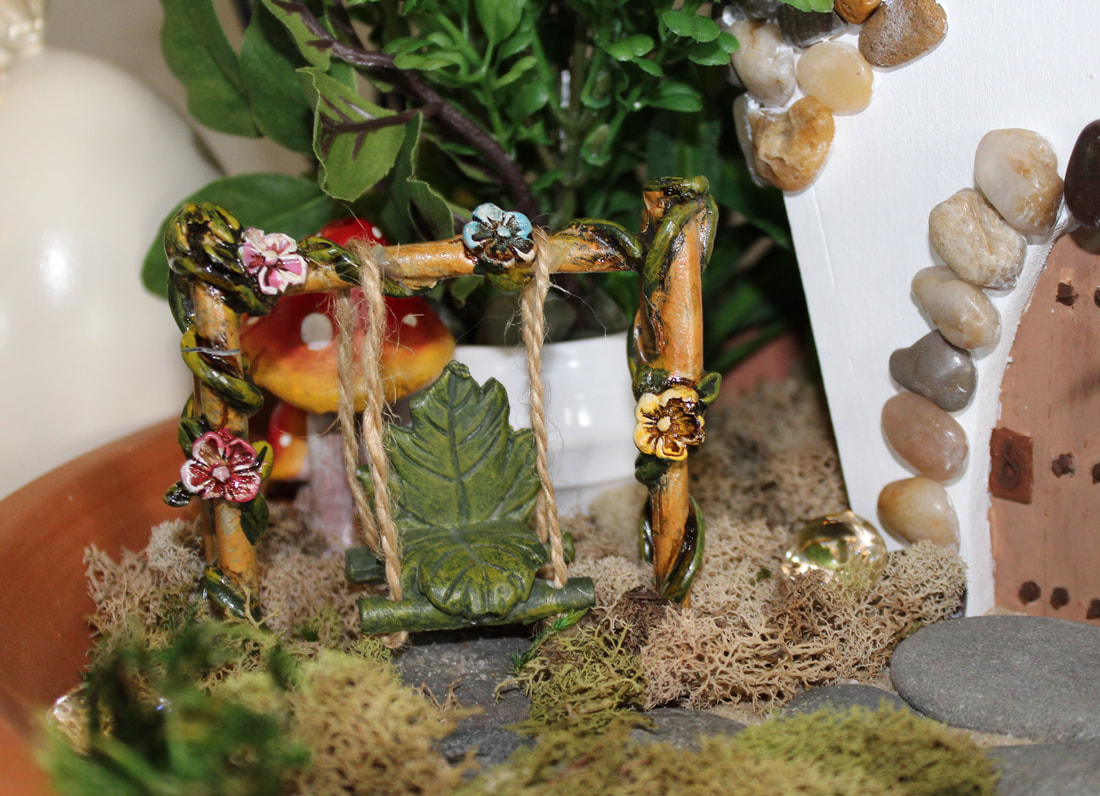 Photo by Diane M. Lilly, 2019. All I needed for this project was plant life to add depth and interest to the empty garden spot. My local Lowes had some interesting plants, and I found the following specimens: Sunny Border Blue Speedwell Veronica spicata “Sunny Border Blue” White Pampa grass Coleus Succulent Jade Plant Ogre Ears Succulent Rainbow Bush Manny Each was chosen for its intriguing characteristics and contrast in shape, color, texture, and size. The grass was the tall “willowy” feature that would fill the corner of my flower bed and hang over the fairy house. The coleus provided a nice splash of magenta amongst all the greenery. (I needed to be careful to nestle the coleus behind my sage, though, because that garden area can get a lot of sun, and this plant doesn’t like full sun.) The ogre's ears were just a no-brainer…I mean, it’s “ogre” ears! I chose this succulent, the rainbow bush manny, and the Pampa grass because they are relatively drought-resistant. Finally, the Sunny Border Blue just added a nice splash of purple into the mix. 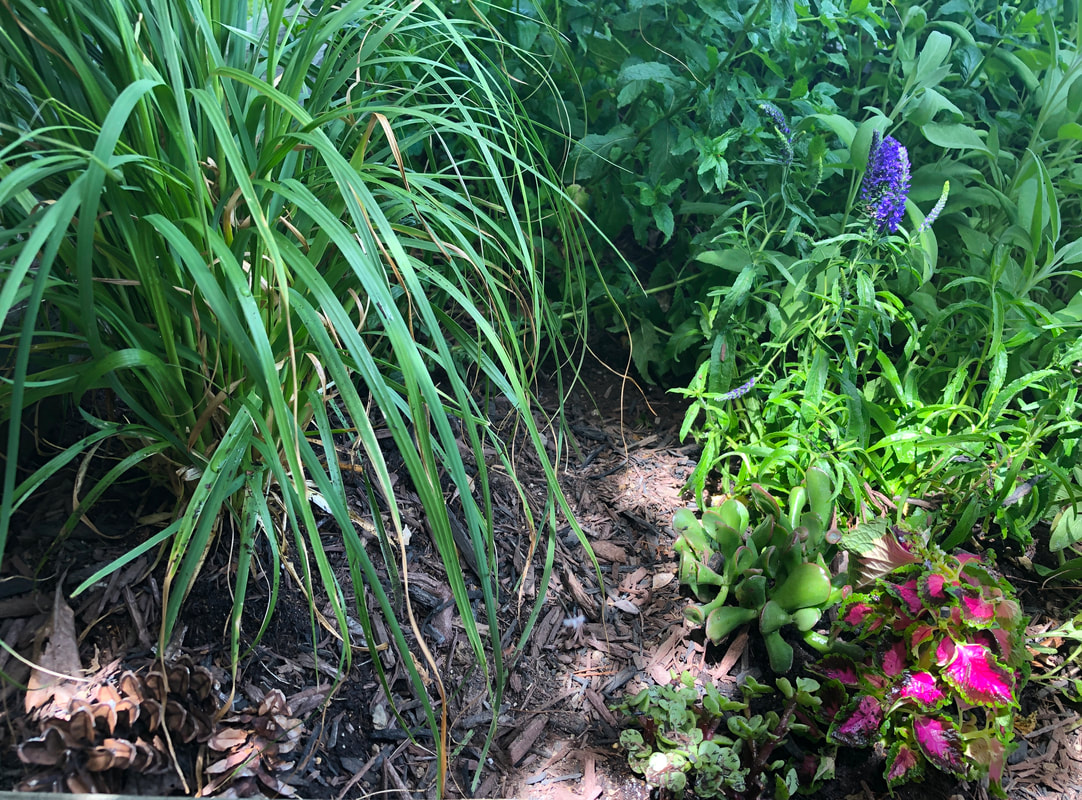 Photo by Diane M. Lilly, 2020. 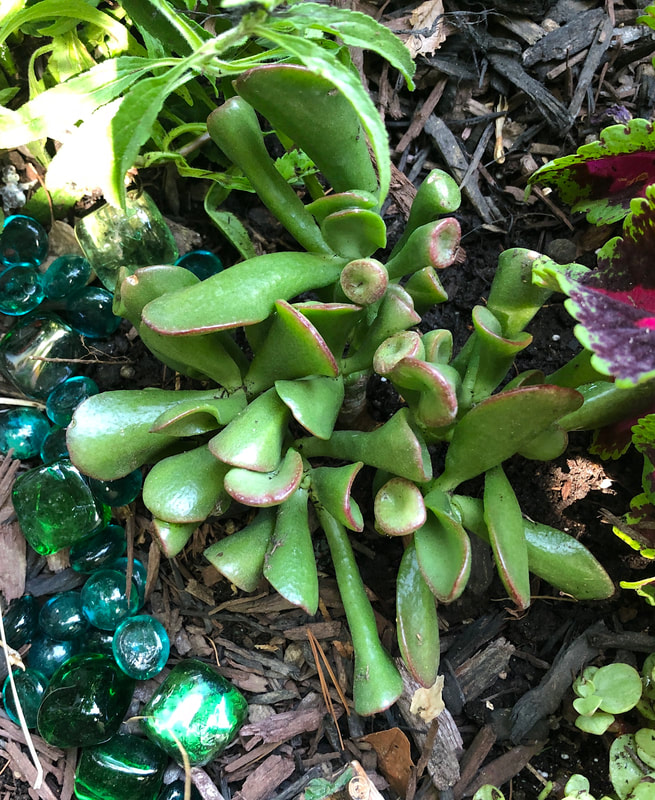 Ogre Ears. Photo by Diane M. Lilly, 2020. 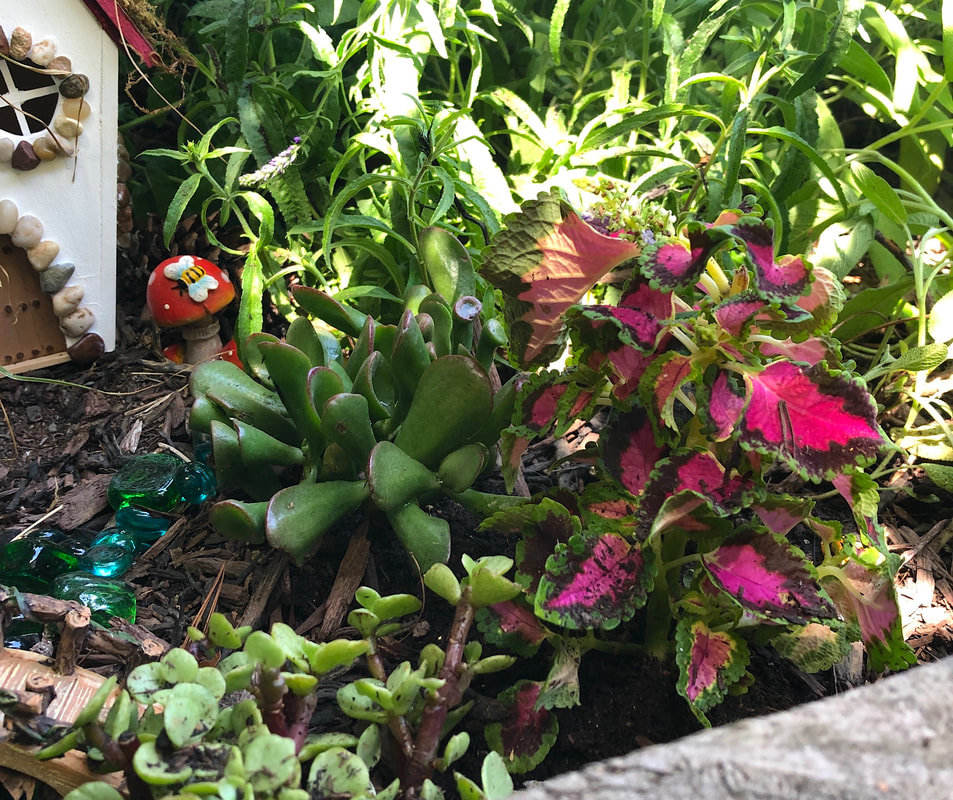 Succulents and Coleus. Photo by Diane M. Lilly, 2020. Before planting, I carefully studied the spot to “see” where the house should sit. I wanted the house to sit back a bit and be nestled into the plant life so that it would look like it had been there a long time, and once that decision was made, the rest was easy. 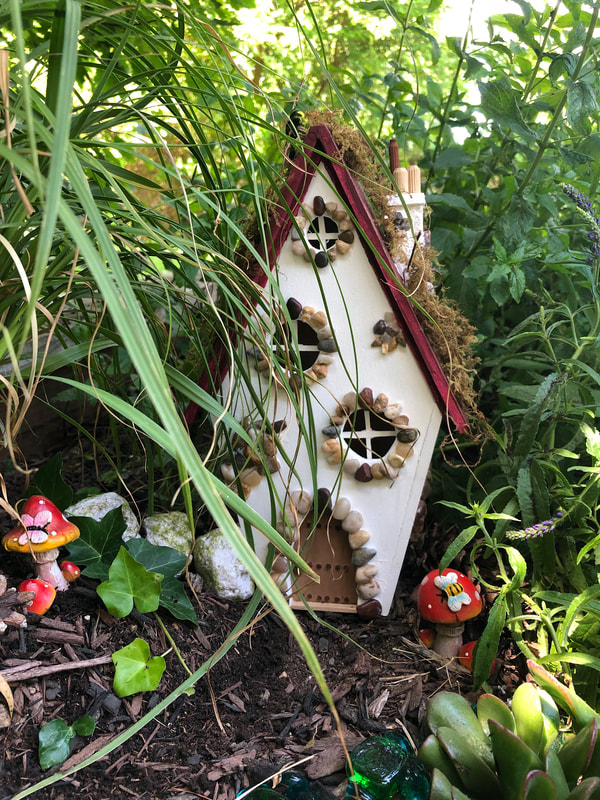 Photo by Diane M. Lilly, 2020. The grass was planted in the corner to fill that space and provide an overhang in front of the house. The rest of the plants were arranged opposite the grass to create a pathway or clearing between the two plant groupings, leading the eye back to where the house stood. I threw some mulch down (which I took from another part of my yard) and then started “sculpting” the clearing to make room for a stream. Glass gems were arranged in a line in the gully to create the stream effect, and the resin bridge was straddled over it. The resin mushrooms, ivy vines, and pinecones were placed under the grass canopy next to the house. There was a small spot still left to fill, so my spoiled little fairy got a resin swing to sit on under the shade of the grass canopy. 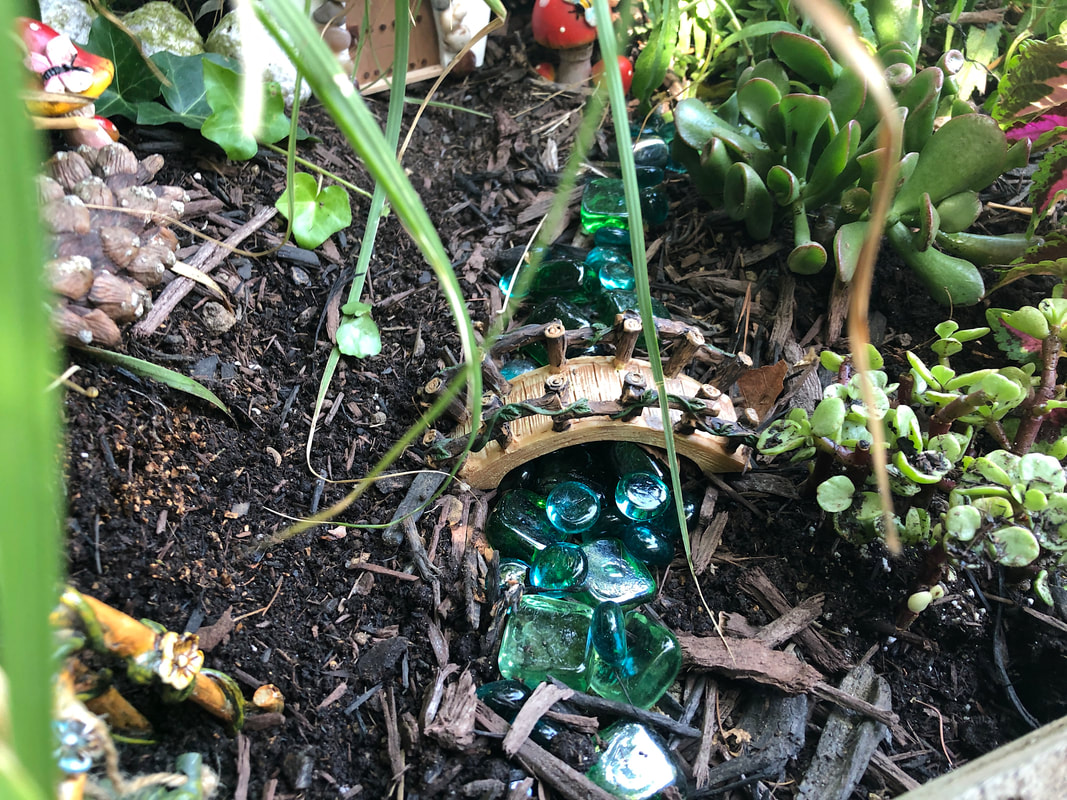 Photo by Diane M. Lilly, 2020. 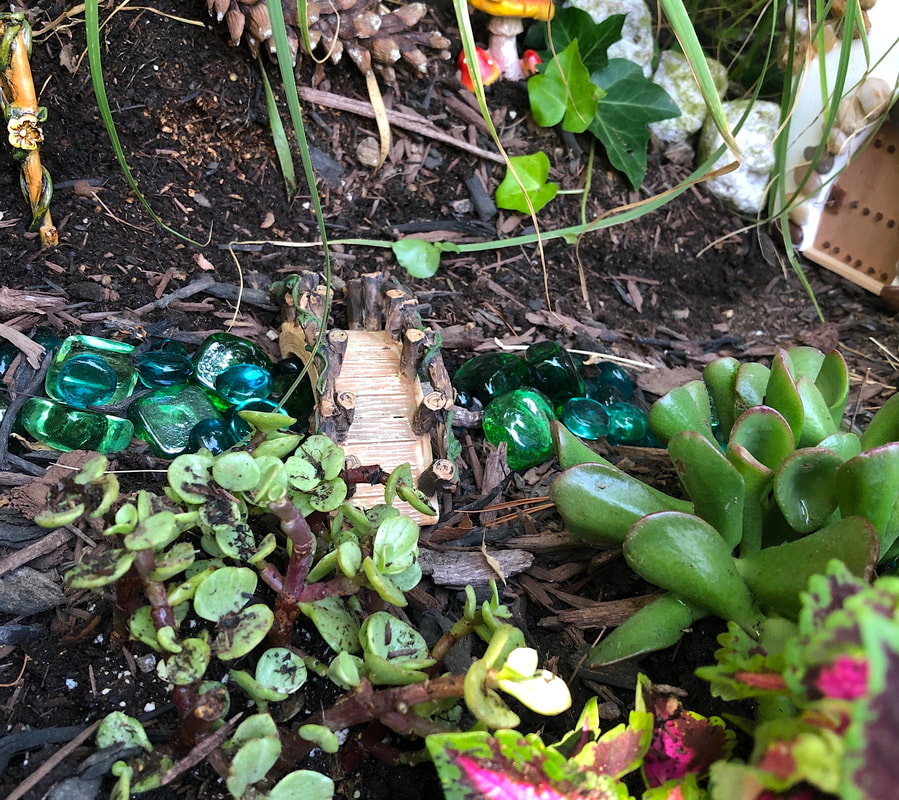 Photo by Diane M. Lilly, 2020. 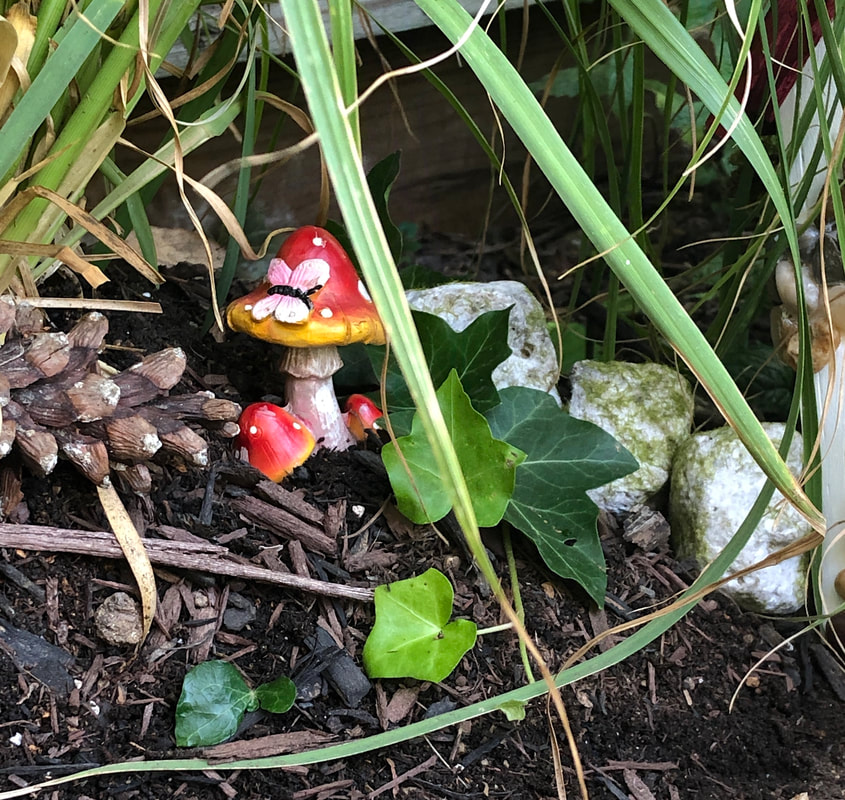 Photo by Diane M. Lilly, 2020.  Photo by Diane M. Lilly, 2020. 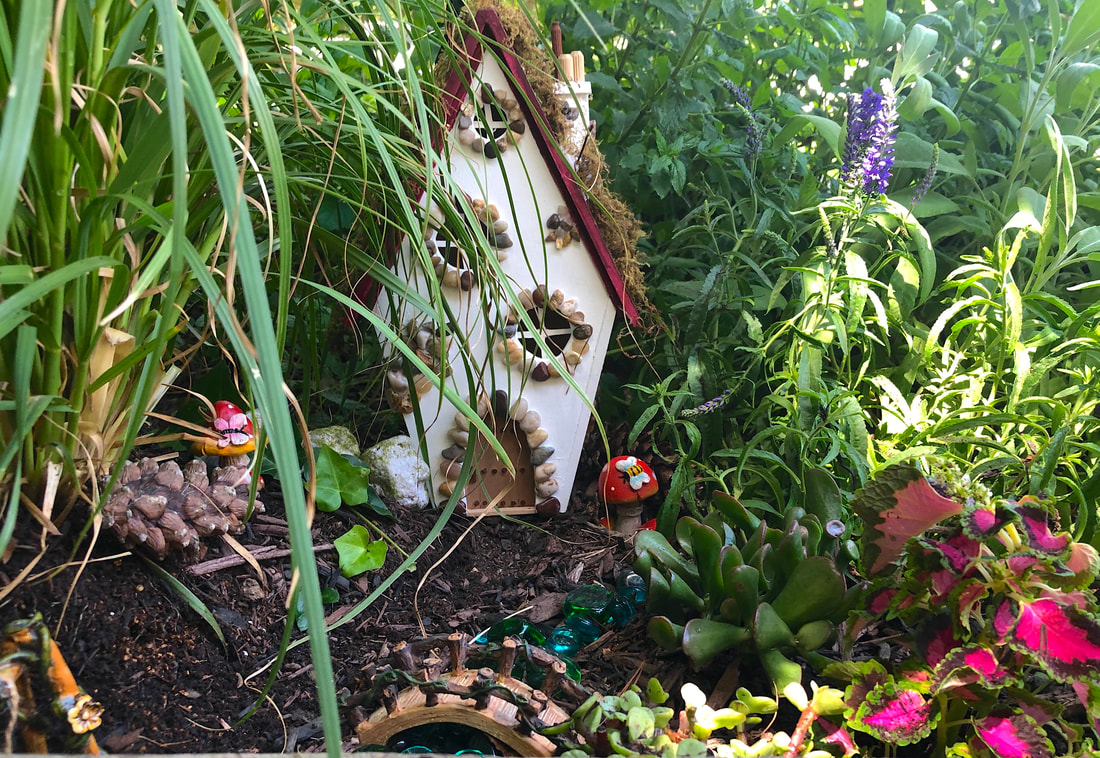 Photo by Diane M. Lilly, 2020. This whole outdoor project took an hour, but it sure was fun! I just sat there for a few moments, trying to imagine my fairy friend sitting by the stream, enjoying the sound of gurgling water and watching her bug friends playing in amongst the plants. Unfortunately, my fairy's wooden cottage is not weatherproof, so I will have to find a suitable resin house as a replacement or make something myself out of flower pots…but that’s a project for another day! I would love to hear about your fairy garden projects, so please feel free to share in the comments below…If you have images to share, visit my Facebook page and share in the comments. Happy gardening! This article contains external links for demonstration purposes only, and are not endorsements for specific products or brands. Related blog posts you may want to read: My fairy house project Spring makeover for my indoor fairy gardens Who is in the mood for strawberries?!  Image from Pixabay. Thrift shops are heaven on earth for creative people like myself. I constantly find new and exciting pieces of unique, vintage glassware and dishware. On one such trip a few years back, I found a couple of slightly rusted metal dessert cups, simple votive glasses with vertical ridges, and some beautiful glass dessert plates with an elegant vine design. 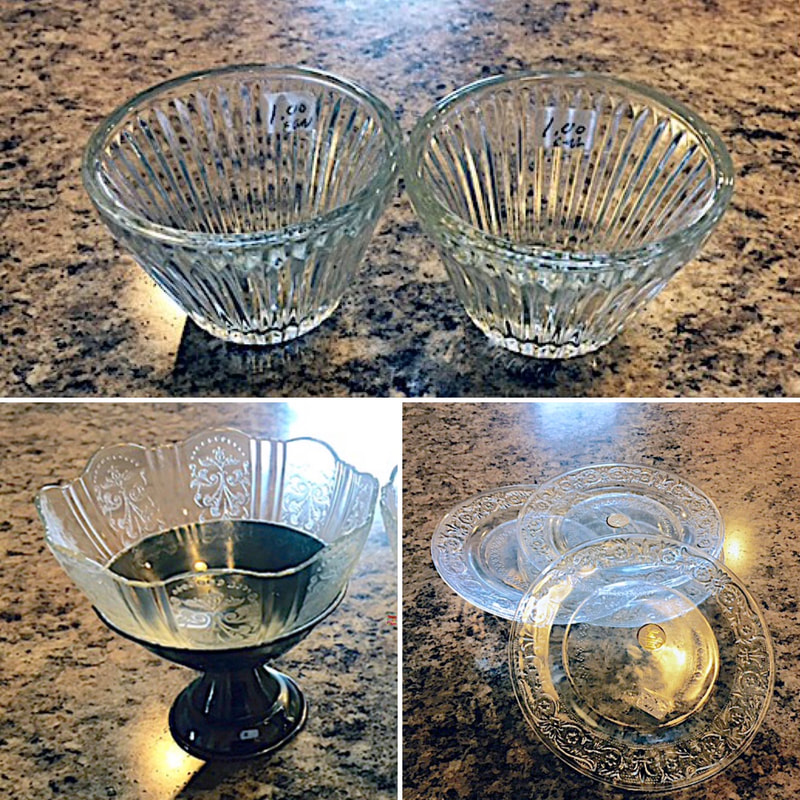 As soon as I saw the metal dessert cups, I knew I would create something sweet! Visions of an old-fashioned ice cream parlor and strawberry desserts slowly crept into my mind.  Image from Pixabay. I played with ideas ranging from strawberry sorbet to ice cream to flowers but eventually settled on actual strawberries. I found faux strawberries on my favorite site and bought some pure white miniature roses to serve as an abstract whipped topping. I had small white doilies left over from a previous project and thought they would go well with this project. So, the project wasn’t too challenging. I glue the white doilies (with E6000 glue) onto the plates. Once set, the dessert cups (spray-painted silver to cover the rust) and glass votive holders were also glued onto the plates. The cups were then filled with faux strawberries topped with mini roses, and a few strawberries were attached to the plates, along with the final touch of sundae spoons (found on Amazon)—all carefully glued into place and allowed to set. 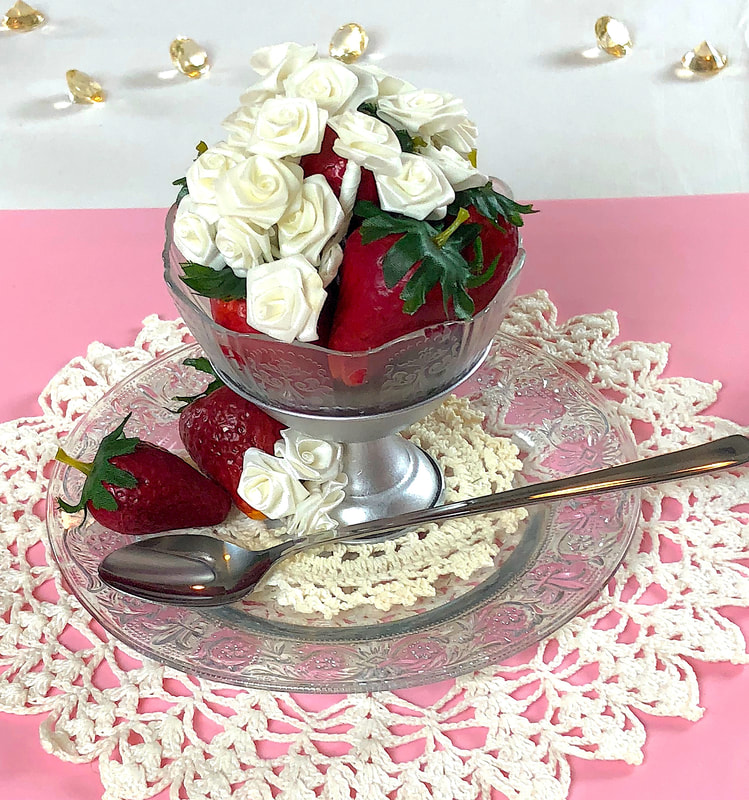 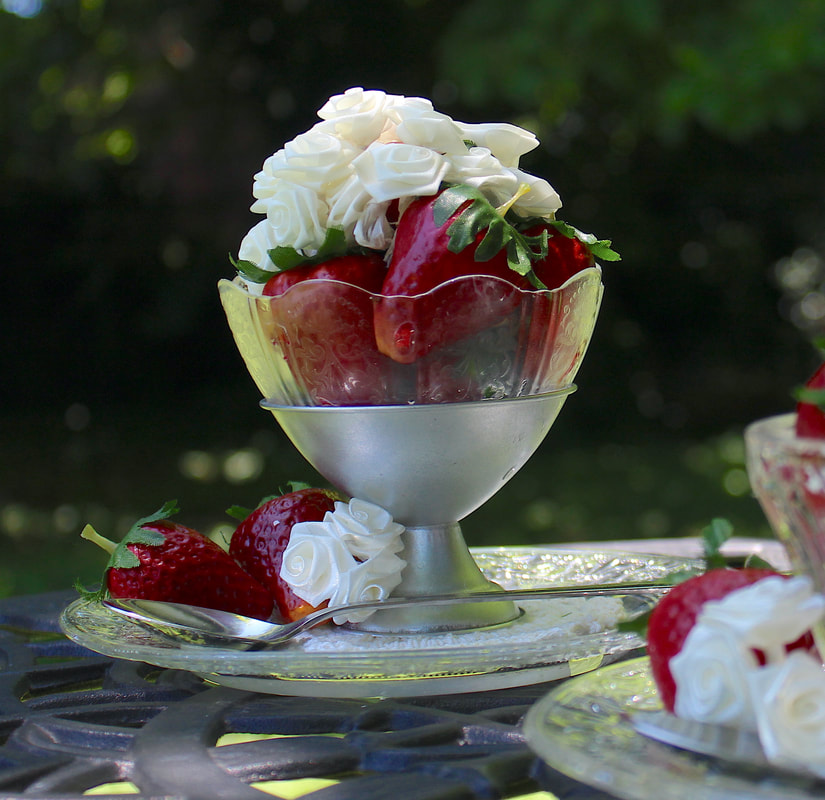 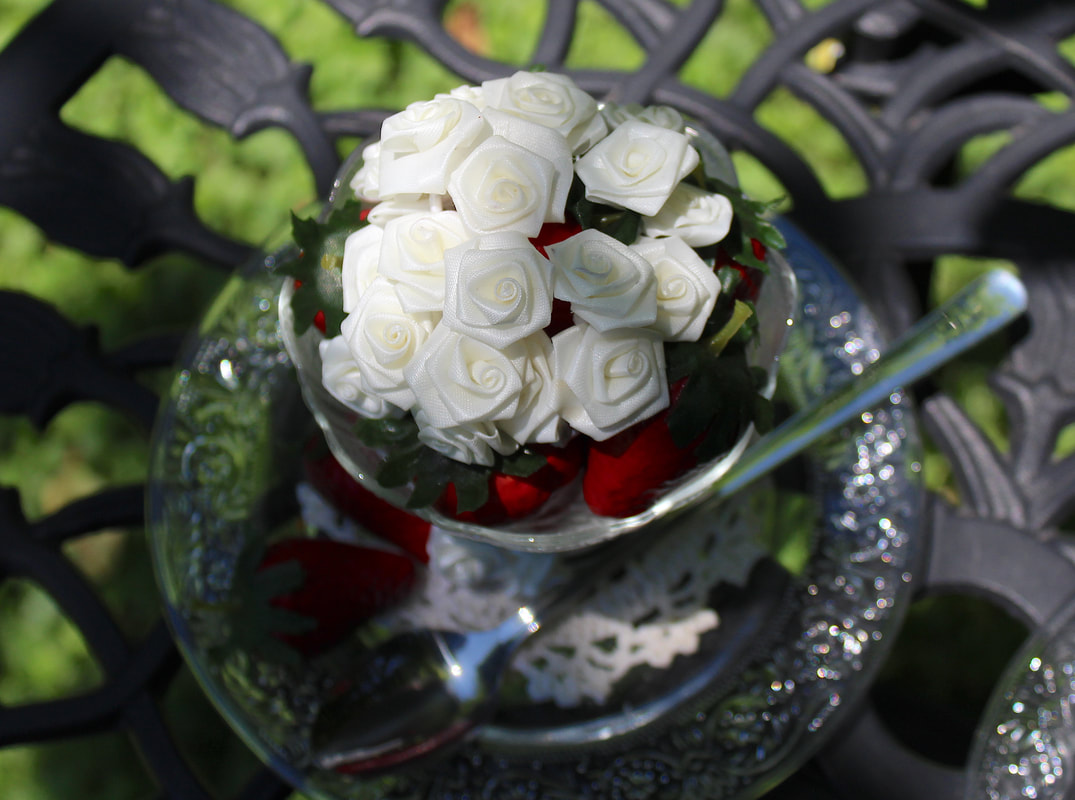 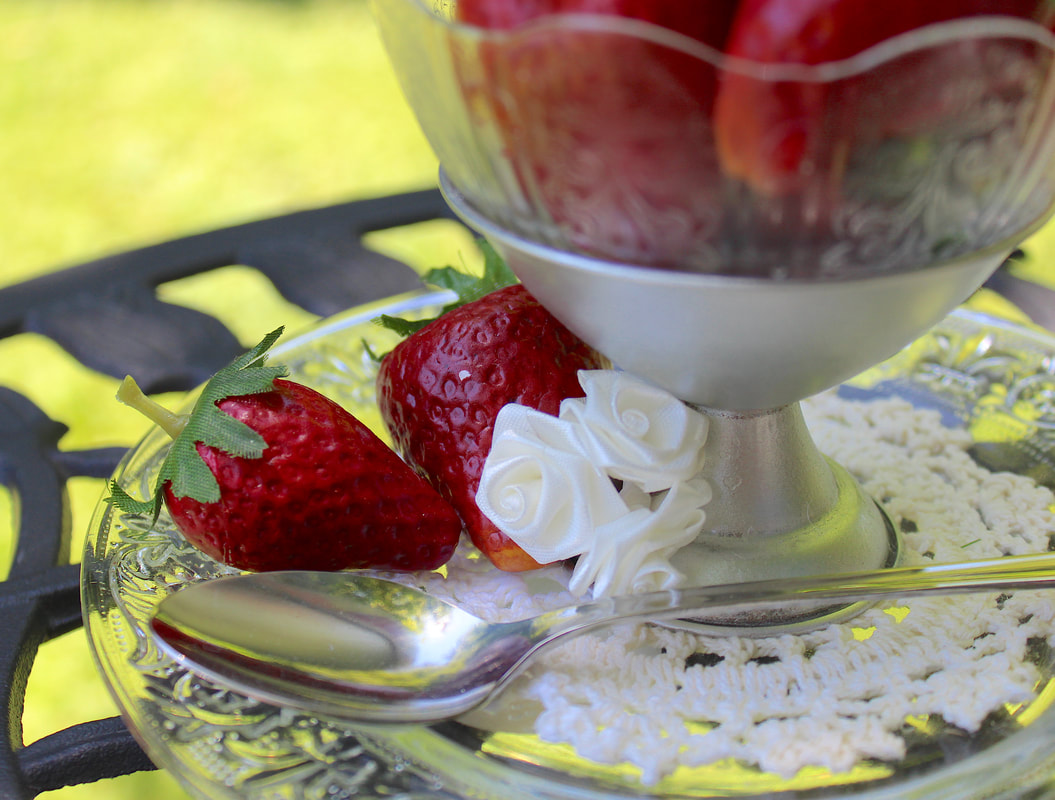 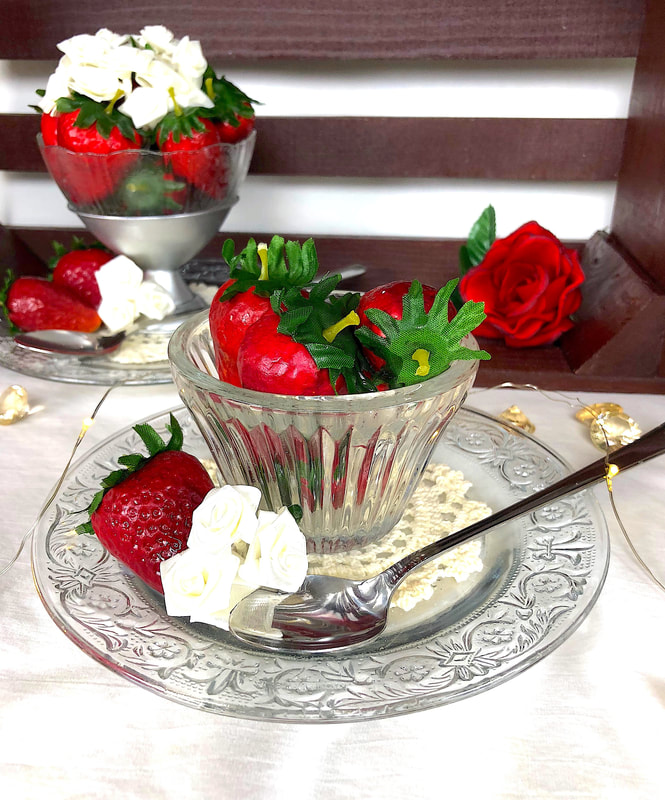 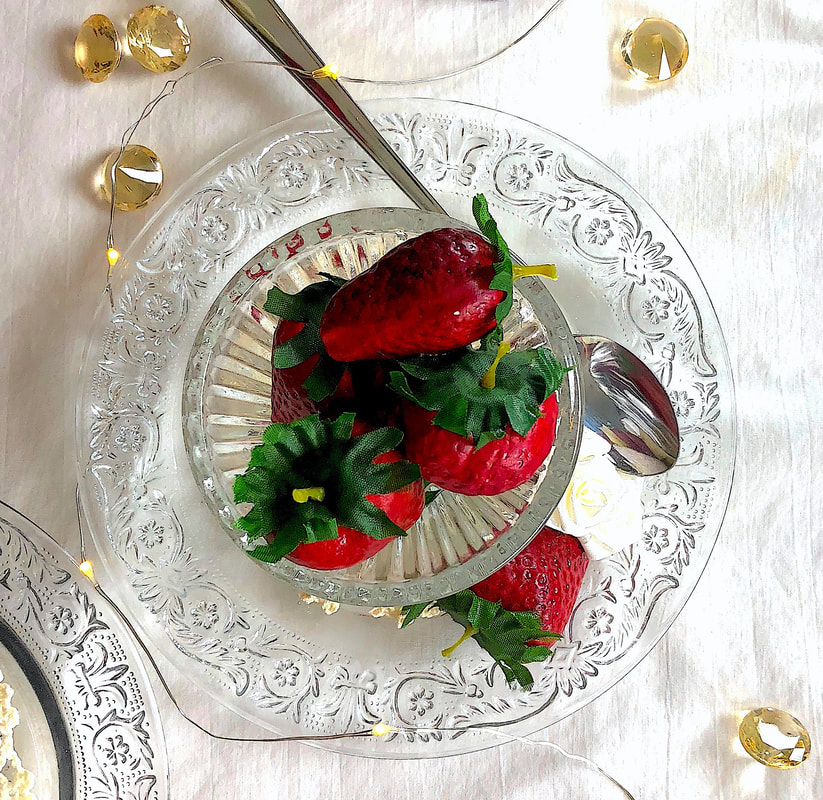 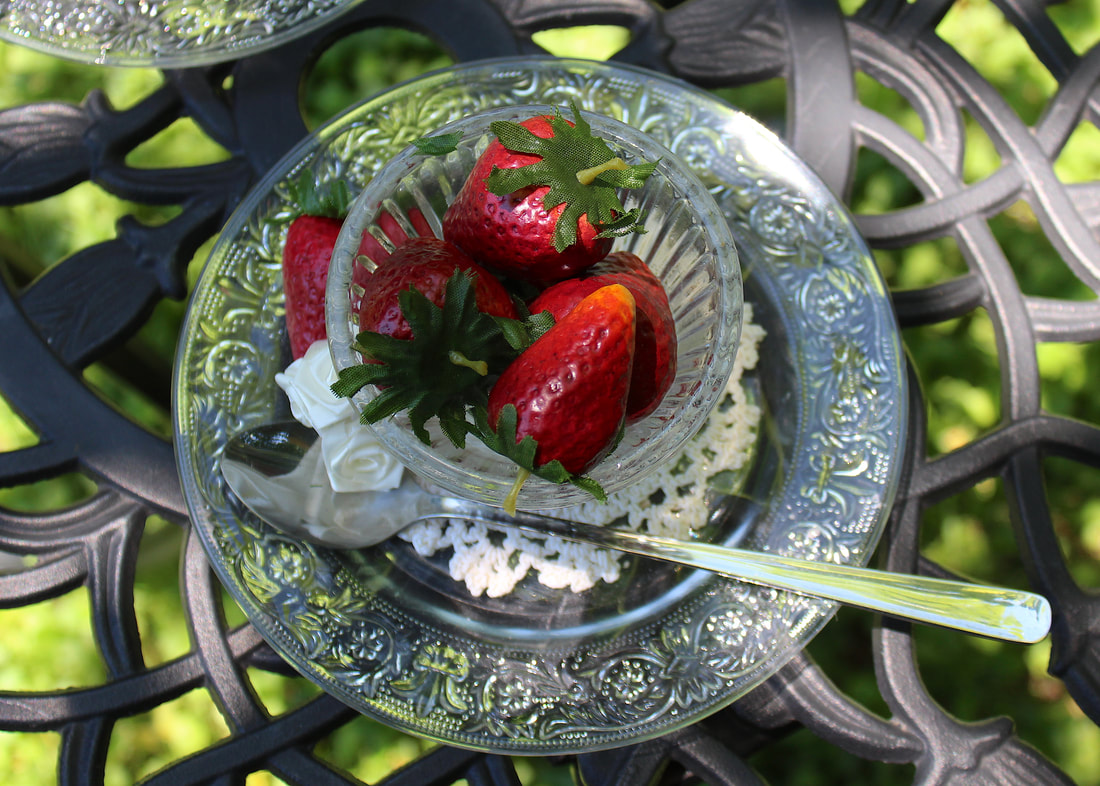 The strawberries look so real!!! I’ve had people ask and touch them to make sure… This ended up being such a charming and delicious-looking display for the kitchen! So what do you think? Do you have any DIY kitchen decor you’d like to share? Feel free to drop a line in the comments! This article contains external links for demonstration purposes only, and are not endorsements for specific products or brands. Related blog posts you may want to read: Tropical themed projects with repurposed dessert cups Repurposed vintage candy dish and cocktail glasses DIY with faux florals, birds, and repurposed thrift store finds |
Author
Some of the posts on this site contain affiliate links. This means if you click on the link and purchase the item, I will receive an affiliate commission. 
Categories
All
Archives
April 2024
|