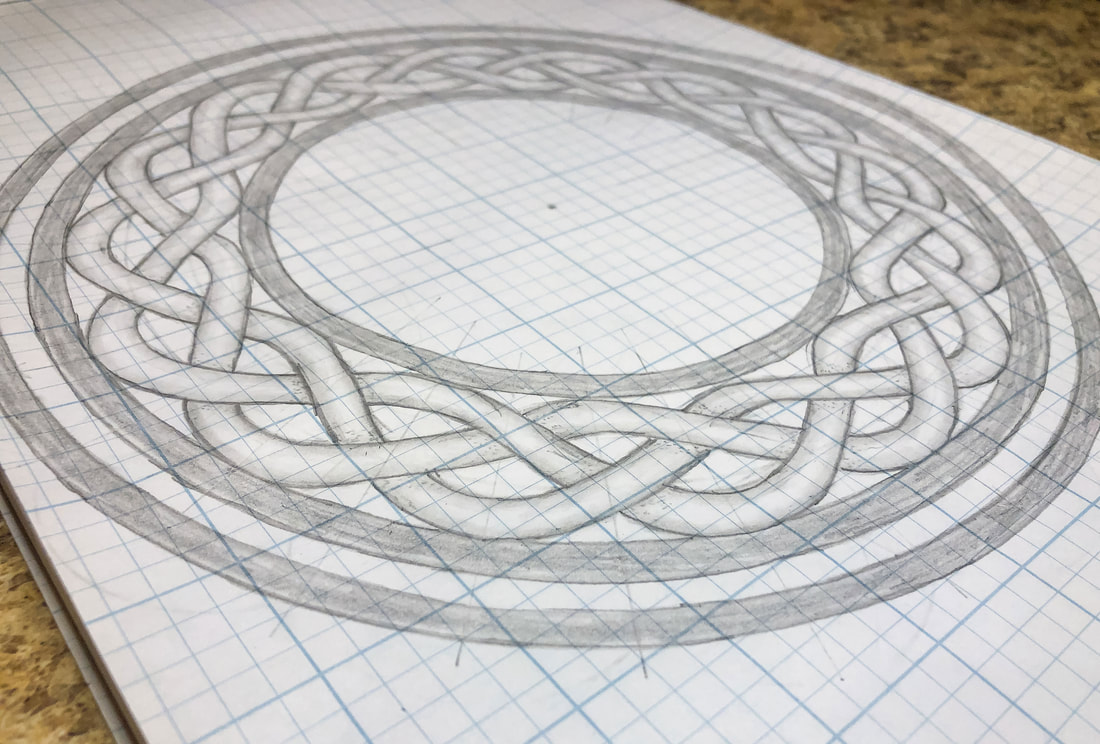
 Hi again everyone! Are you ready for another Celtic drawing tutorial? This one is more complex than the border knots we’ve previously done. If you haven’t seen those tutorials, I suggest you click on the “Related blogs you may want to read” links at the end of this blog before attempting this circular Celtic knot tutorial. This tutorial is more advanced, and it will be beneficial to learn some basics first! Having said that, anyone can do this! I broke the process down into easy-to-digest bite-size snippets so that even a Celtic knot newbie can follow along! There are a lot of steps, so let’s jump right in… Below is a list of supplies you may want on hand (Blick Art affiliate links are included), but you certainly don’t have to have all of these supplies to do this tutorial. Just find yourself a piece of paper, a pencil, an eraser, and a ruler, and let’s get to drawing! Gather your supplies: Drawing pencils Markers Blending stumps Eraser Clic eraser Ruler Horse hair brush Grid paper Sketch pad Tracing paper Before you begin: Any lines and marks you make in steps 1 through 9 should be drawn using light pressure and/or a 2H drawing pencil. Most—if not all—of these lines will eventually be erased, as they are only guidelines for your final design. Also, you may want to watch this YouTube tutorial, especially if you are only using a few basic tools: How to find the center of a line, arc, and circle without a ruler Step 1: Place a dot in the middle of your paper. Make four marks 4.5” from that dot, above, below, and on either side. Using a compass, lightly draw an outer circle, which should be 9” in diameter. 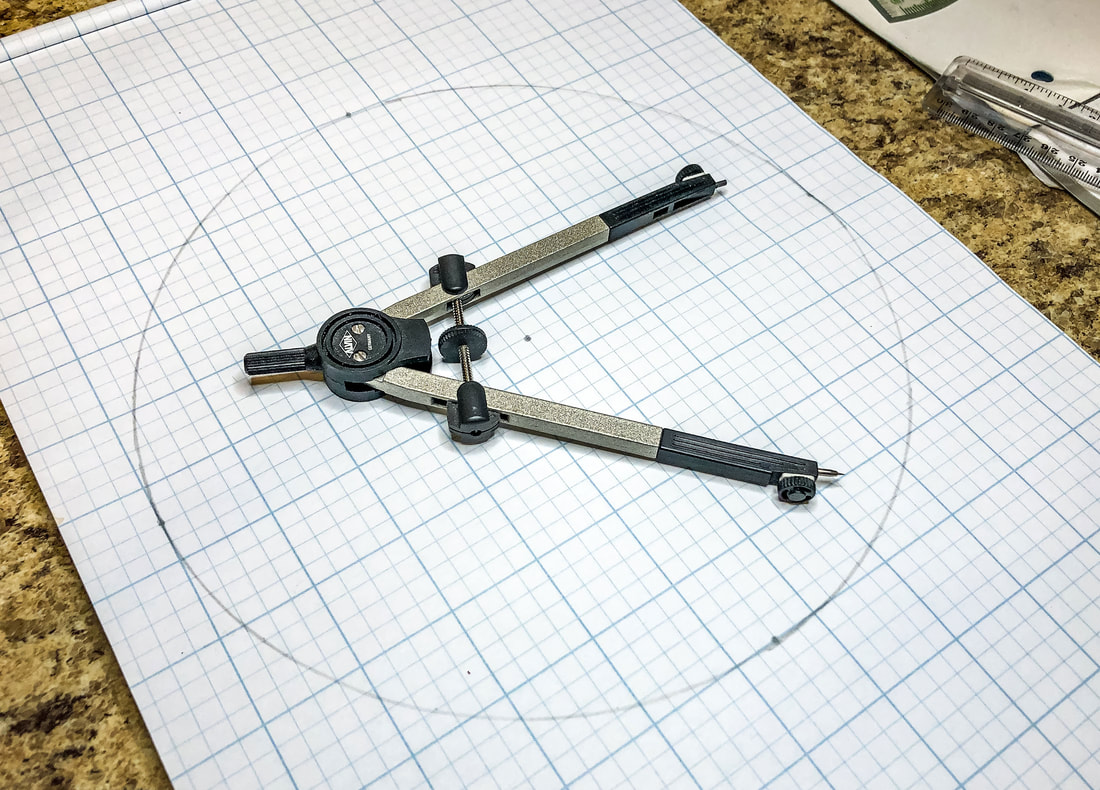 Step 2: Make marks 1/2” inside that circle. Using a compass, draw the first of three inner circles. Follow the same steps to create the next two inner circles. You should now have four concentric circles, 1/2” apart each. 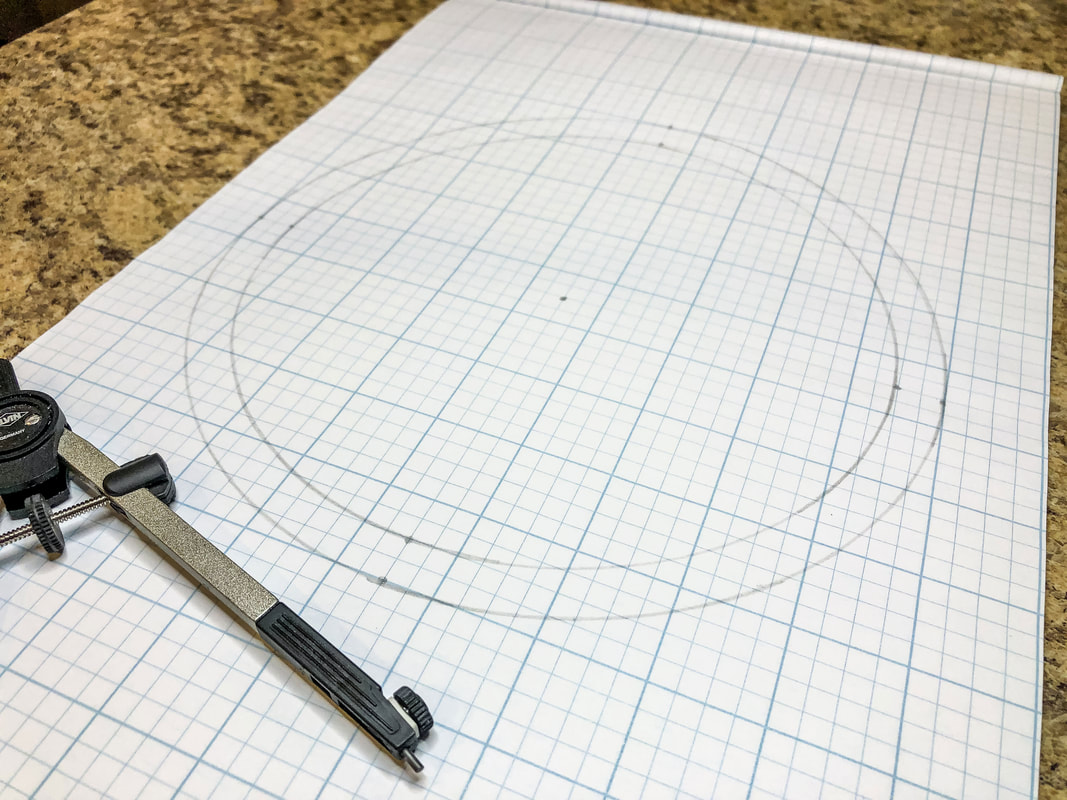 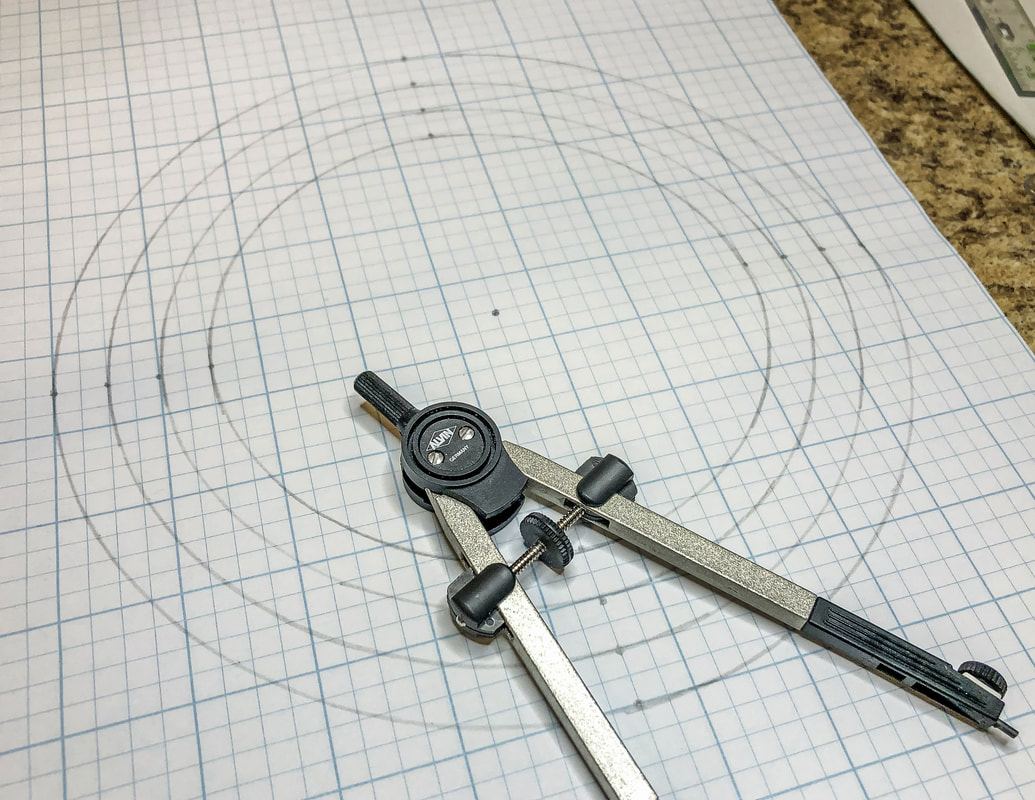 Step 3: Using a ruler, T-square, or grid as your guide, lightly divide the circles into halves horizontally and vertically, creating equal quadrants. 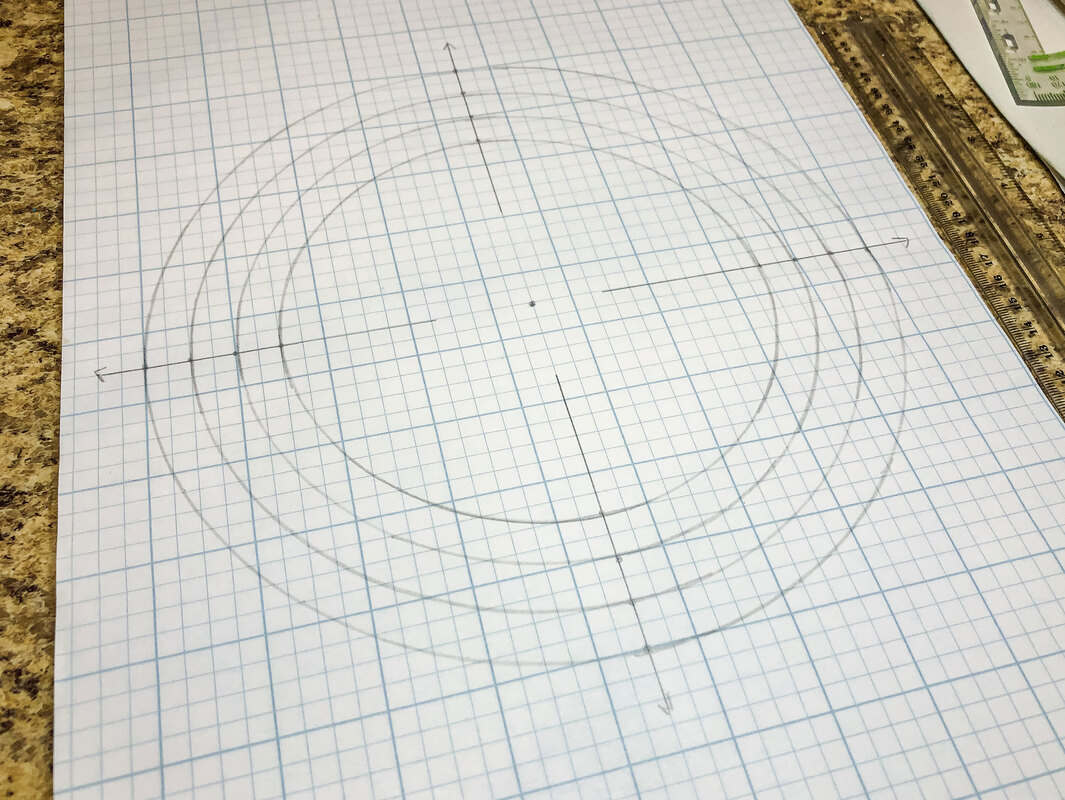 Step 4: Divide each quadrant into half using a protractor marking at 45˚. (If you don’t have a protractor watch the YouTube short previously listed to find the center of the arc.) You should now have eight sections. 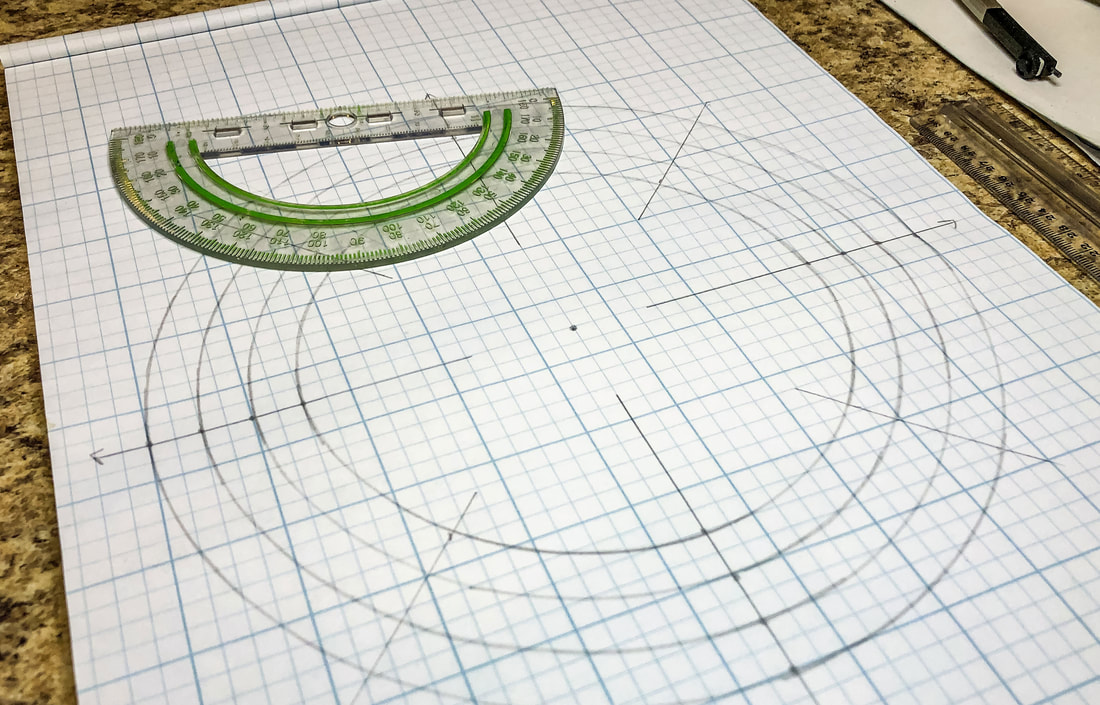 Step 5: Divide each of the eight sections in half again using a protractor marking at 22.5˚. (If you don’t have a protractor watch the YouTube short previously listed to find the center of the arc.) This will give you 16 sections. 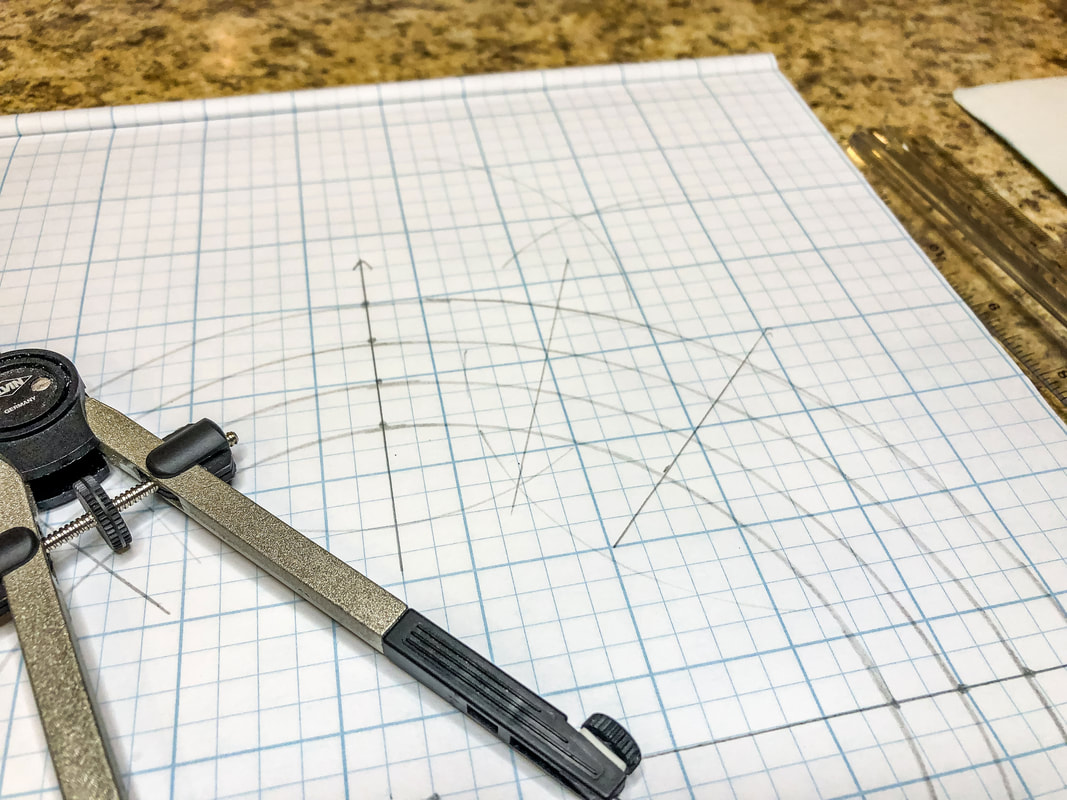 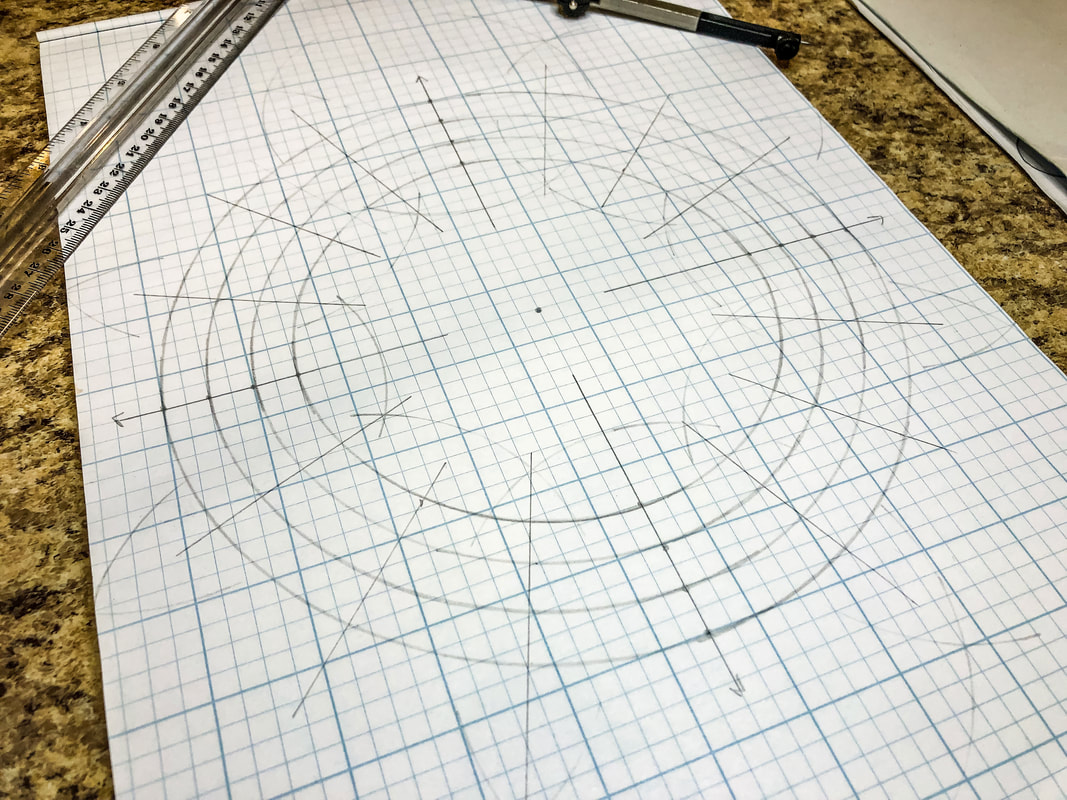 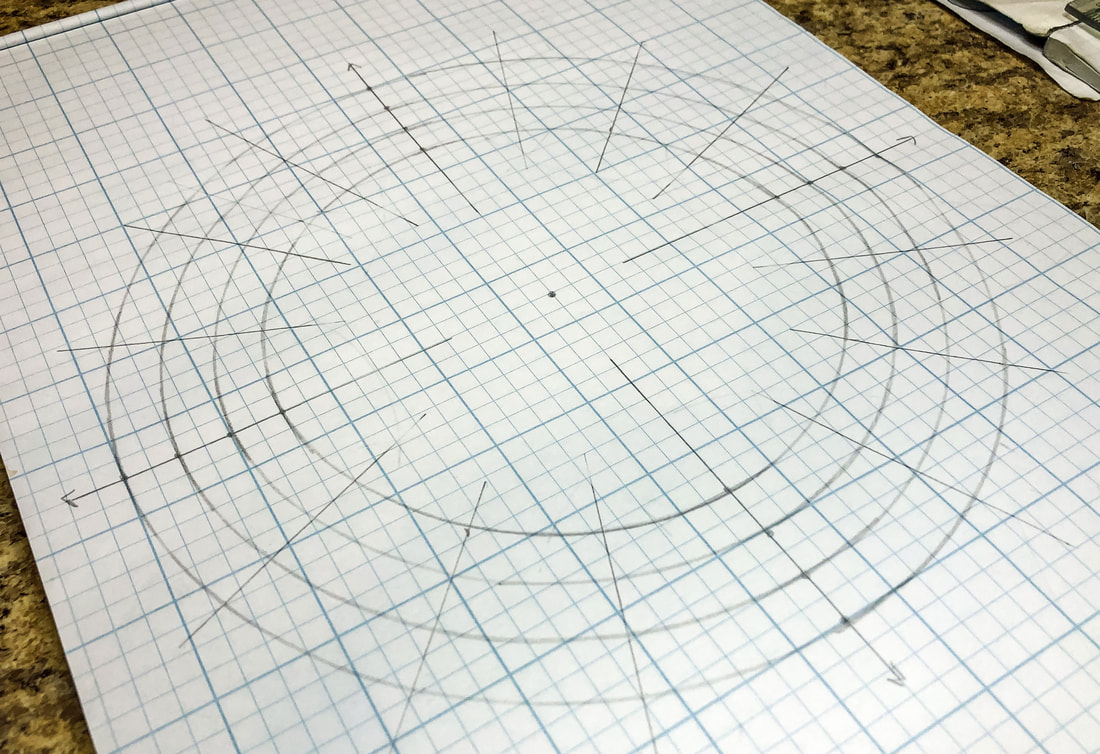 Step 6: Divide each of the 16 sections in half again using a protractor marking at 11.25˚. (If you don’t have a protractor watch the YouTube short previously listed to find the center of the arc.) This will give you 32 sections, creating your circle grid for your design. 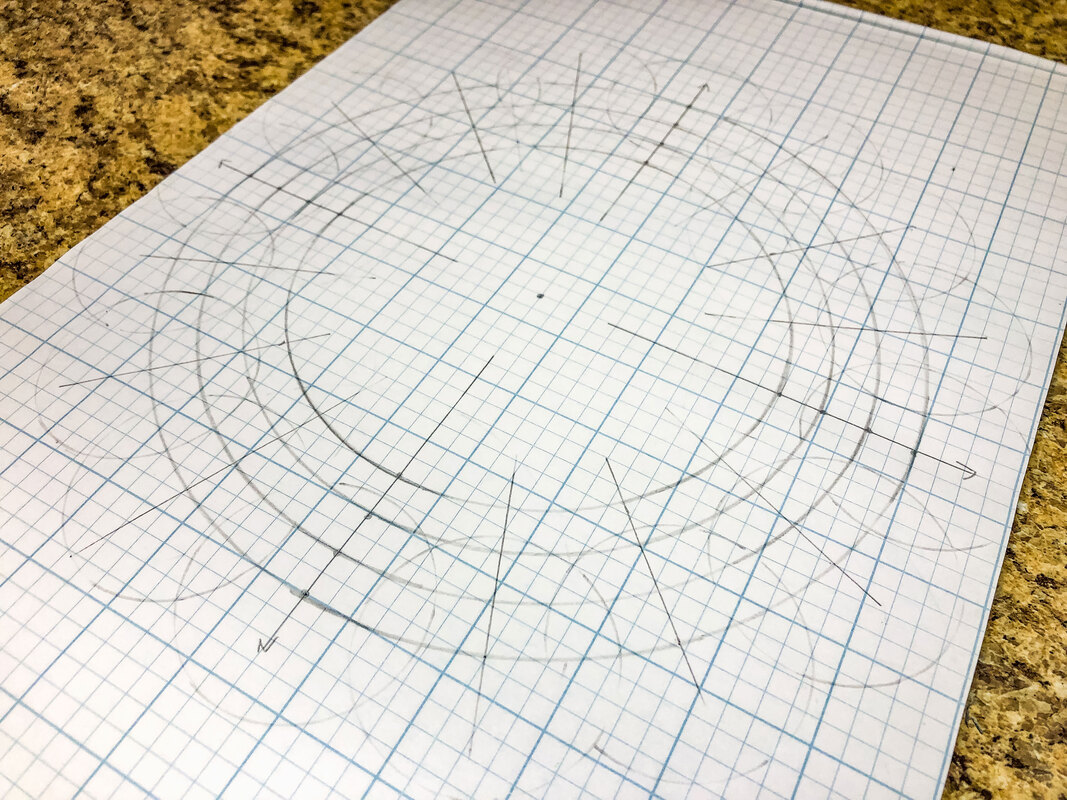 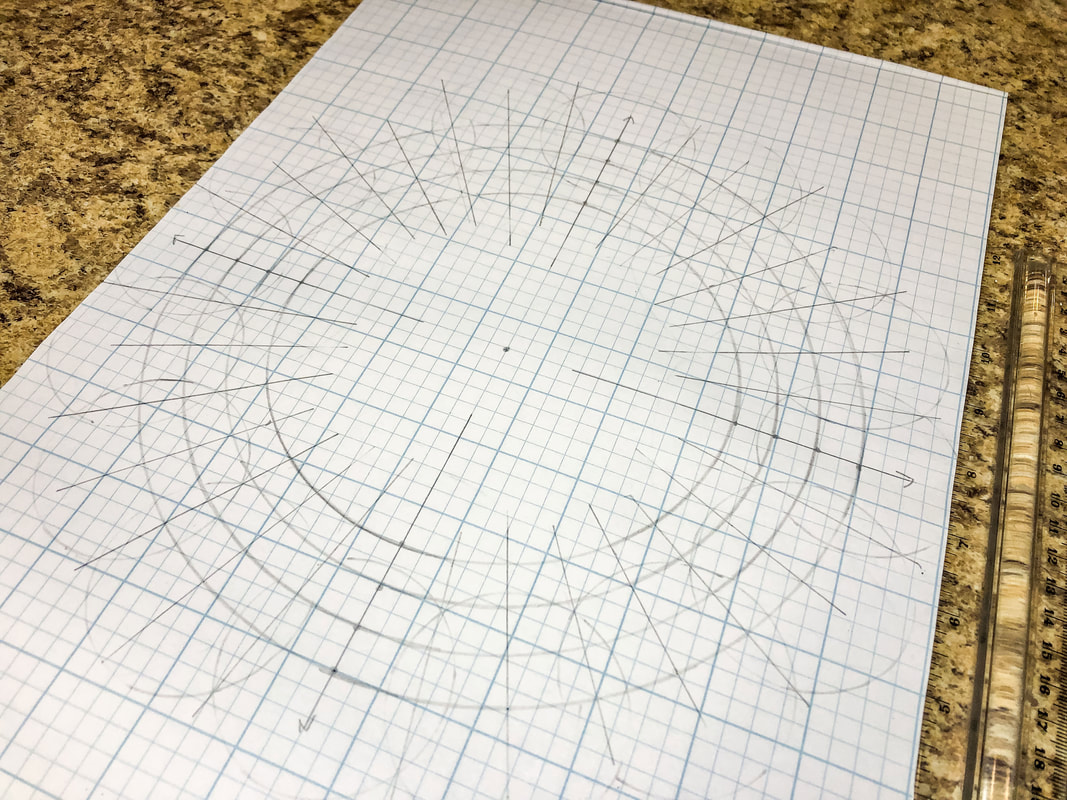 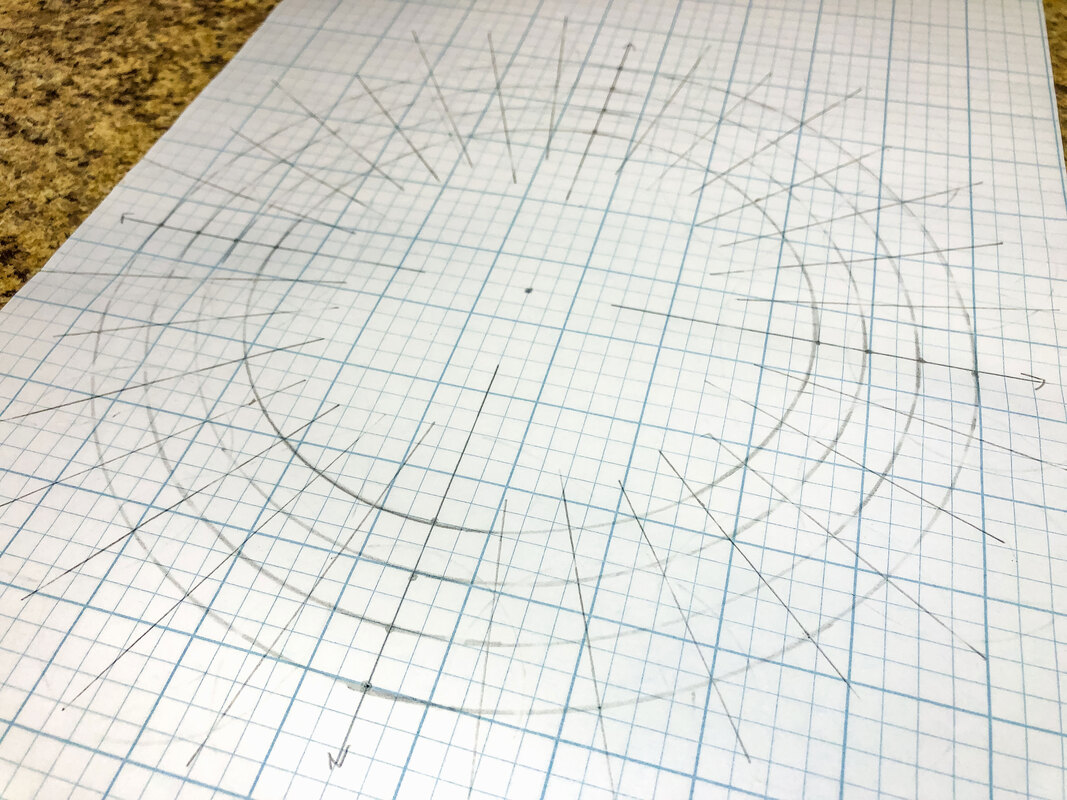 Step 7: Lightly draw a curved line spanning two outer blocks connecting the two intersections, as shown below. Do the same for the rest of the outer ring.  Step 8: Lightly draw a curved line spanning two inner blocks connecting the two intersections, as shown below. Do the same for the rest of the inner ring. 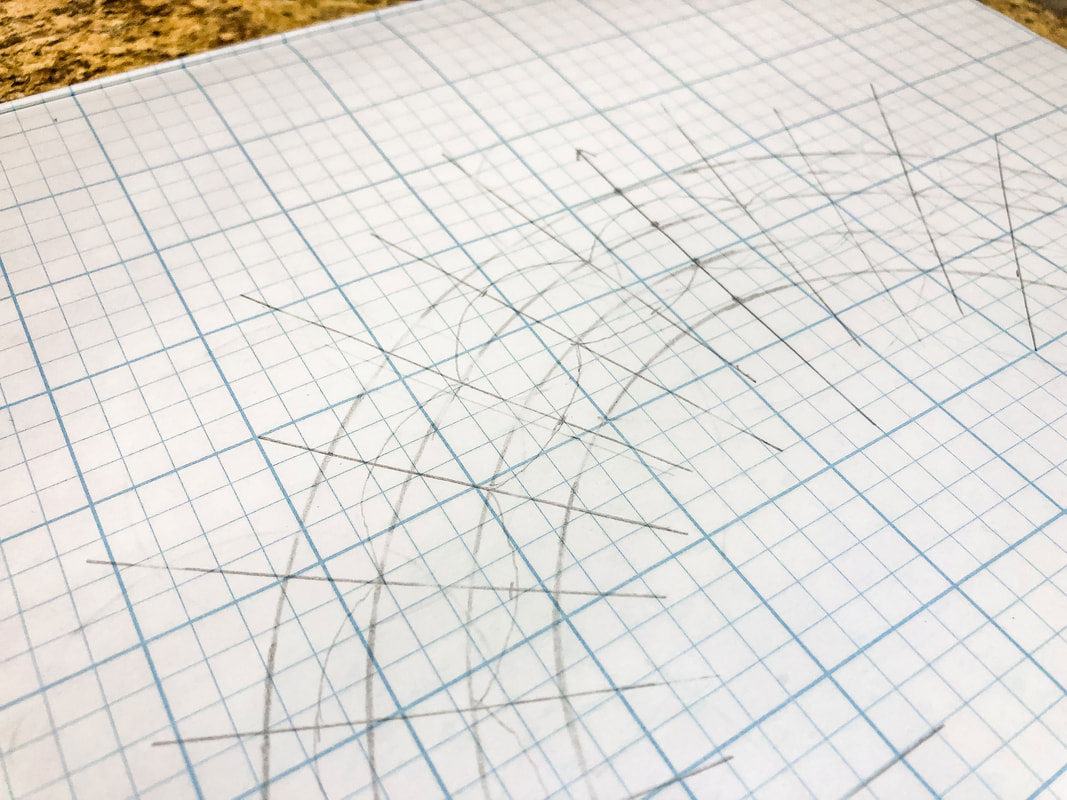 Step 9: Lightly connect the top and bottom arcs with diagonal lines. This gives you a pretzel shape and the spine of the braid. 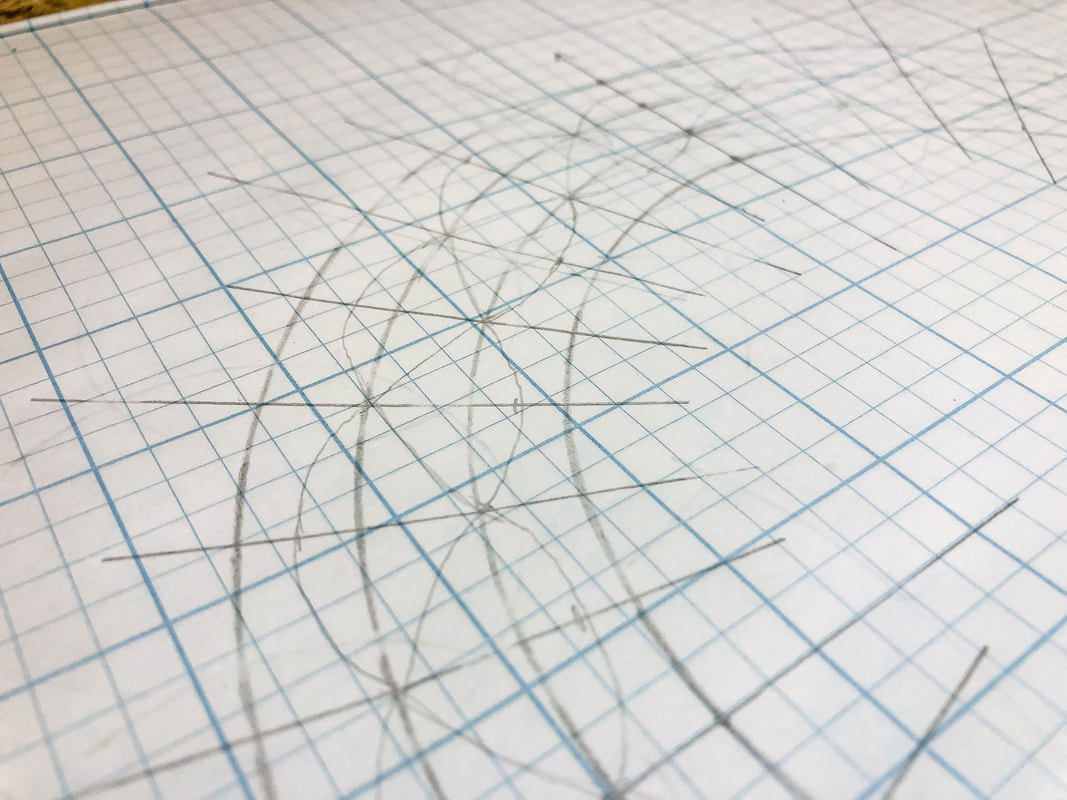 Step 10: Draw slightly darker lines on either side of this spine, parallel to each other, as seen below. Keep the distance between the lines consistent. 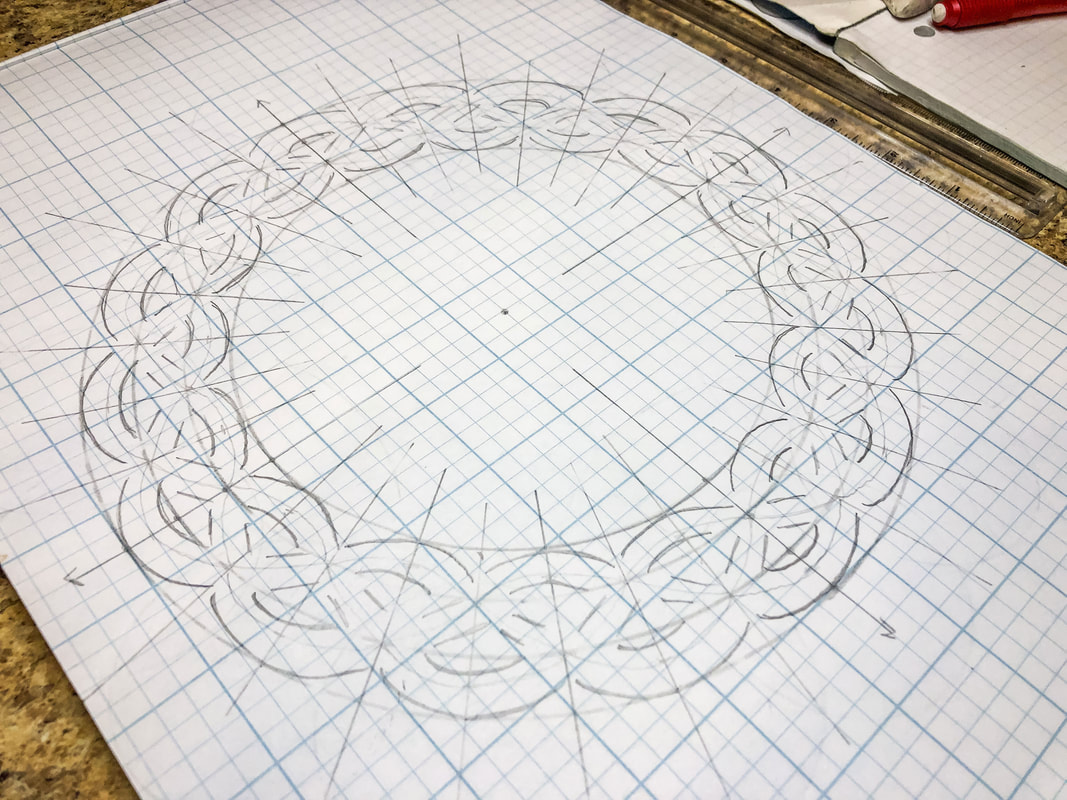 Step 11: Erase the inner line (the spine). 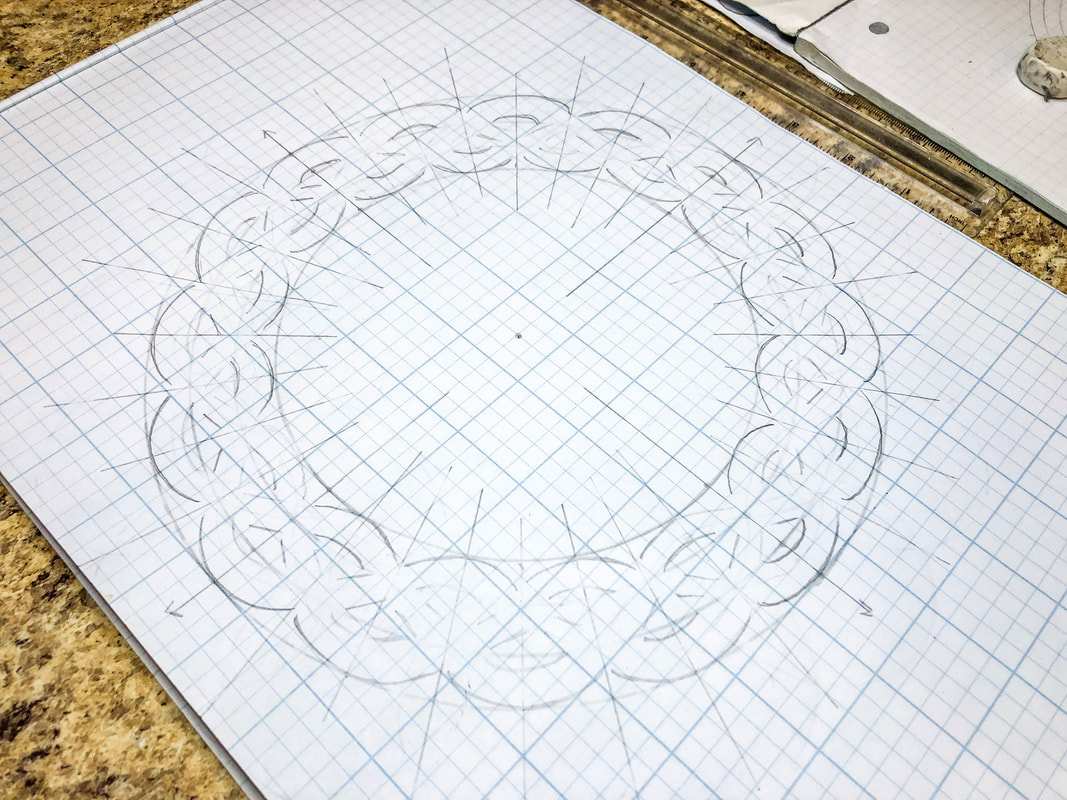 Step 12: Pick a place where two threads intersect. Start at this spot, drawing one thread crossing over another, erasing any unnecessary lines. 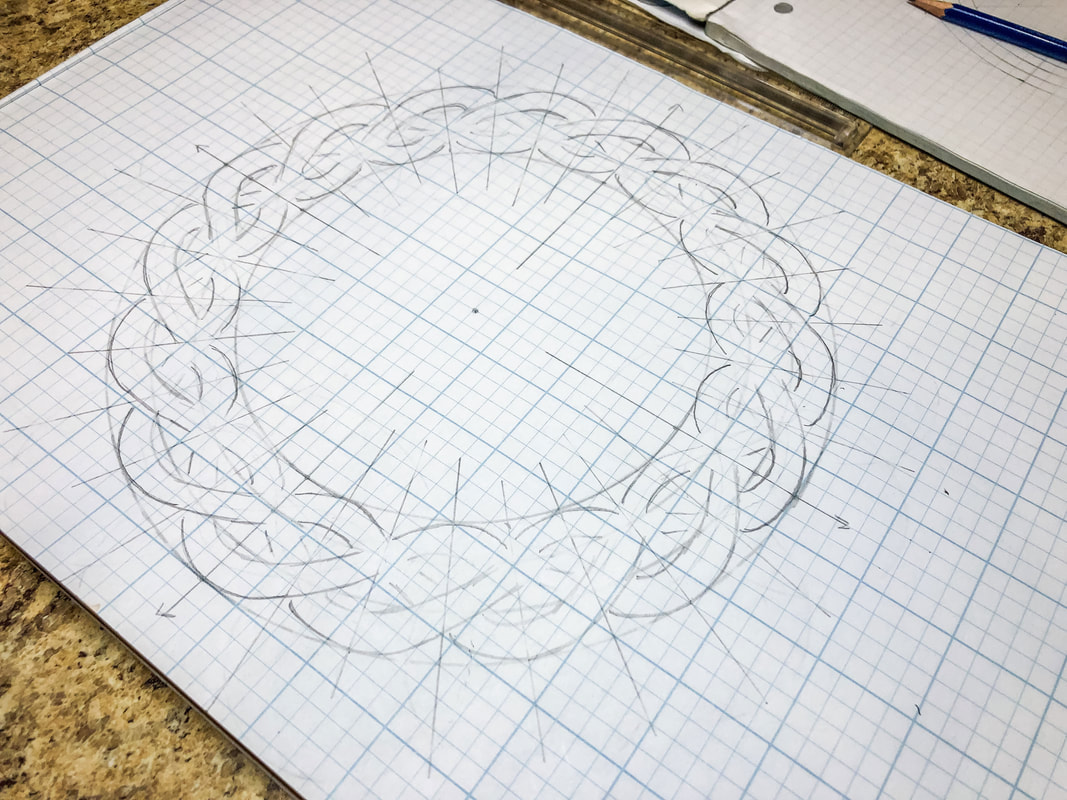 Step 13: Moving from this point, follow the thread that crossed OVER to the very next spot where there is an intersection and draw that thread crossing UNDER the next thread. Follow this pattern, working around the circle until you return to the beginning intersection. If you did it right, every intersection of your thread should alternate over-under, over-under, over-under, etc., creating a weave pattern. 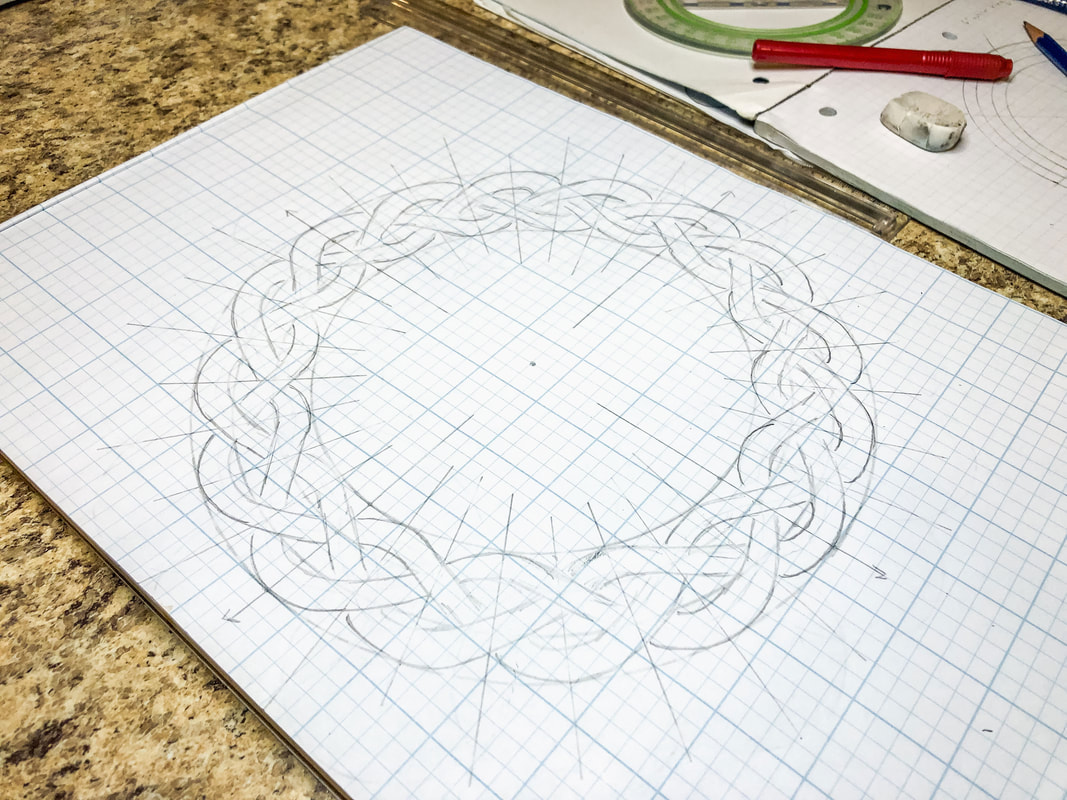 Step 14: Double-check your overs and unders, then erase any unnecessary guidelines and start adding shading where the threads intersect to add depth. 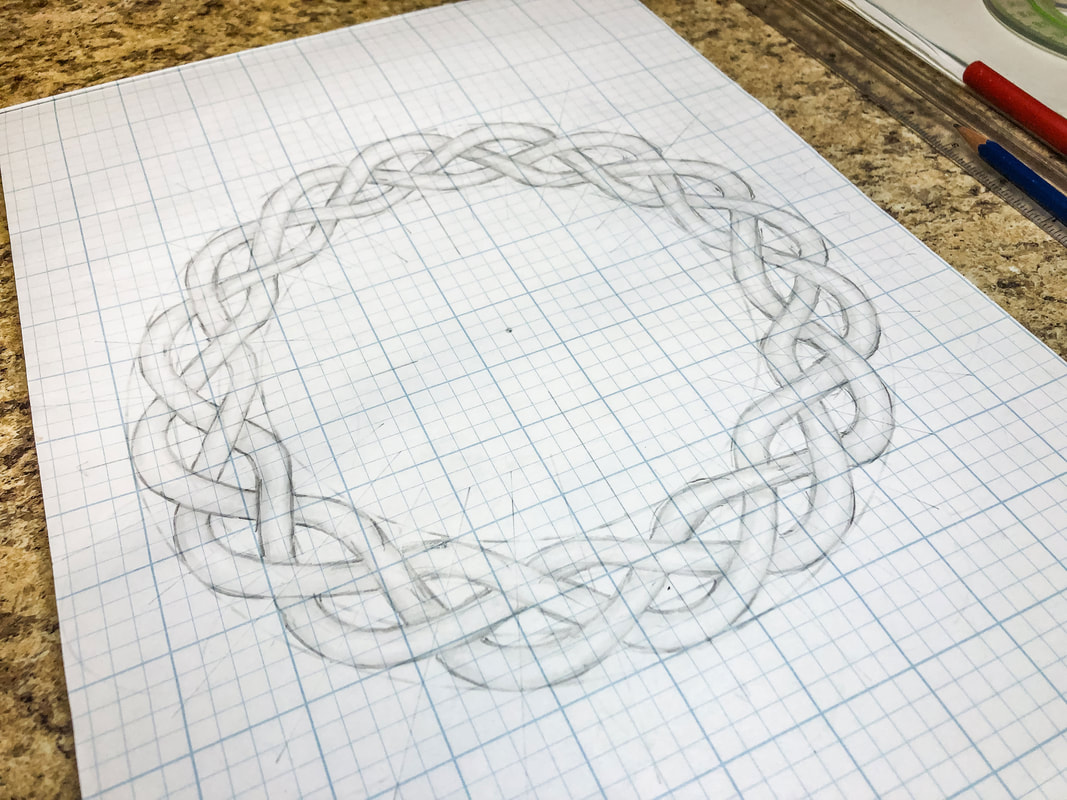 Step 15: Darken your lines using a pencil or marker and stylize as you wish. And you’re done! 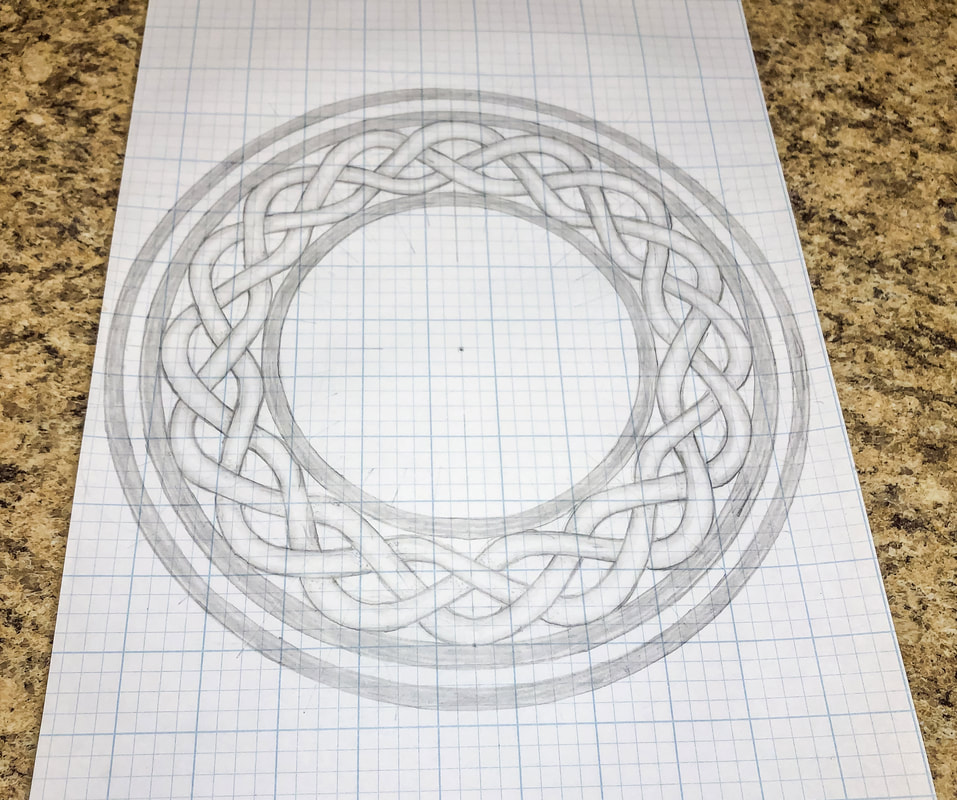 How did it go? I hope you enjoyed this project and are encouraged to try more designs of your own! I’ll be creating additional tutorials using this basic braid as a template for making more intricate designs, so stay tuned! I created a YouTube tutorial to go with this blog for those of you who are visual learners like myself! You can view the full video tutorials on my YouTube channel here! Related blogs you may want to read: Basic twist step-by-step drawing tutorial using grid paper Celtic braid step-by-step drawing tutorial Basic border knot with vertical breaks, step-by-step drawing tutorial Basic border knot with horizontal breaks, step-by-step drawing tutorial DIY chalk-painted tray with Celtic border A fun DIY project with paint and a thrifted mirror part 2 The Celtic Motherhood Knot, a symbol of love Celtic Tree of Life Basic Celtic Knot Tutorial Part 1 Celtic Knot Tutorial Part 2 Some of the posts in this article contain affiliate links. If you click on the link and purchase the item, I will receive an affiliate commission at no extra cost to you. I will only recommend products or services I use personally and/or believe will add value to my readers, so there is no conflict of interest.
0 Comments
Get into the Halloween spirit with these 11 home accents from Amazon! 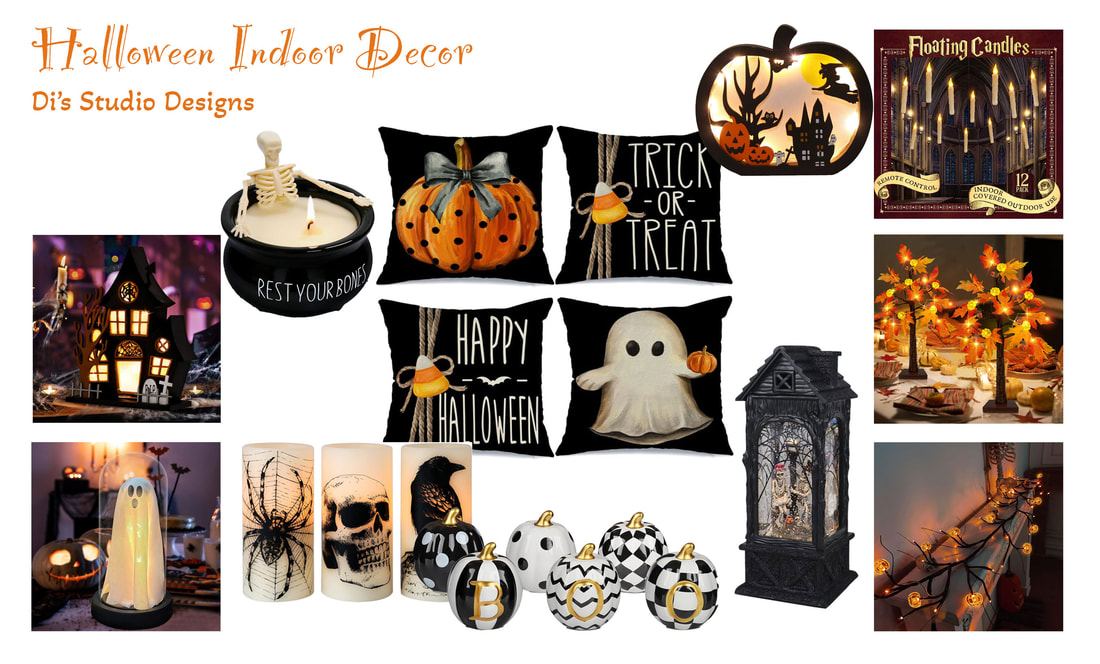 Images from Amazon.com. Click the links below to view or purchase. Some of the posts in this article contain affiliate links. If you click on the link and purchase the item, I will receive an affiliate commission at no extra cost to you. I will only recommend products or services I use personally and/or believe will add value to my readers, so there is no conflict of interest. October is upon us, and if you haven’t started your Halloween decorating yet…well…what are you waiting for?! Maybe you just need a bit of inspiration…So here are some unique indoor Halloween decor items to infuse the Halloween spirit into those tables, mantles, counters, and other interior spaces. Whether you are just looking for a few simple pieces of decor or you’re one of those who go full-on Halloween in your home, this list has something for everyone! And now that I’ve inspired you, I need to get back to my OWN Halloween decorating! Item 1—Prelit Battery Operated Maple Fall Tree Decor 20” by TURNMEON We’re kicking off the list with this prelit tabletop tree with vibrant orange maple leaves. The silk leaves are accented with acorns and battery-operated pumpkin lights. The branches are adjustable, allowing you to tweak the look of your tree. Doesn’t this adorable little tree just scream fall?! 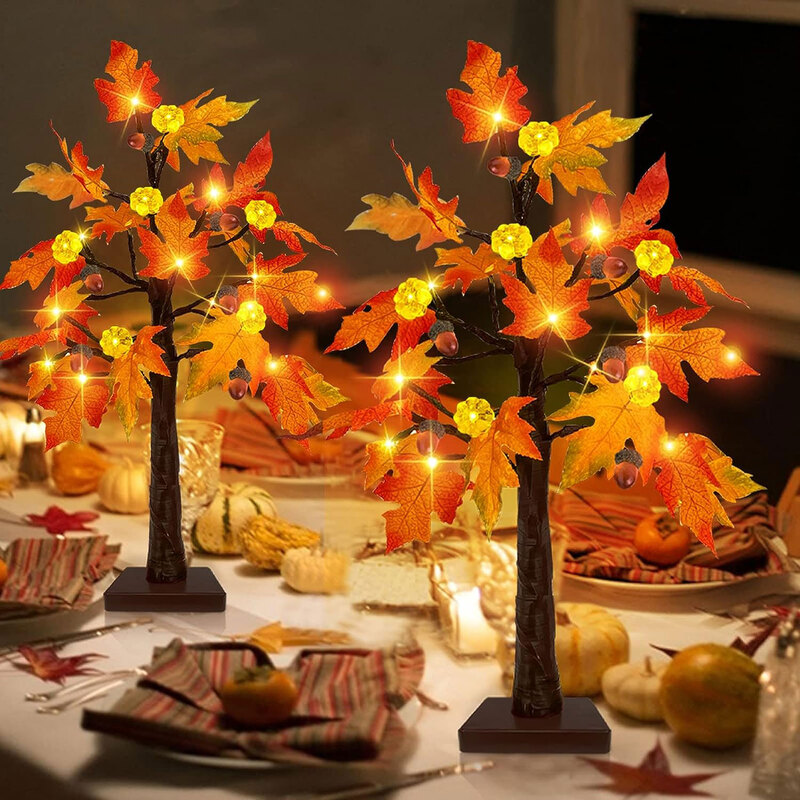 Item 2—Light-Up Ghost in Glass Cloche by FestalMart Everyone needs a cloche this season! How about this spooky light-up ghost with an adjustable light? This is such a unique handmade product! 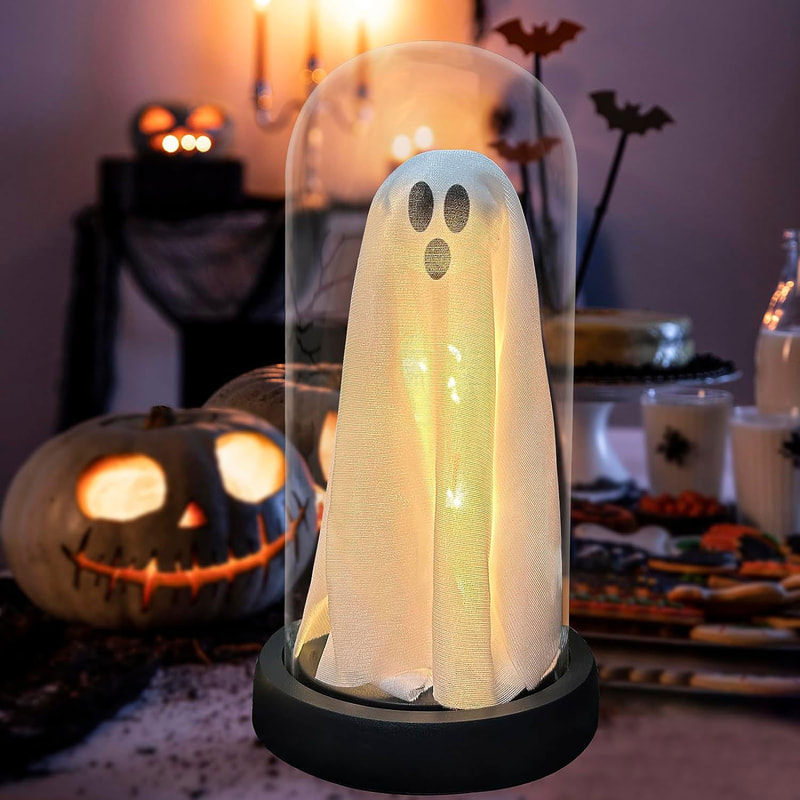 Item 3—Lighted Wooden Haunted House with Ghost Tree by Bunny Chorus Store Check out this gothic-looking haunted house! The house is lit by built-in white string lights that create a spooky silhouette to spruce up your Halloween mantle or table.  Item 4—Ceramic Black and White Halloween Pumpkins Set of 6 by DAZONGE These black, white, and gold ceramic pumpkins come in a pack of six for multiple vignette options. The colors will complement any fall or Halloween decor scheme, whether your decor is simple and bright or dark and creepy! 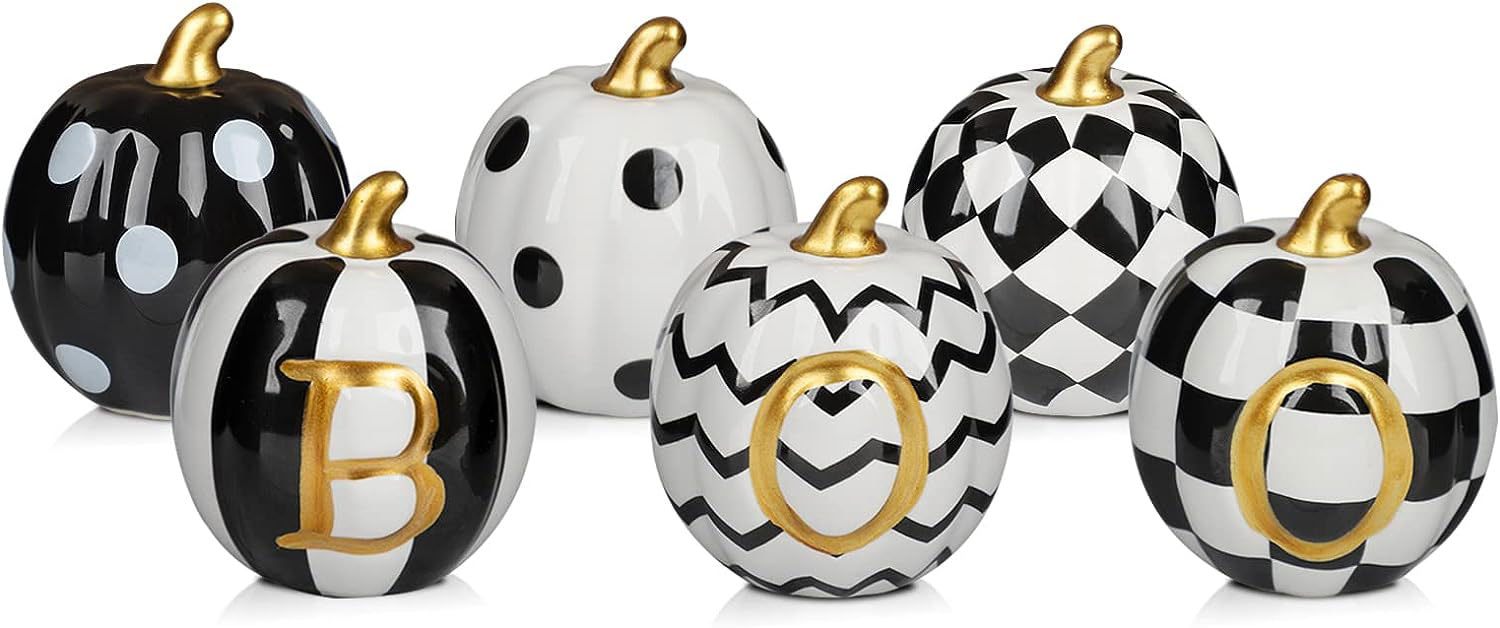 Item 5—Willow Vine Battery Operated Twig Decor Garland by TURNMEON The willow vine adjustable garland matches the prelit maple trees mentioned earlier, so you can pull together a cohesive look. The pumpkin light branch has a variety of lighting settings and is perfect for a wall, mantle, or dining room table. 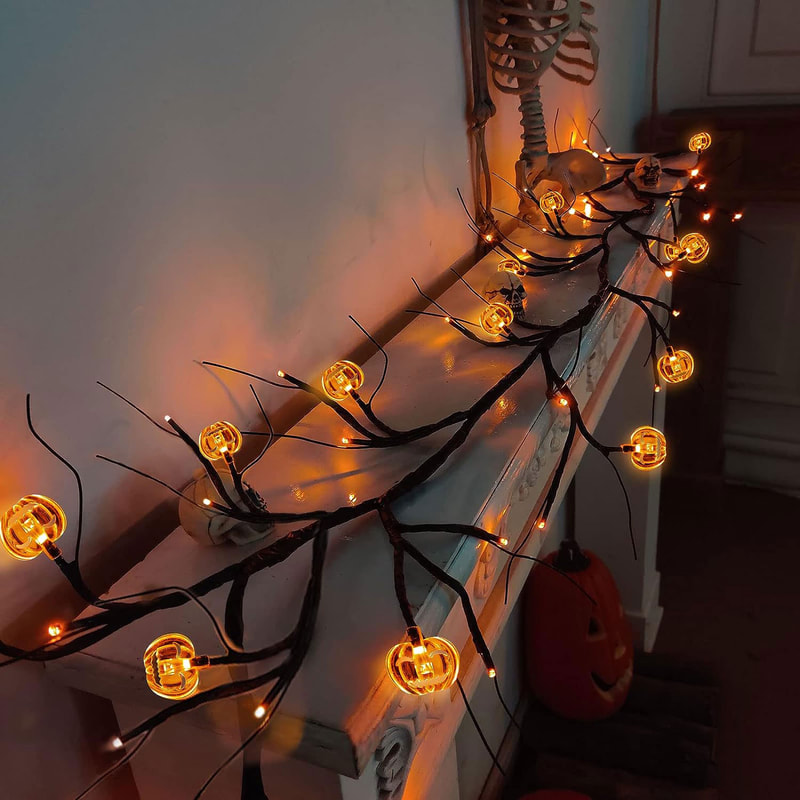 Item 6—Trick or Treat Halloween Pillow Covers Set of 4 18 x 18 by CORINTH How about these whimsical rustic pillow covers for Halloween?! This set of 4 pillow covers is durable and machine washable. 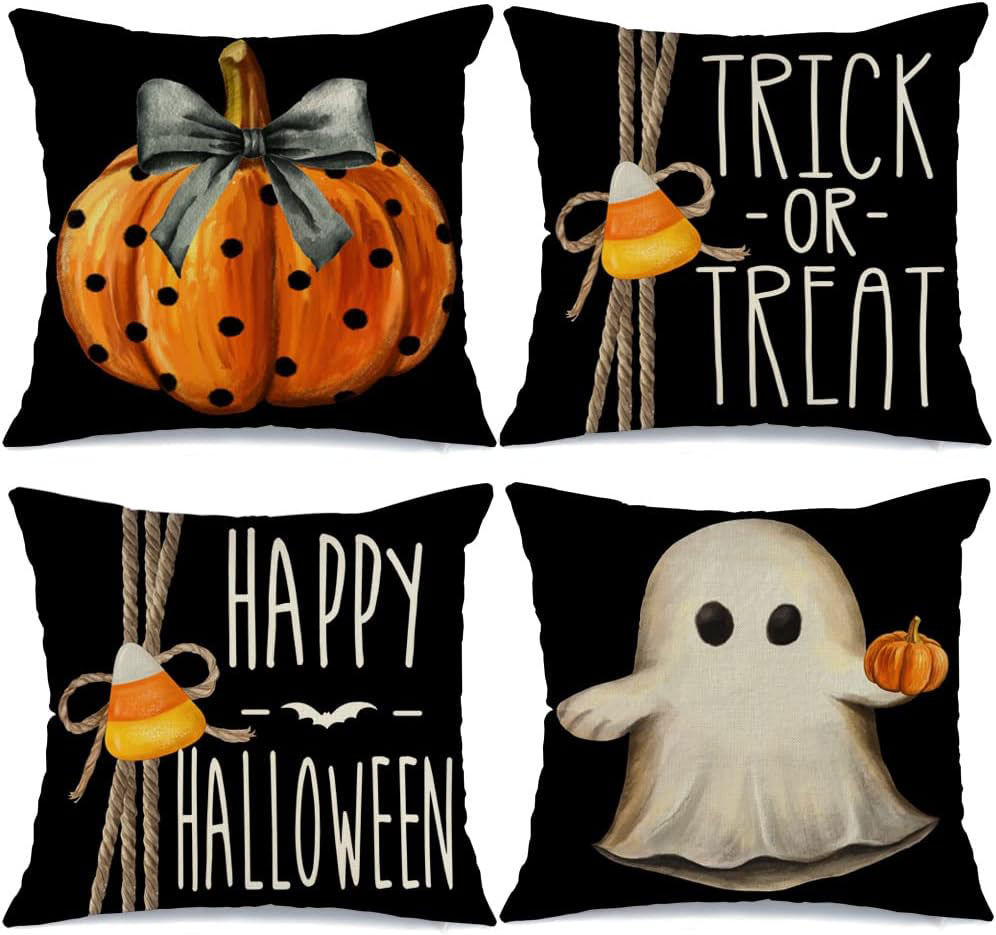 Item 7—Light Up Wooden Pumpkin Table Centerpiece by FOIMAS If you need something to take your Halloween table or vignette to the next level, this wooden frame with a haunted Halloween scene might fit the bill! Lights inserted into the frame illuminate the scene from behind, creating a spooky silhouette. 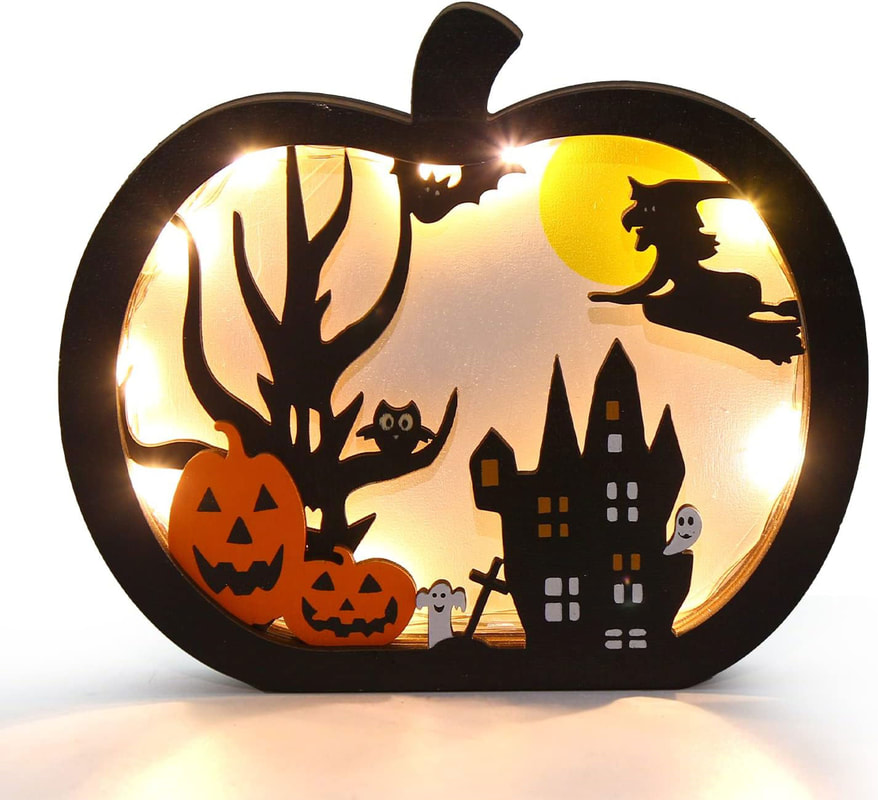 Item 8—Halloween Ghost Projection Snow Globe Lantern by Eldnacele This spooky Halloween lantern snow globe featuring skeletons in a graveyard is a unique find! The creepy scene is lit with an LED light, creating an eerie glow. 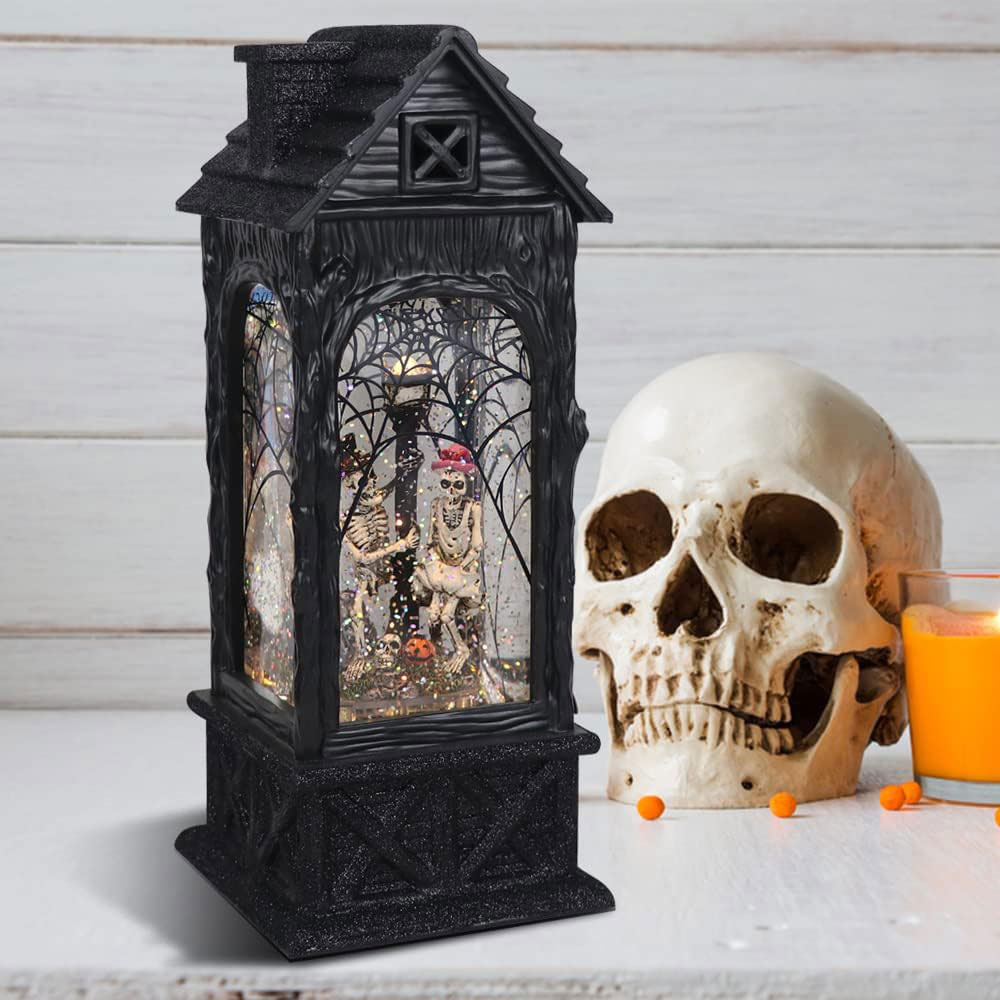 Item 9—Halloween Flickering Candles Set of 3 by Eldnacele Your Halloween vignette needs this set of three LED wax pillar candles with spooky Halloween decals! The flameless candles have flickering lights for a realistic eerie effect. These candles work well in this simple Halloween decor scheme but would also look right at home in a Dark Academia setting! 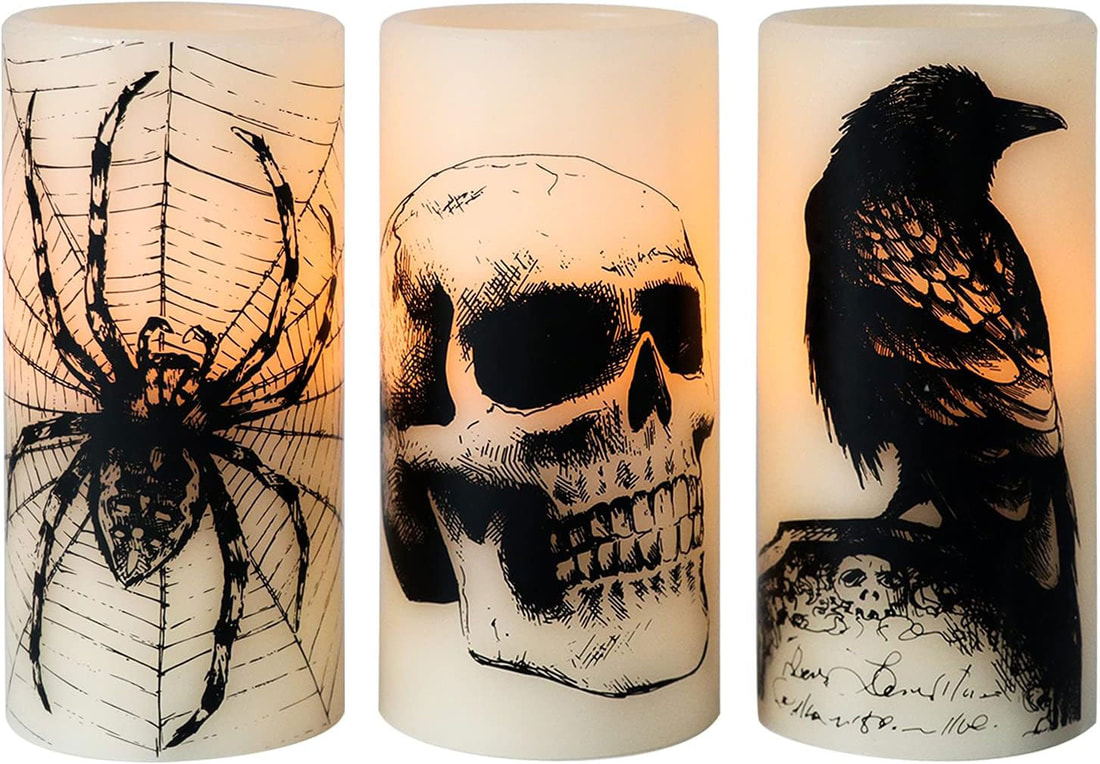 Item 10—Halloween Skeleton Candle by ORIENTAL CHERRY This skeleton in a cauldron candle is a must-have! The soy wax candle burns for up to 50 hours—so your bony friend can take a long bath!  Item 11—Floating LED Candles by ORIENTAL CHERRY Give your home the Hogwarts treatment with these floating LED candles! Hang the candles from the ceiling and let the mesmerizing flickering lights set the tone for a spooky Halloween experience!  Related blogs you may want to read: Halloween lawn decor ideas Dark Academia for the Fall Create a cozy relaxing interior space this fall with neutral colors Brighten up your autumn decor with these items Pastel decorating ideas for autumn Need ideas for incorporating the color blue into your fall decor? Inspirational ideas for creating that cozy boho style Nine hygge decor ideas Winter color palette ideas for your home decor Design concept for a dreamy coastal interior Let’s talk Bohemian Surround yourself with these 12 dark and cozy items from Amazon this fall! 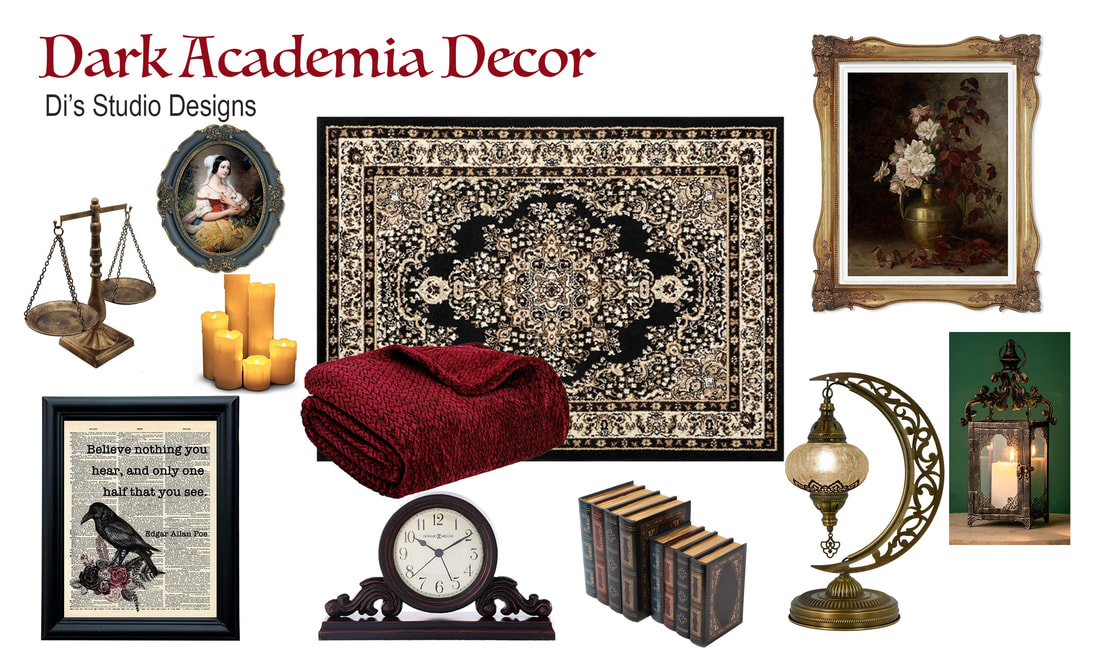 Images from Amazon.com. Click the links below to view or purchase. Some of the posts in this article contain affiliate links. If you click on the link and purchase the item, I will receive an affiliate commission at no extra cost to you. I will only recommend products or services I use personally and/or believe will add value to my readers, so there is no conflict of interest. What is this Dark Academia decor style that is all the rage right now? It’s certainly not a new aesthetic, having been around since Victorian times. This dark and broody decor style has now been “rediscovered” by a new generation looking for a mature design style that feels like an escape from our hectic modern world. The look can be achieved with dark woods, Victorian furniture, antique ornate frames, and bookshelves full of collegiate material and old books. Decorate the space with accents that harken back to the age of discovery, such as botanical prints, species of butterflies in picture frames, scientific equipment like scales, a world atlas or globe, and a few exotic items from around the world. If you’d like to make the space look more Gothic, use black, grey, and deep red colors. Add spookier accents like skeletons, skulls, candelabras, black crows, and books by Edgar Allen Poe. Now you’re all set for Halloween! I scoured Amazon to find a few decorative accents you could use in a Dark Academia space or serve as inspiration for recreating the style in your own home. Let me know in the comments whether you tried any of these! What do you think of this design aesthetic? Is it your cup of tea? I’d love to hear your thoughts! Item 1—Wine Red Fleece Sofa Throw 60 x 80 by PAVILIA Curl up in a cozy wingback chair and wrap yourself in this dark burgundy fleece blanket! The luxurious velvety texture and moody red color perfectly complement the Dark Academia aesthetic. This microfiber polyester blanket is machine washable and won’t pill. 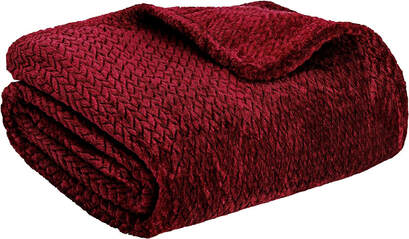 Item 2—Blue Oval Frame with Gold Trim 8 x 10 by SIMON’S SHOP This deep blue picture frame with gold trim looks aged and antique, perfect for a Dark Academia vignette or wall space. 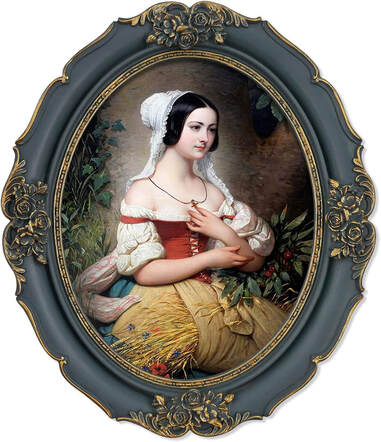 Item 3—Gold Picture Frame 11 x 14 by SIMON’S SHOP Need an antique-looking frame for a botanical print or wall mirror? This ornate gold frame looks Victorian and vintage and would complement the Academia style. 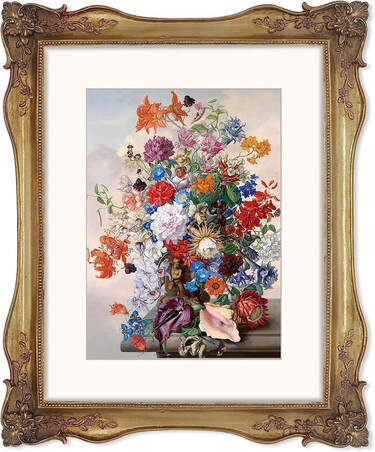 Item 4—Indoor/Outdoor 16” Decorative Lantern by DECORKEY This ornate metal lantern has a bronze finish that makes it look aged. Put a candle inside to create a moody ambiance in the room. The lantern can be hung or placed on a fireplace mantel or table with the rest of your decor. 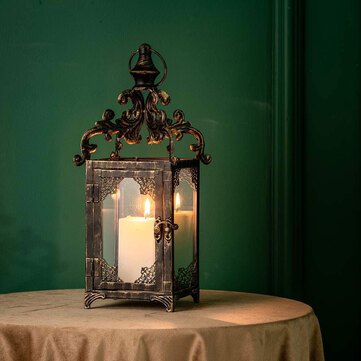 Item 5—Edgar Allen Poe Spooky Decor by insovita Are you an Edgar Allen Poe fan? Add a little spooky academia to your space with this vintage-inspired book page with a crow inside a black frame. Perfect gothic touch for Halloween!  Item 6—Dark Academia Botanical Wall Art 12 x 16 by AWTJIS This moody botanical print is a must-have for your Dark Academia space! Set the artwork inside a vintage-looking frame and hang it on a dark wall, and you’re all set! 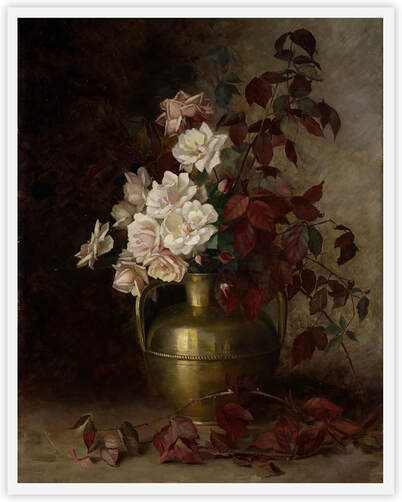 Item 7—Turkish Clear Glass Moon Shape Table Lamp by mozaist Conjure up a worldly aesthetic in your space with this exotic desk lamp with Turkish glass! The arabesque style hints at a well-traveled person who appreciates a broody academic style…or someone who loves the mysterious! 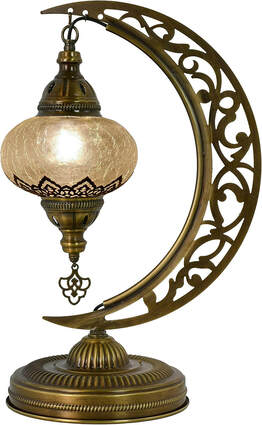 Item 8—Bishop Table Clock with Worn Black Finish by Howard Miller This clock with dark red wood undertones would make quite a statement on a fireplace mantel or a kitchen counter! The quality and style of this mantel clock make it a good candidate for a space with dark and vintage furnishings.  Item 9—LED Flickering Wax Halloween Candles by LED Lytes These LED flickering candles with realistic melted wax can be used any time of year but are perfect for a spooky Halloween vignette! Dark Academia and Halloween make an ideal combination, right?!  Item 10—Vintage Style Metal Libra by Owlgift One must-have accent for any academic style space is a set of scales. This antique-style scale with a bronze finish makes an intriguing room accent that hints at science and learning. Or, if you’re going for a more mystical aesthetic, use it for storing small trinkets such as jewelry or potpourri.  Item 11—Decorative Wooden Book Boxes 2 pack by Tosnail A proper academic-style space has to have books! Bring a collegiate feel to your room with these antique-looking book boxes. Not only do they add the necessary element of knowledge to a space, but they double as storage! They may not be authentic books, but who would know?!  Item 12—Oriental Area Rug 5 x 7 Black and Beige by Antep Rugs And finally…Any Dark Academia-style room is incomplete without an ornate Turkish rug, such as this beauty with its dark black and cream design! This oriental rug creates a moody space with an air of mystery.  Related blogs you may want to read: Create a cozy relaxing interior space this fall with neutral colors Brighten up your autumn decor with these items Pastel decorating ideas for autumn Need ideas for incorporating the color blue into your fall decor? Inspirational ideas for creating that cozy boho style Nine hygge decor ideas Winter color palette ideas for your home decor Design concept for a dreamy coastal interior Let’s talk Bohemian 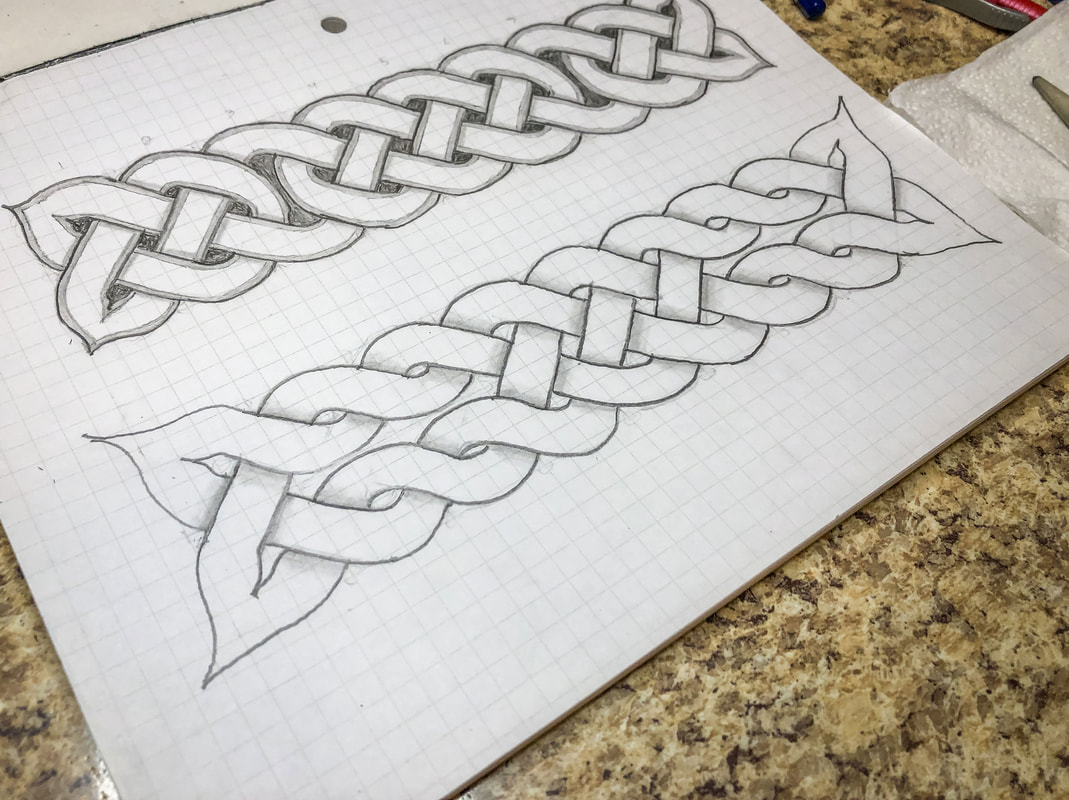 This drawing tutorial is the fourth in a short series of lessons to teach you how to draw a few variations of Celtic border knots. In the previous lesson, we added vertical breaks to a basic braid pattern to create a different knot style. In this tutorial, we will add horizontal breaks to the basic braid pattern to create yet another knot style with a different look. Below is a list of supplies you may want on hand (Amazon affiliate links are included), but you certainly don’t have to have all of these supplies to do this tutorial. Just find yourself a piece of paper, a pencil, and an eraser, and let’s get to drawing! Gather your supplies: Drawing pencils Markers Blending stumps Eraser Click eraser Ruler Horse hair brush Grid paper Sketch pad Step 1: Draw a grid of 9 squares across and 2 squares down. Use a ruler If drawing the grid by hand so all the squares end up the same size. 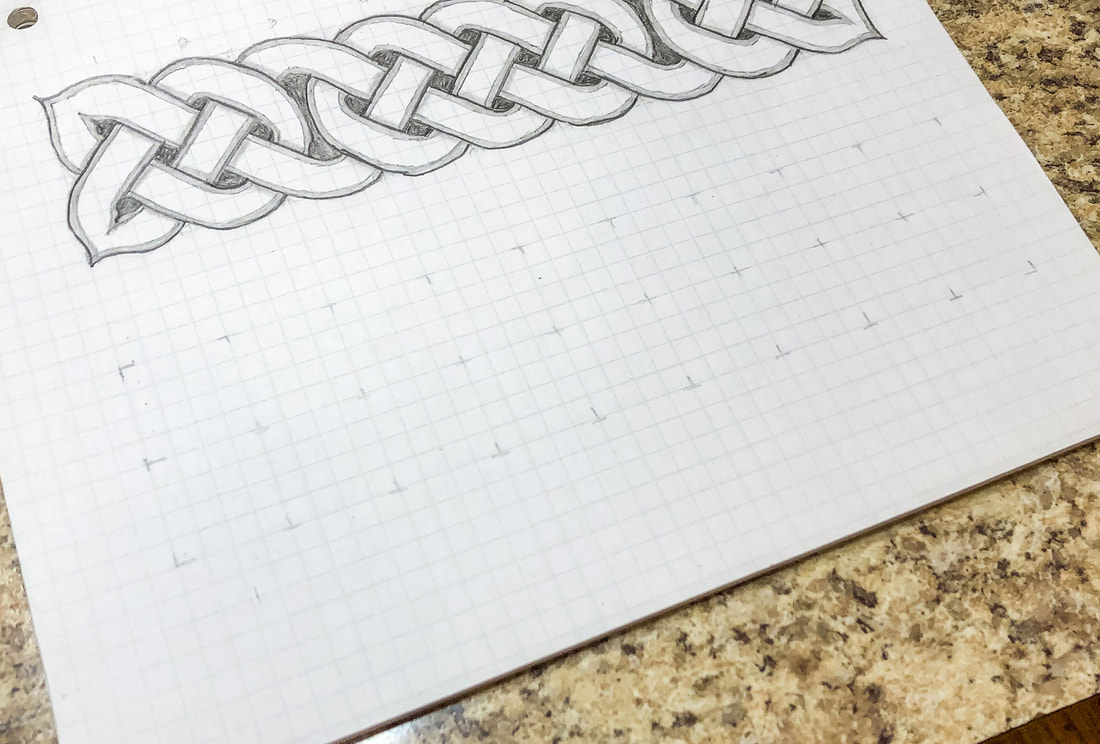 Step 2: Draw circles at the intersections of each corner and then in the middle of each square. Keep the circles the same size. Small circles will give you a thicker thread, while large circles will allow you to create a thinner thread. 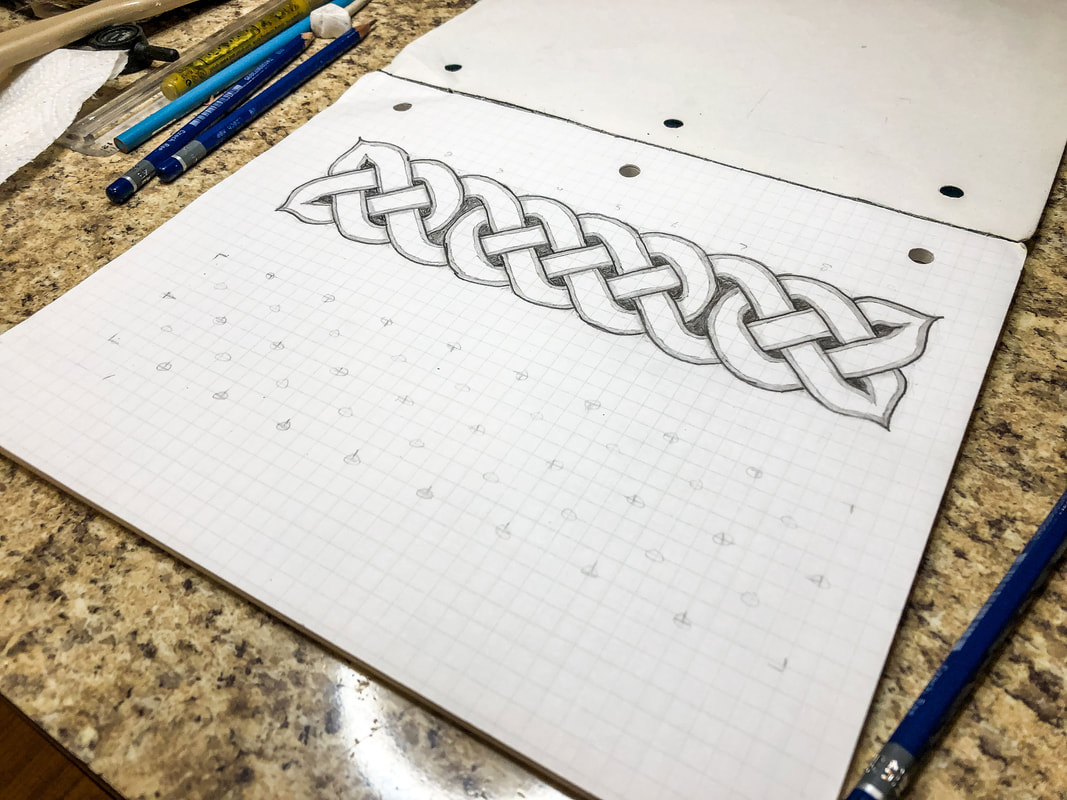 Step 3: Starting from the left, draw a pair of parallel lines touching the inside edges of the first four circles. Find the set of four circles above that first pair of lines, and draw a second set of perpendicular lines. Return to the first pair of lines and create another pair of perpendicular lines to the side, as shown. This sets up an alternating pattern of lines that you will continue across the grid to create a weave. Ignore any places where you only have three circles for now. 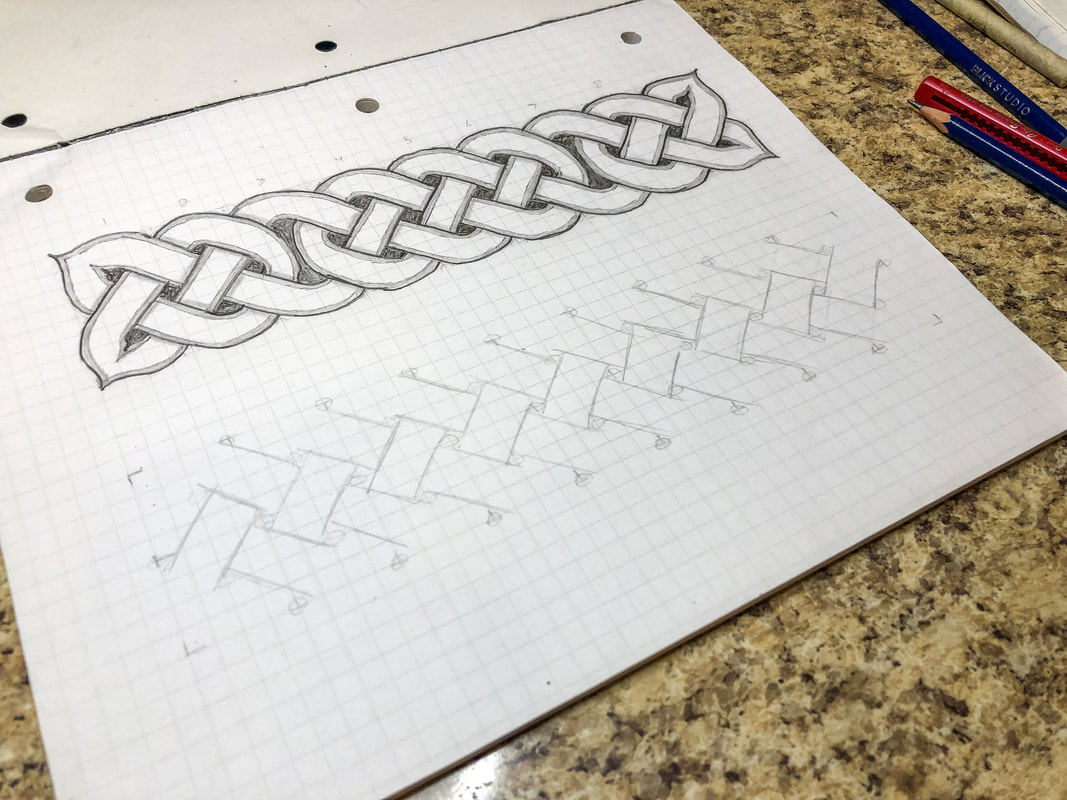 Step 4: Draw two horizontal lines across columns 2 & 3 and 7 & 8, as shown. 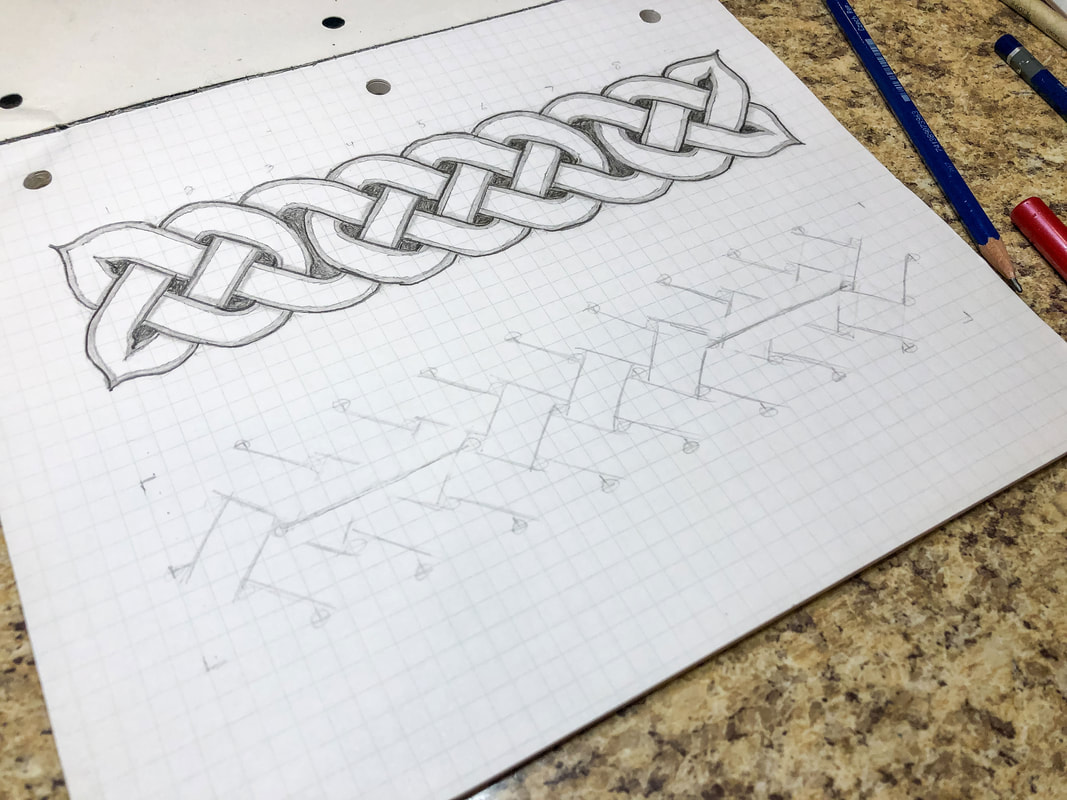 Step 5: Erase any lines that cross over those two new horizontal lines, looping them back around to link up with the threads as shown. 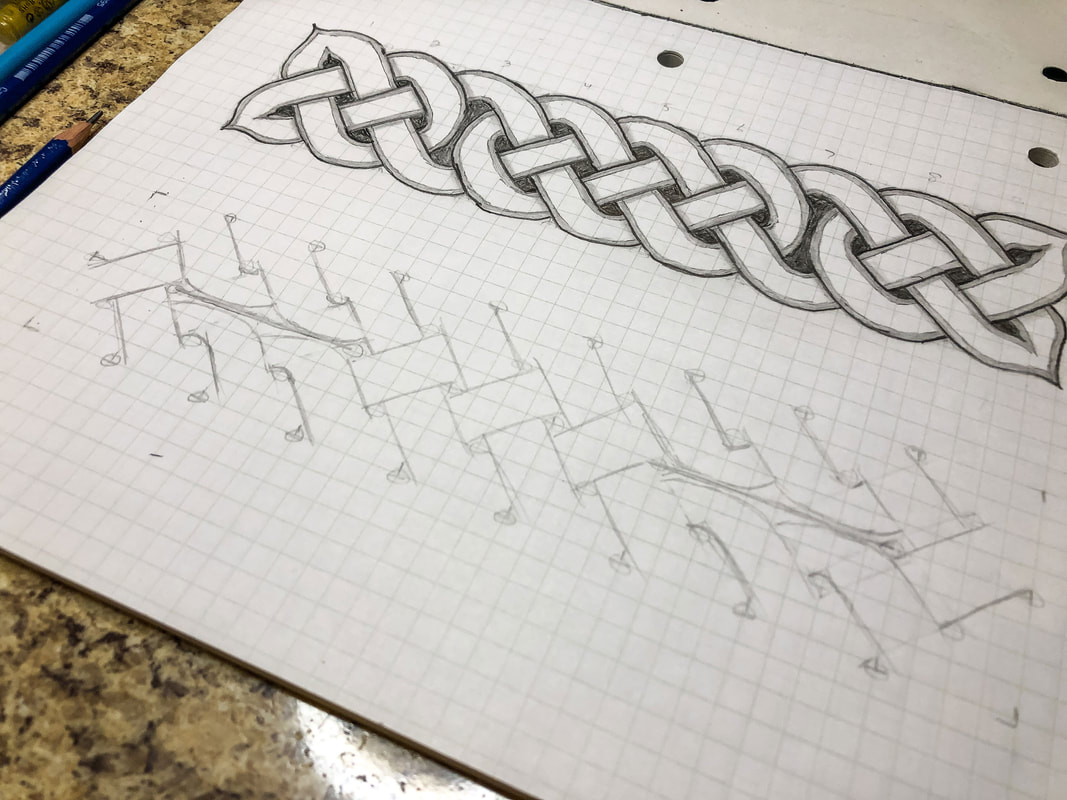 Step 6: Sketch in the top and bottom edges of the loops as shown. 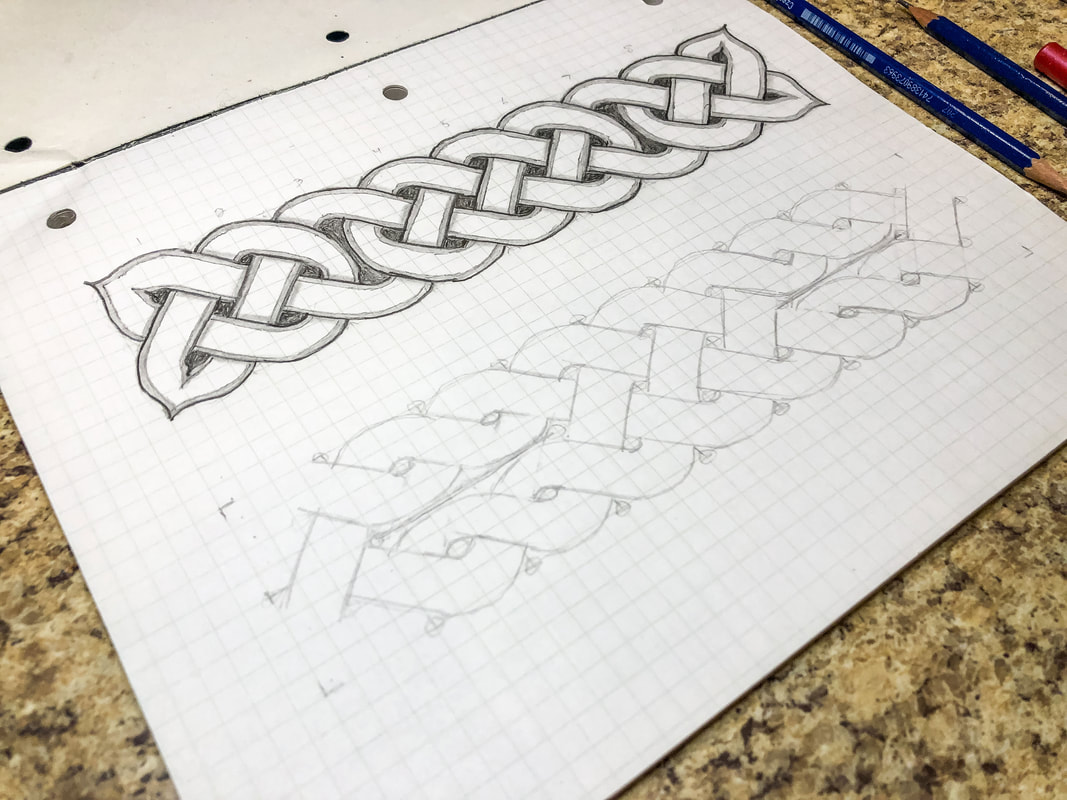 Step 7: Create the loops at each end of the grid. For this design, there will be a loop at each corner. 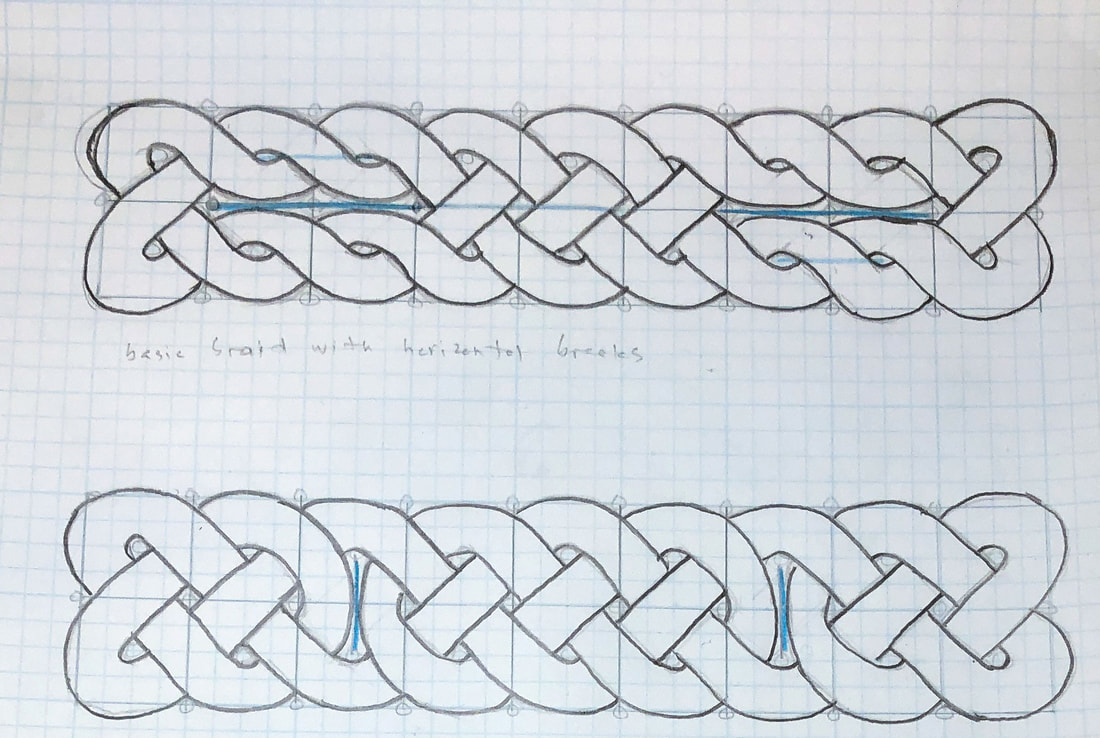 Step 8: Erase any guidelines and trace over the pattern with a darker pencil, creating any stylistic changes you may want. 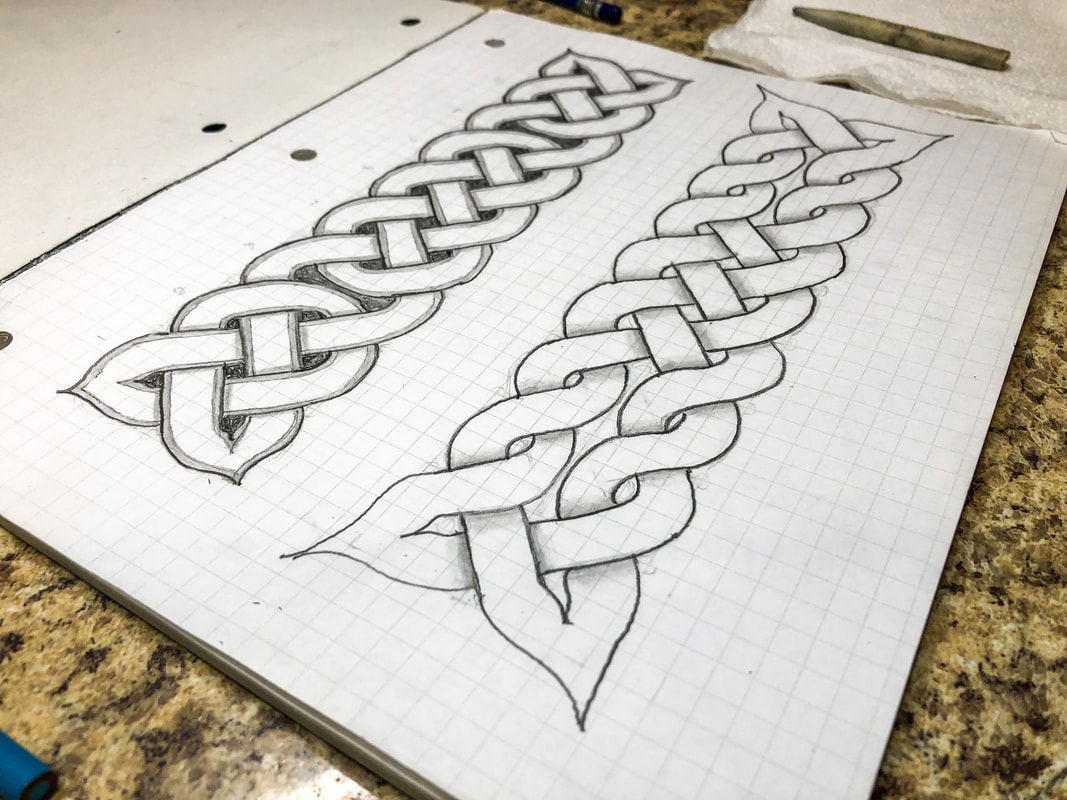 Step 9: Add in the shadows for a 3D effect, blend, and add final details. Go over your finished design with markers if desired. I hope you enjoyed this project and are encouraged to try more designs! I created a YouTube tutorial to go with this blog for those of you who are visual learners like myself! You can view the full video tutorial on my YouTube channel here! Related blogs you may want to read: Basic twist step-by-step drawing tutorial using grid paper Celtic braid step-by-step drawing tutorial Basic border knot with vertical breaks, step-by-step drawing tutorial DIY chalk-painted tray with Celtic border A fun DIY project with paint and a thrifted mirror part 2 The Celtic Motherhood Knot, a symbol of love Celtic Tree of Life Basic Celtic knot tutorial part 1 Celtic knot tutorial part 2 Some of the posts in this article contain affiliate links. If you click on the link and purchase the item, I will receive an affiliate commission at no extra cost to you. I will only recommend products or services I use personally and/or believe will add value to my readers, so there is no conflict of interest. 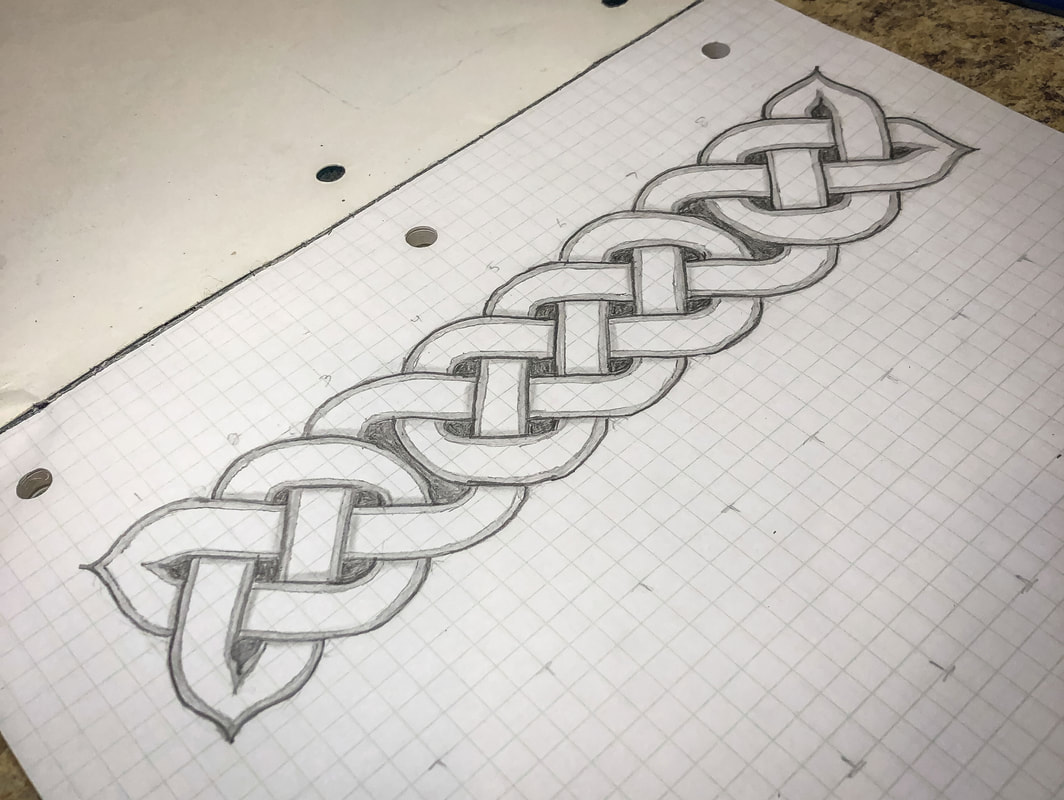 This drawing tutorial is the third in a short series of lessons to teach you how to draw a few variations of Celtic border knots. In lesson one, we learned how to draw a simple twist. In lesson two, we used a grid system to draw a basic braid pattern. In this third tutorial, we will build on what we have learned to create a variation using vertical breaks. Breaks introduce a level of complexity to the design that adds visual interest. There are many ways to add breaks to a border pattern, but today’s lesson will show you how to add two simple vertical breaks to the braid we have previously drawn. Below is a list of supplies you may want on hand (Amazon affiliate links are included), but you certainly don’t have to have all of these supplies to do this tutorial. Just find yourself a piece of paper, a pencil, and an eraser, and let’s get to drawing! Gather your supplies: Drawing pencils Markers Blending stumps Eraser Click eraser Ruler Horse hair brush Grid paper Sketch pad Step 1: Draw a grid of 9 squares across and 2 squares down. Use a ruler If drawing the grid by hand so all the squares end up the same size. 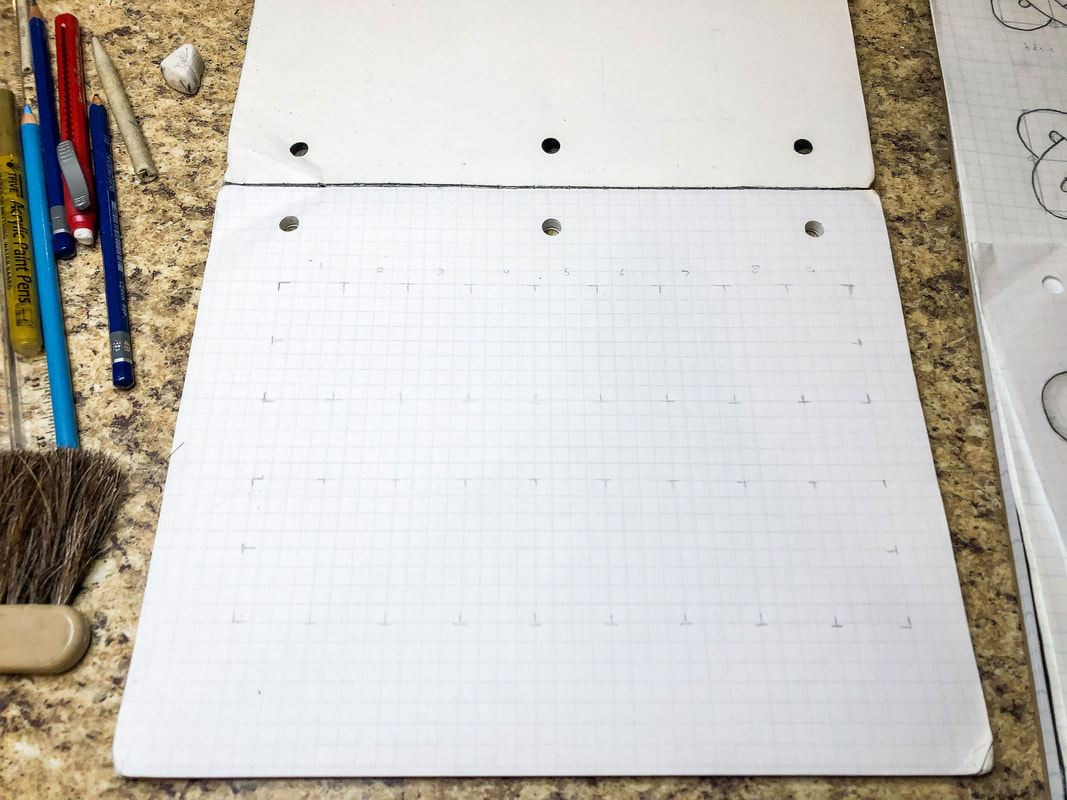 Step 2: Draw circles at the intersections of each corner and then in the middle of each square. Keep the circles the same size. Small circles will give you a thicker thread, while large circles will allow you to create a thinner thread. 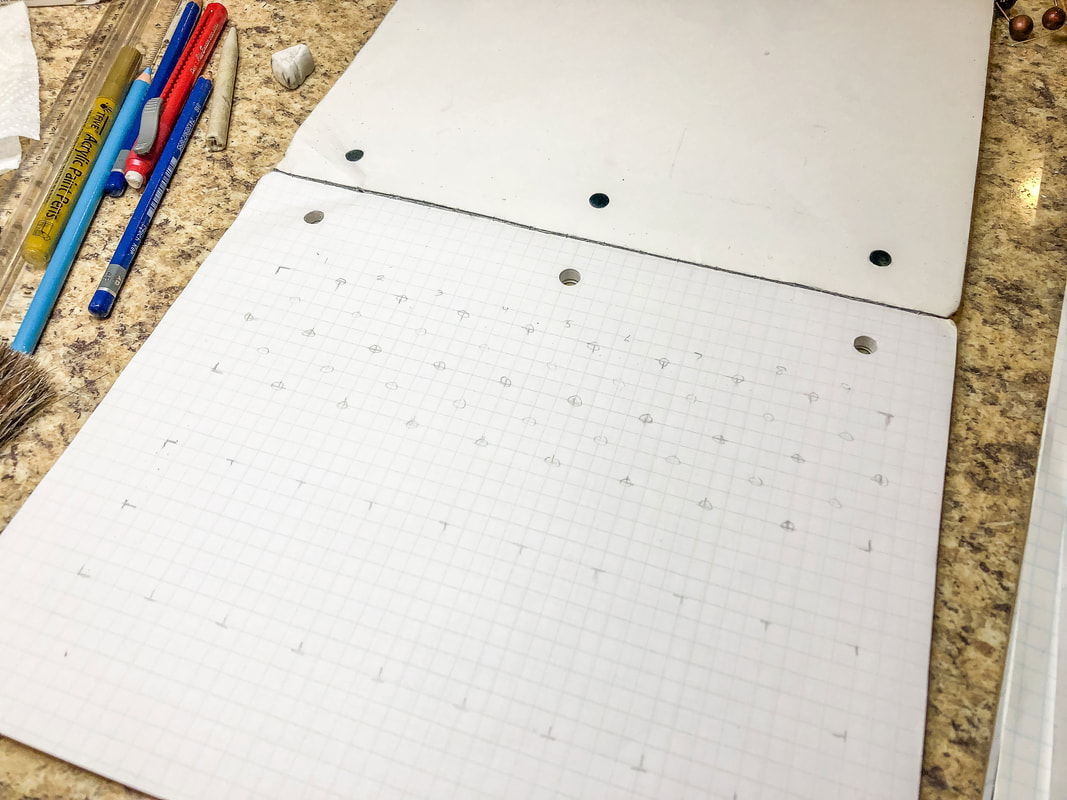 Step 3: Starting from the left, draw a pair of parallel lines touching the inside edges of the first four circles. Find the set of four circles above that first pair of lines, and draw a second set of perpendicular lines. Return to the first pair of lines and create another pair of perpendicular lines to the side, as shown. This sets up an alternating pattern of lines that you will continue across the grid to create a weave. Ignore any places where you only have three circles for now. 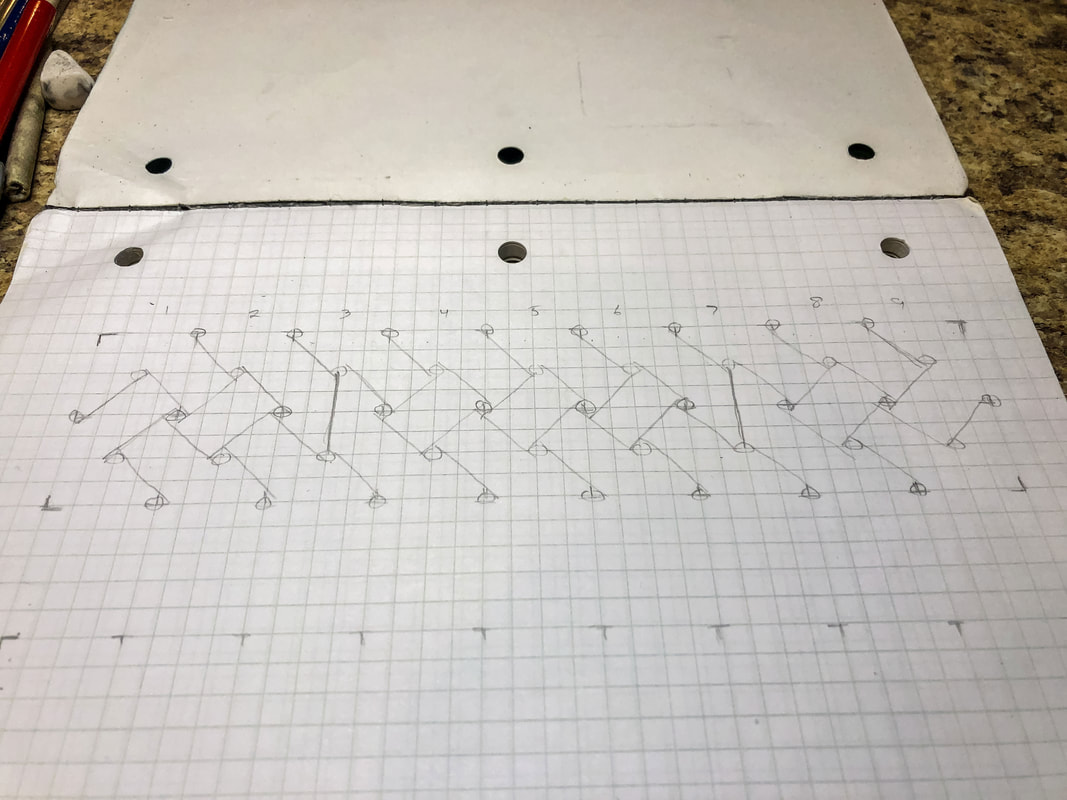 Step 4: Draw a vertical line connecting the two circles in columns 3 and 7, as shown. 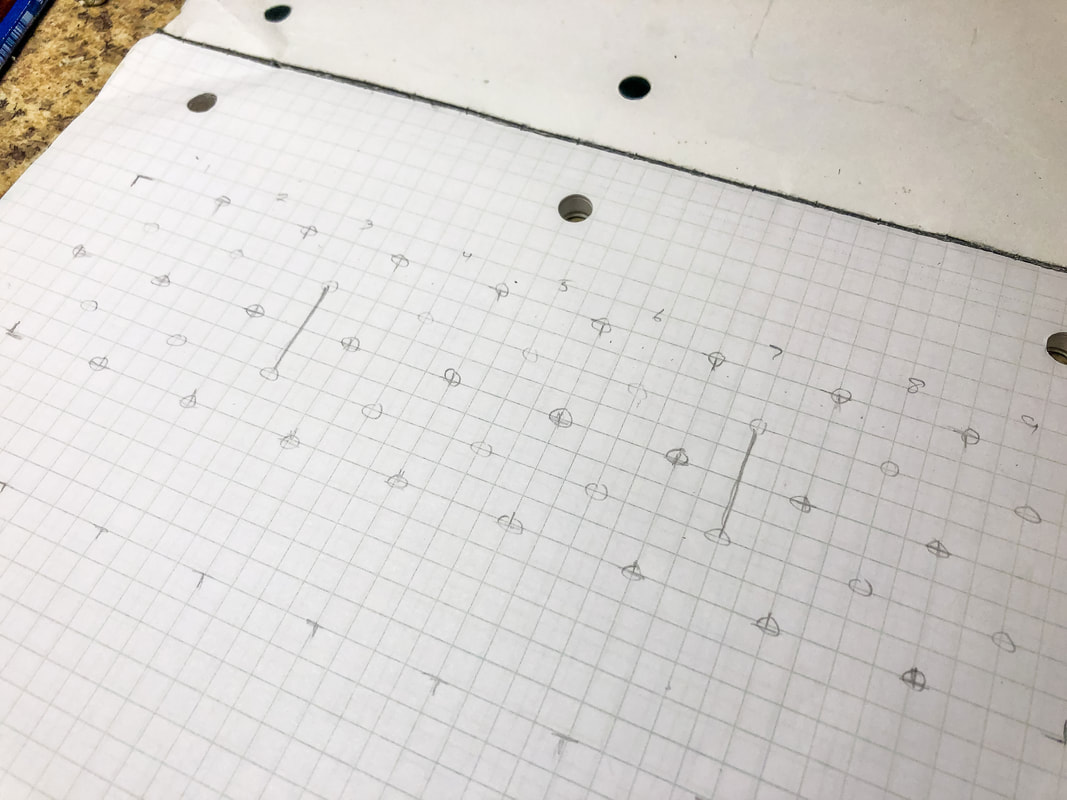 Step 5: Erase any lines that cross over those two new vertical lines, looping them back around to link up with the threads as shown. 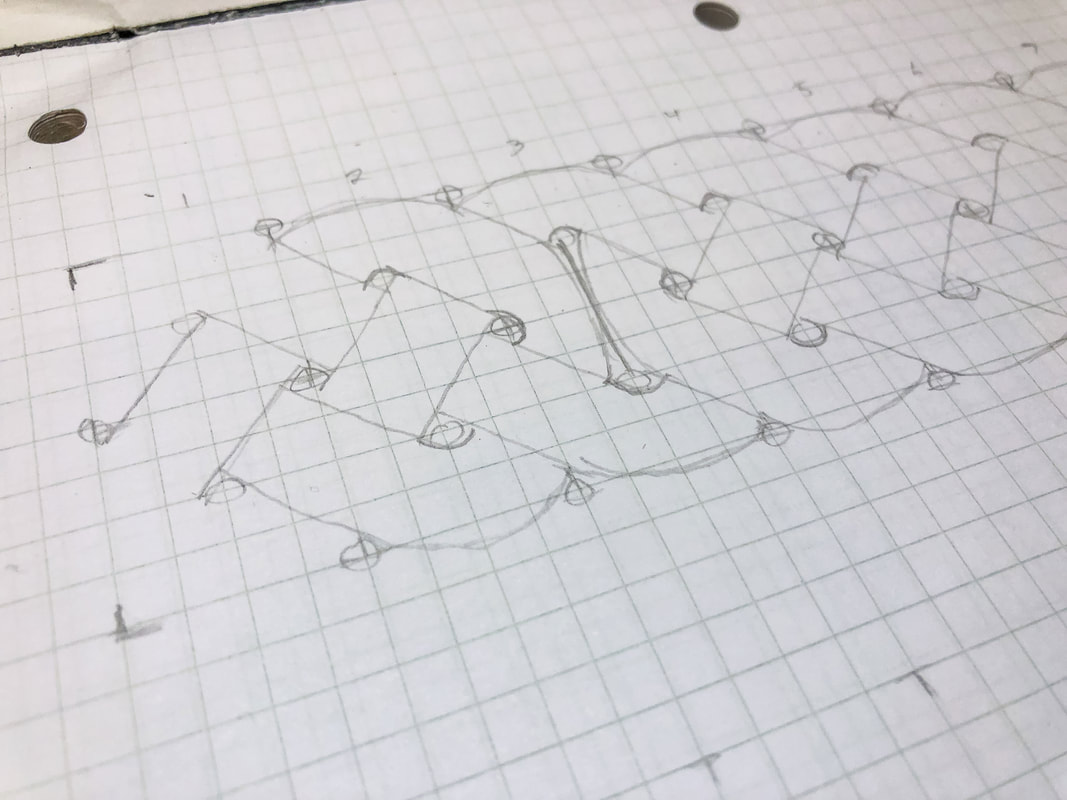 Step 6: Sketch in the top and bottom edges of the loops as shown. 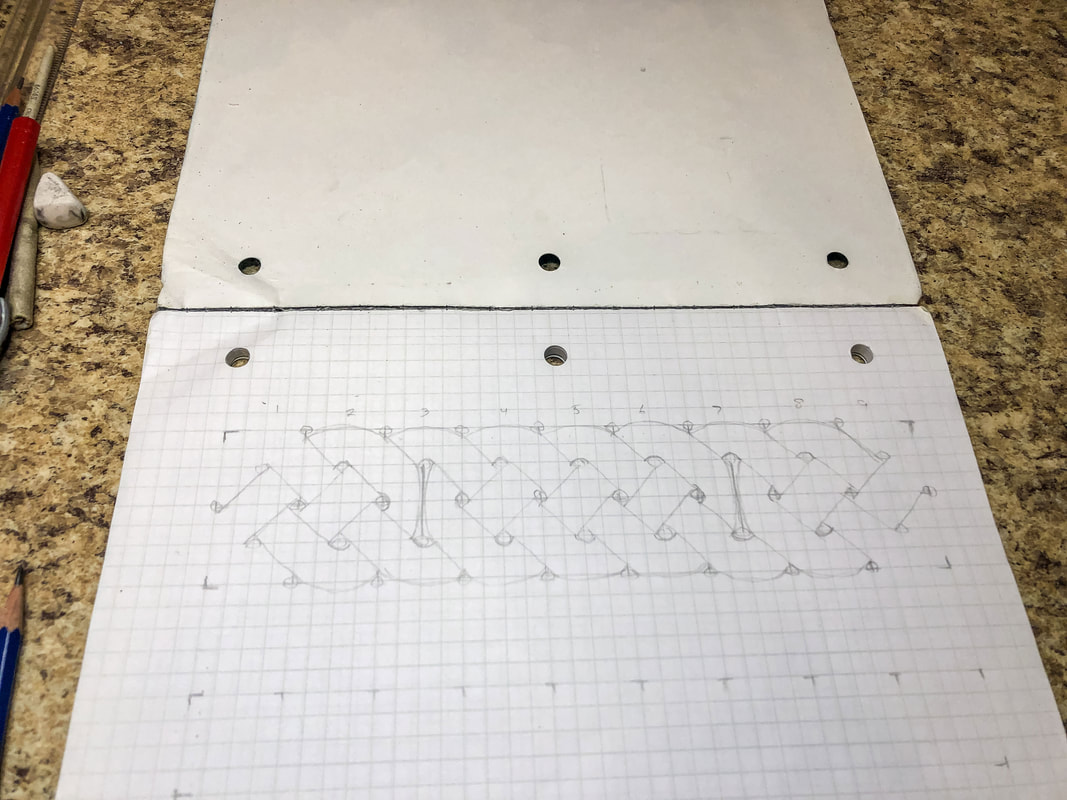 Step 7: Create the loops at each end of the grid. For this design, there will be a loop at each corner. 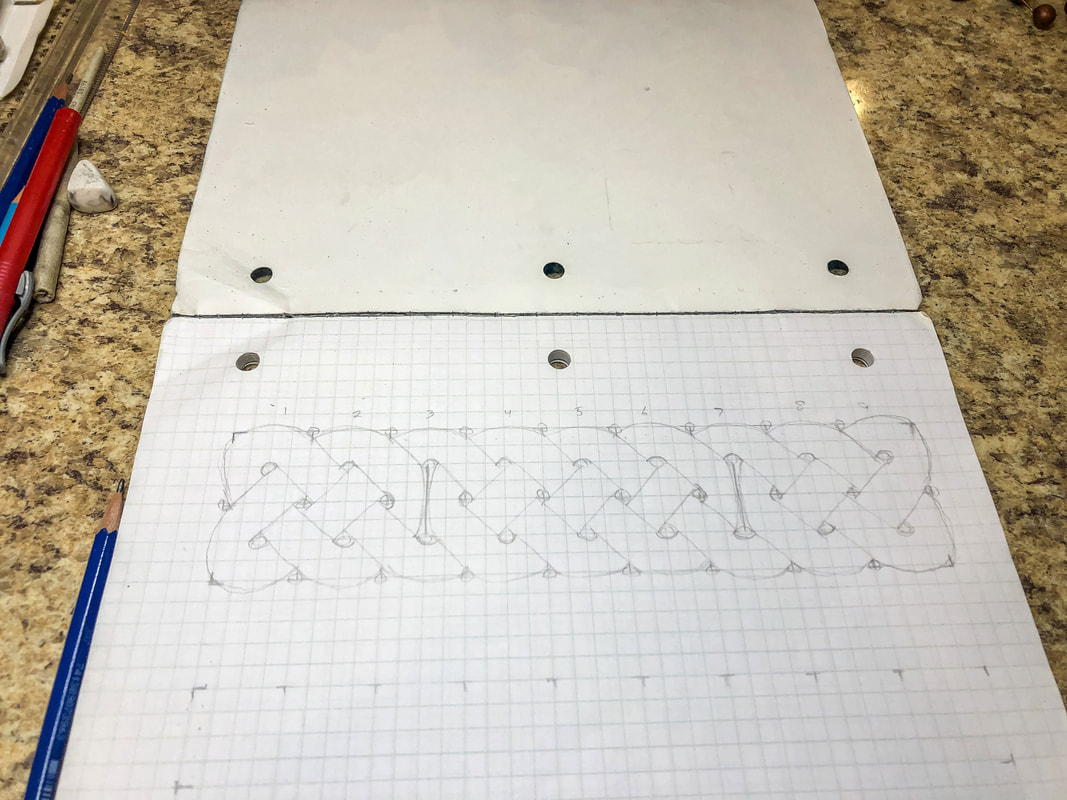 Step 8: Erase any guidelines and trace over the pattern with a darker pencil, creating any stylistic changes you may want. 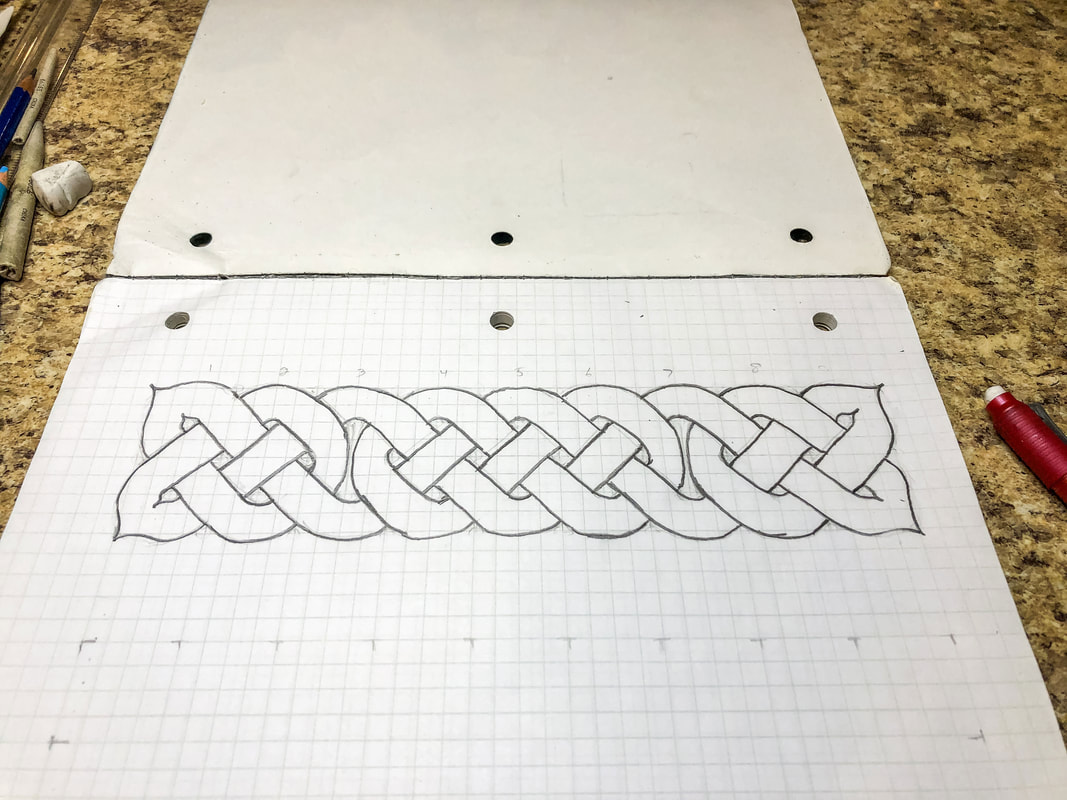 Step 9: Add in the shadows for a 3D effect, blend, and add final details. Go over your finished design with markers if desired. I hope you enjoyed this project and are encouraged to try more designs! I created a YouTube tutorial to go with this blog for those of you who are visual learners like myself! You can view the full video tutorial on my YouTube channel here! Related blogs you may want to read: Basic twist step-by-step drawing tutorial using grid paper Celtic braid step-by-step drawing tutorial Basic border knot with horizontal breaks, step-by-step drawing tutorial DIY chalk-painted tray with Celtic border A fun DIY project with paint and a thrifted mirror part 2 The Celtic Motherhood Knot, a symbol of love Celtic Tree of Life Basic Celtic knot tutorial part 1 Celtic knot tutorial part 2 Some of the posts in this article contain affiliate links. If you click on the link and purchase the item, I will receive an affiliate commission at no extra cost to you. I will only recommend products or services I use personally and/or believe will add value to my readers, so there is no conflict of interest. 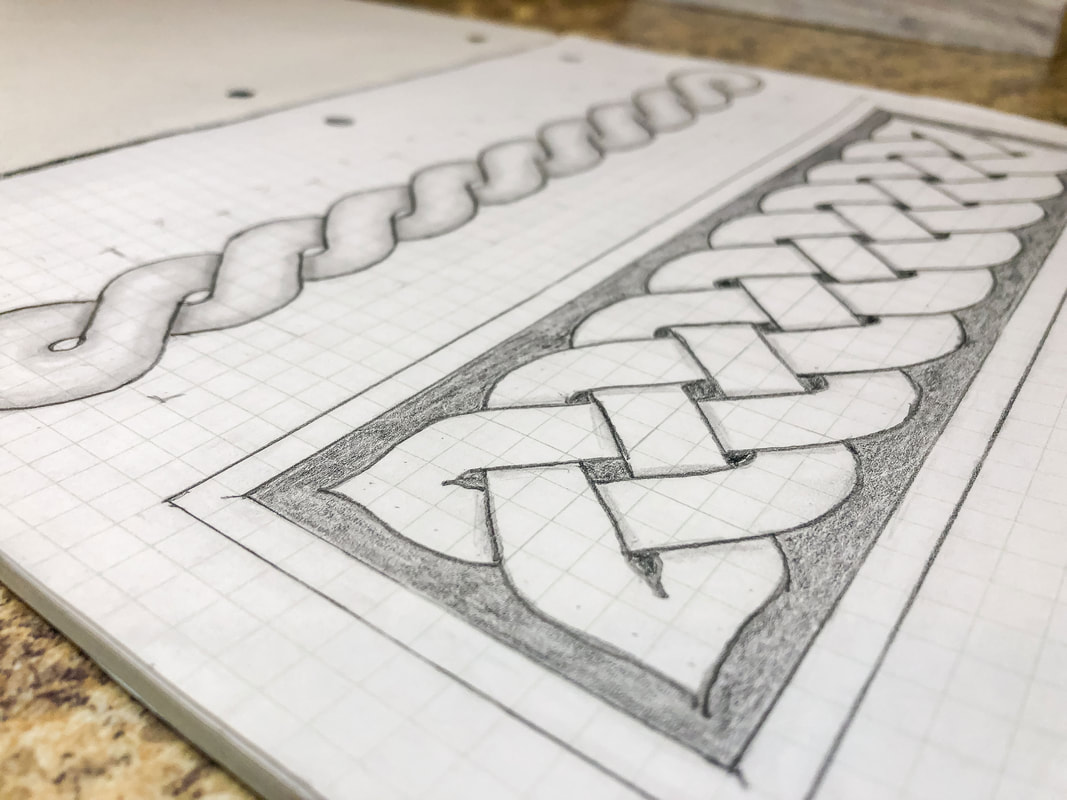 This drawing tutorial is the second in a short series of lessons to teach you how to draw a few variations of Celtic border knots. In the first tutorial, we used a grid system to draw a simple twist. In this blog, we will build on what we have learned in that lesson to create a braid pattern. The braid forms the building block for many Celtic-style borders. Below is a list of supplies you may want on hand (Amazon affiliate links are included), but you certainly don’t have to have all of these supplies to do this tutorial. Just find yourself a piece of paper, a pencil, and an eraser, and let’s get to drawing! Gather your supplies: Drawing pencils Markers Blending stumps Eraser Click eraser Ruler Horse hair brush Grid paper Sketch pad Step 1: Draw a grid of 9 squares across and 2 squares down. Use a ruler If drawing the grid by hand so all the squares end up the same size.  Step 2: Draw circles at the intersections of each corner and then in the middle of each square. Keep the circles the same size. Small circles will give you a thicker thread, while large circles will allow you to create a thinner thread. 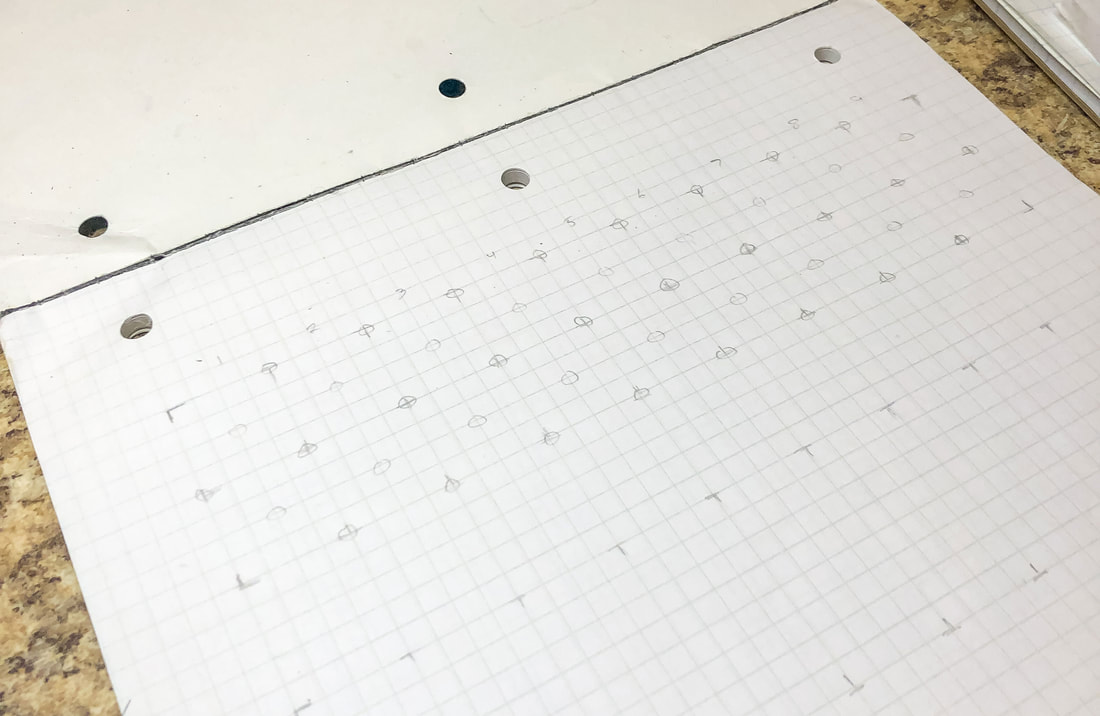 Step 3: Starting from the left, draw a pair of parallel lines touching the inside edges of the first four circles. Find the set of four circles above that first pair of lines, and draw a second set of perpendicular lines. Return to the first pair of lines and create another pair of perpendicular lines to the side, as shown. This sets up an alternating pattern of lines that you will continue across the grid to create a weave. Ignore any places where you only have three circles for now. 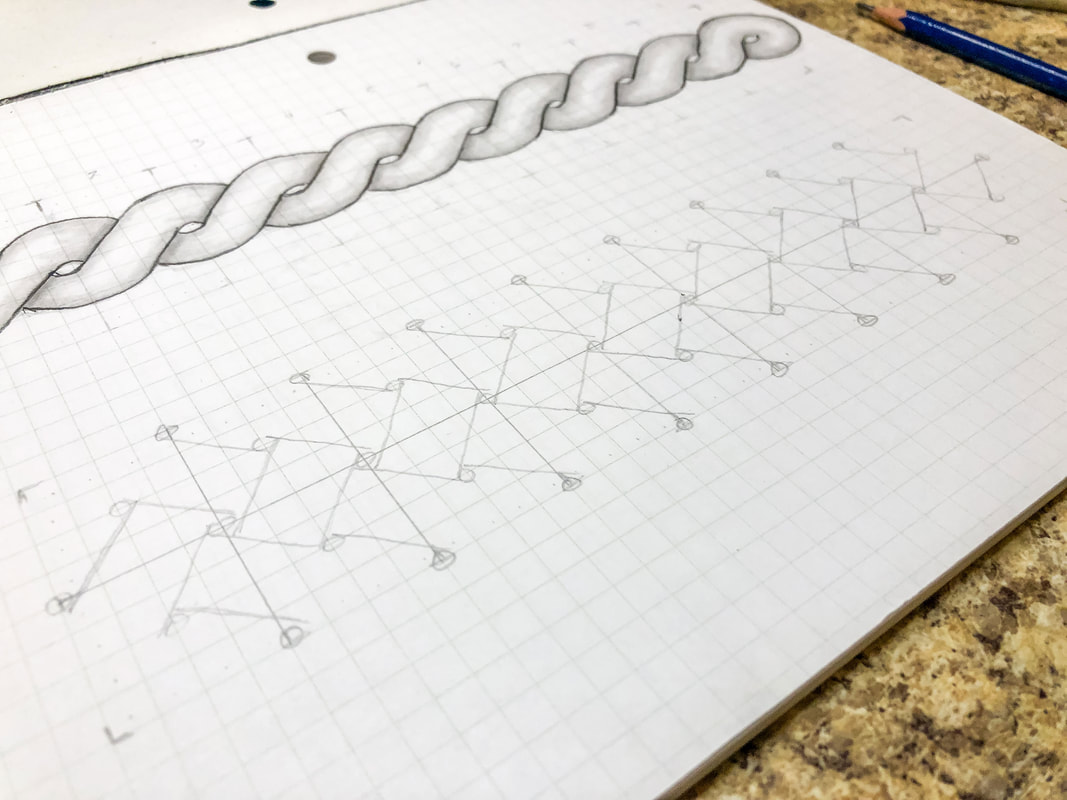 Step 4: Sketch in the top and bottom edges of the loops as shown. 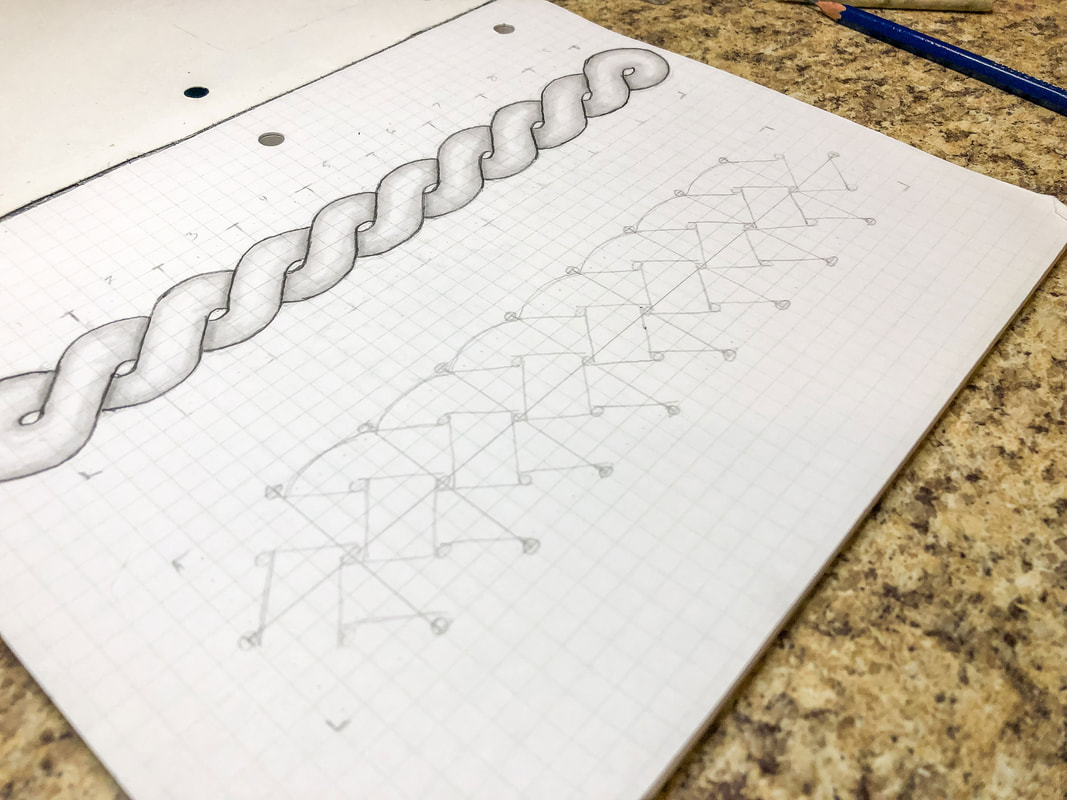 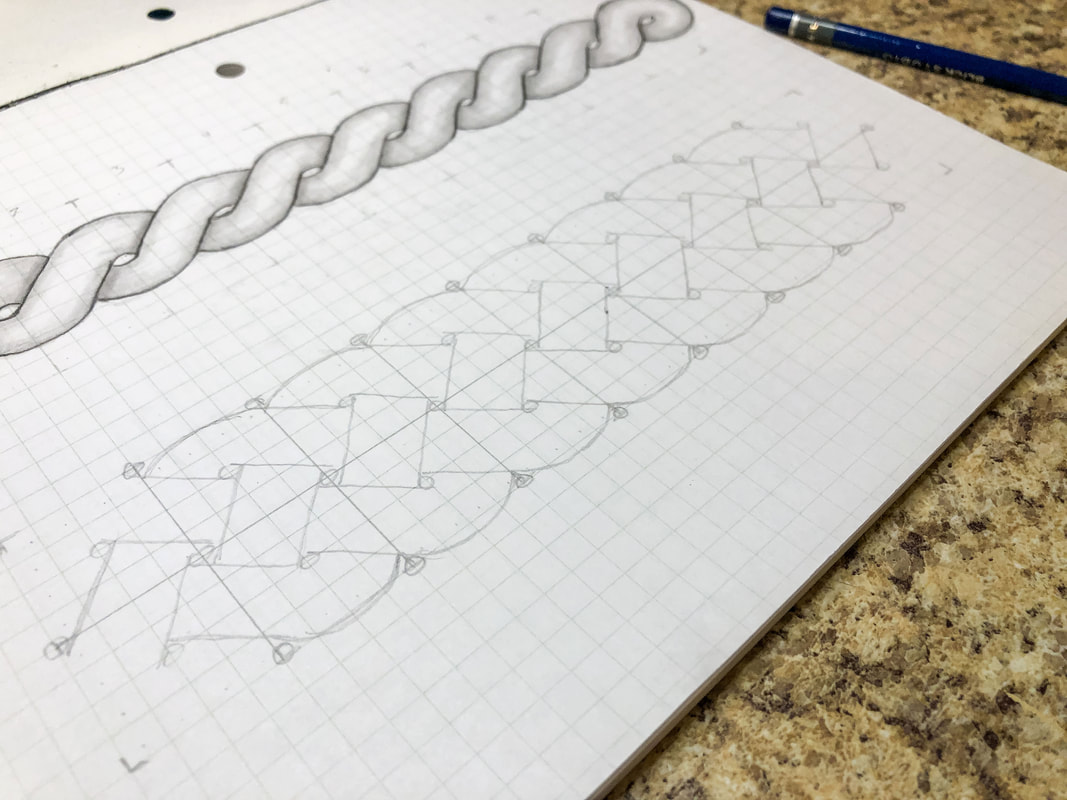 Step 5: Create the loops at each end of the grid. For this design, there will be a loop at each corner. 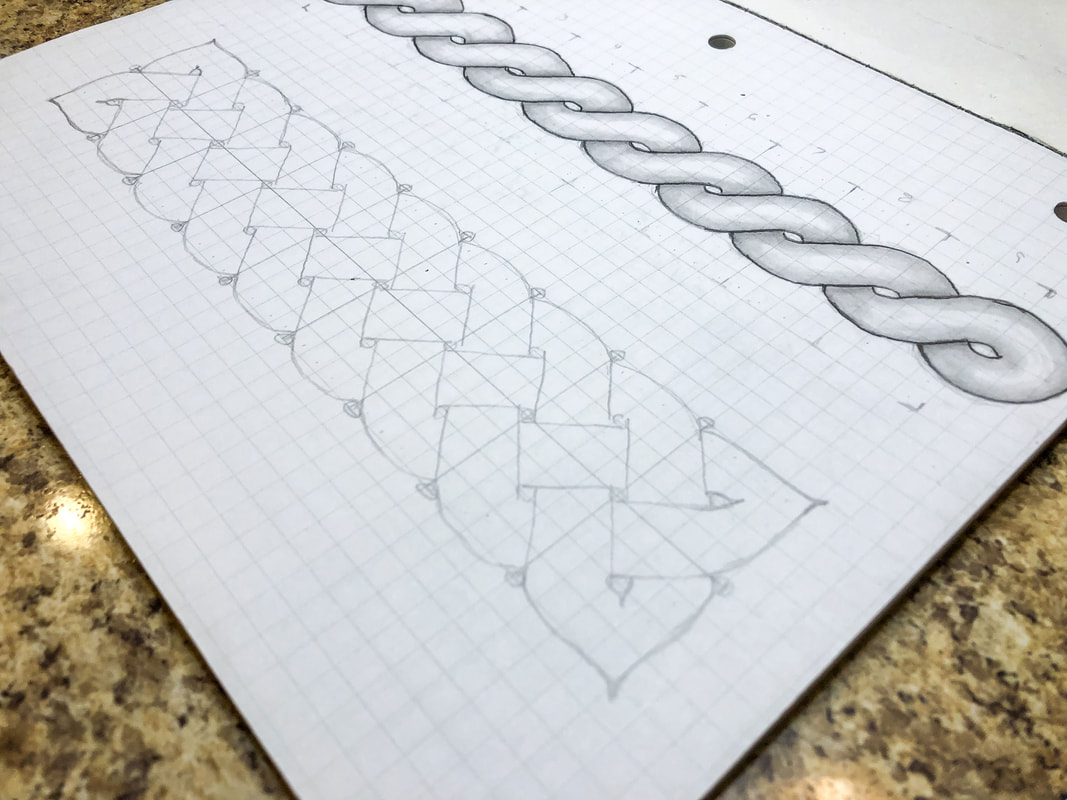 Step 6: Erase any guidelines and trace over the pattern with a darker pencil, creating any stylistic changes you may want. 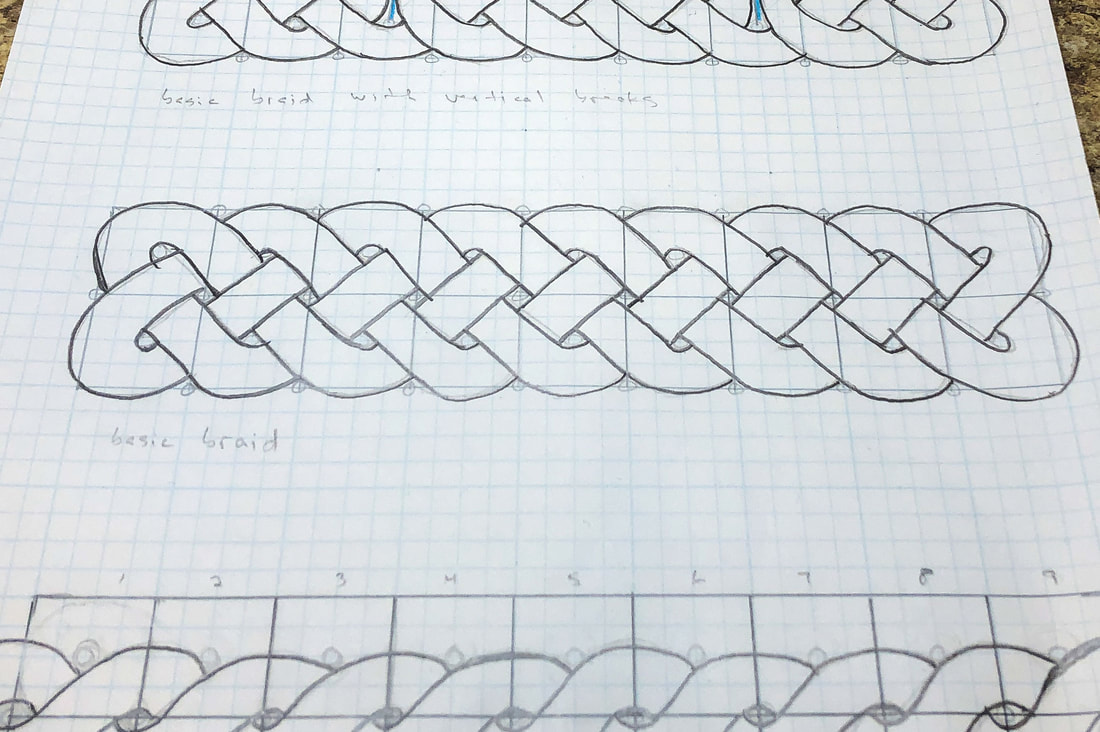 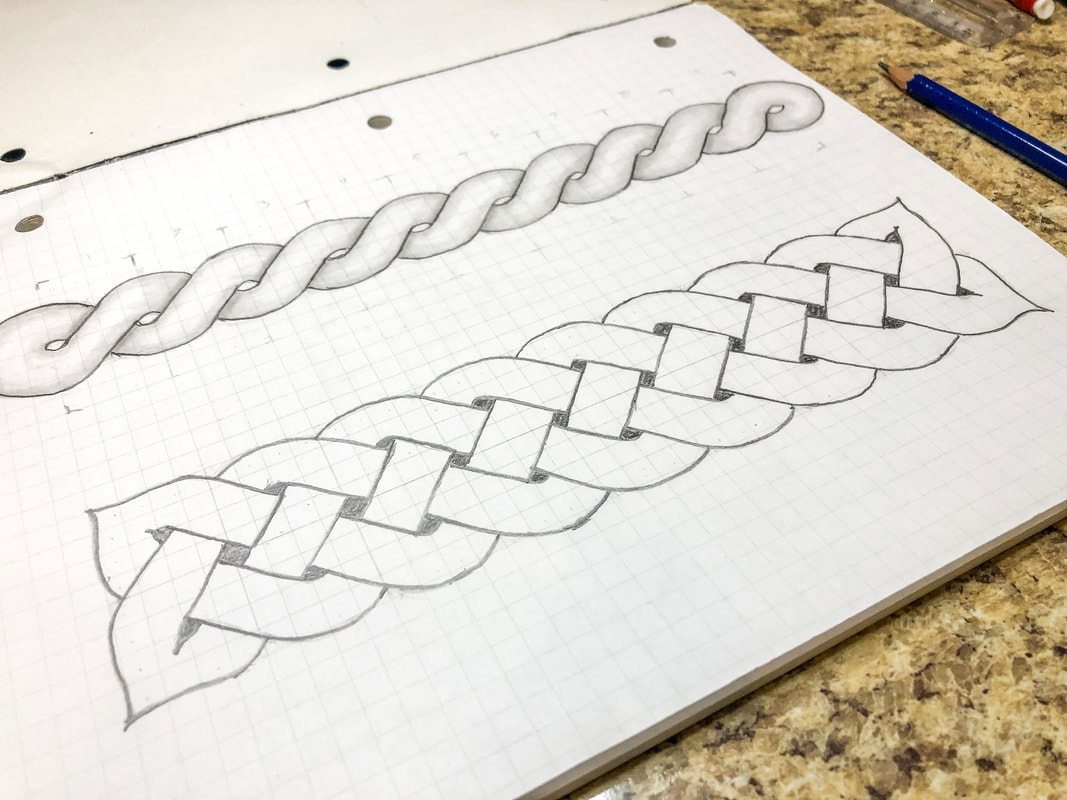 Step 7: Add in the shadows for a 3D effect, blend, and add final details. Go over your finished design with markers if desired. I hope you enjoyed this project and are encouraged to try more designs! I created a YouTube tutorial to go with this blog for those of you who are visual learners like myself! You can view the full video tutorial on my YouTube channel here! Related blogs you may want to read: Basic twist step-by-step drawing tutorial using grid paper Basic border knot with vertical breaks, step-by-step drawing tutorial Basic border knot with horizontal breaks, step-by-step drawing tutorial DIY chalk-painted tray with Celtic border A fun DIY project with paint and a thrifted mirror part 2 The Celtic Motherhood Knot, a symbol of love Celtic Tree of Life Basic Celtic knot tutorial part 1 Celtic knot tutorial part 2 Some of the posts in this article contain affiliate links. If you click on the link and purchase the item, I will receive an affiliate commission at no extra cost to you. I will only recommend products or services I use personally and/or believe will add value to my readers, so there is no conflict of interest. 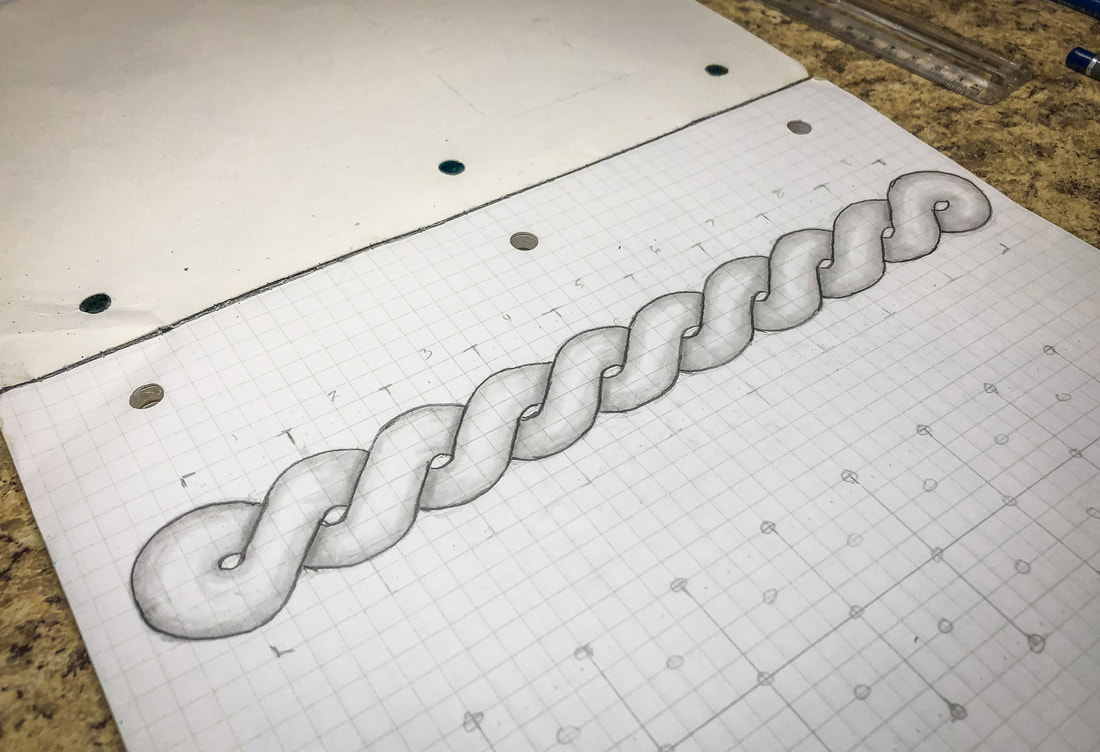 This drawing tutorial is the first in a short series of lessons to teach you how to draw a few variations of Celtic border knots. This first tutorial will show you how to draw a simple twist. The twist is not a Celtic style, but the tutorial series will build on this simple pattern, creating more complex weave patterns as we go. Twist borders can be found in many ancient art forms, such as Roman mosaics, and are easy to draw. If you use grid paper—or draw out a grid with guidelines—you will get a perfectly symmetrical twist every time! Below is a list of supplies you may want on hand (Amazon affiliate links are included), but you certainly don’t have to have all of these supplies to do this tutorial. Just find yourself a piece of paper, a pencil, and an eraser, and let’s get to drawing! Gather your supplies: Drawing pencils Markers Blending stumps Eraser Click eraser Ruler Horse hair brush Grid paper Sketch pad Step 1: Draw a grid of 9 squares across and 2 squares down. Use a ruler if drawing the grid by hand so all the squares end up the same size.  Step 2: Draw circles at the intersections of each corner and then in the middle of each square. Keep the circles the same size. Small circles will give you a thicker thread, while large circles will allow you to create a thinner thread. 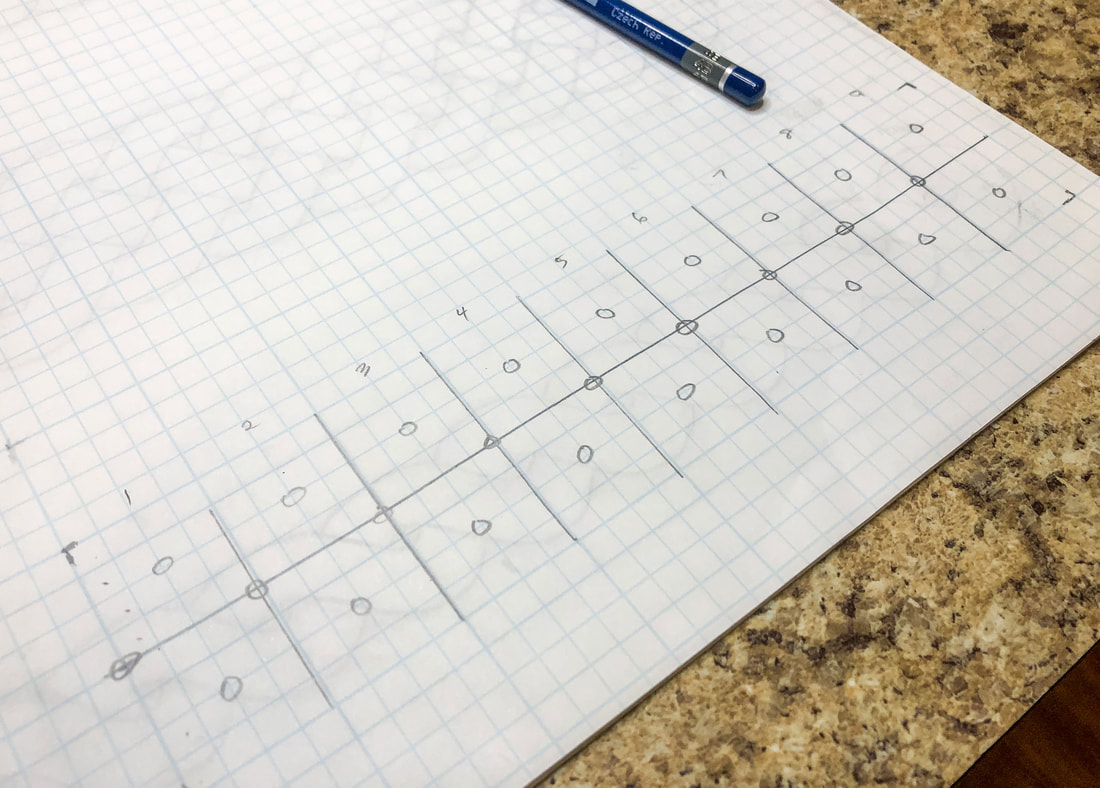 Step 3: Starting from the left, draw a pair of parallel lines touching the inside edges of the first four circles. Do this for each set of four circles across the grid. 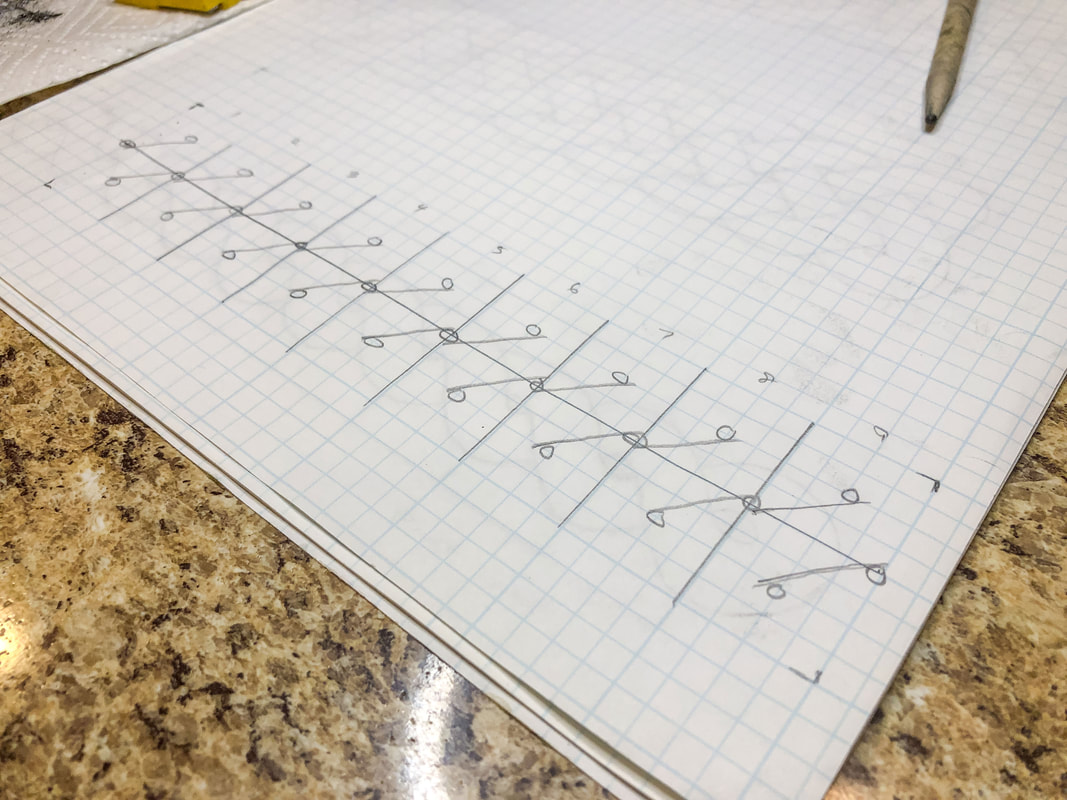 Step 4: Sketch in the top and bottom edges of the loops as shown. 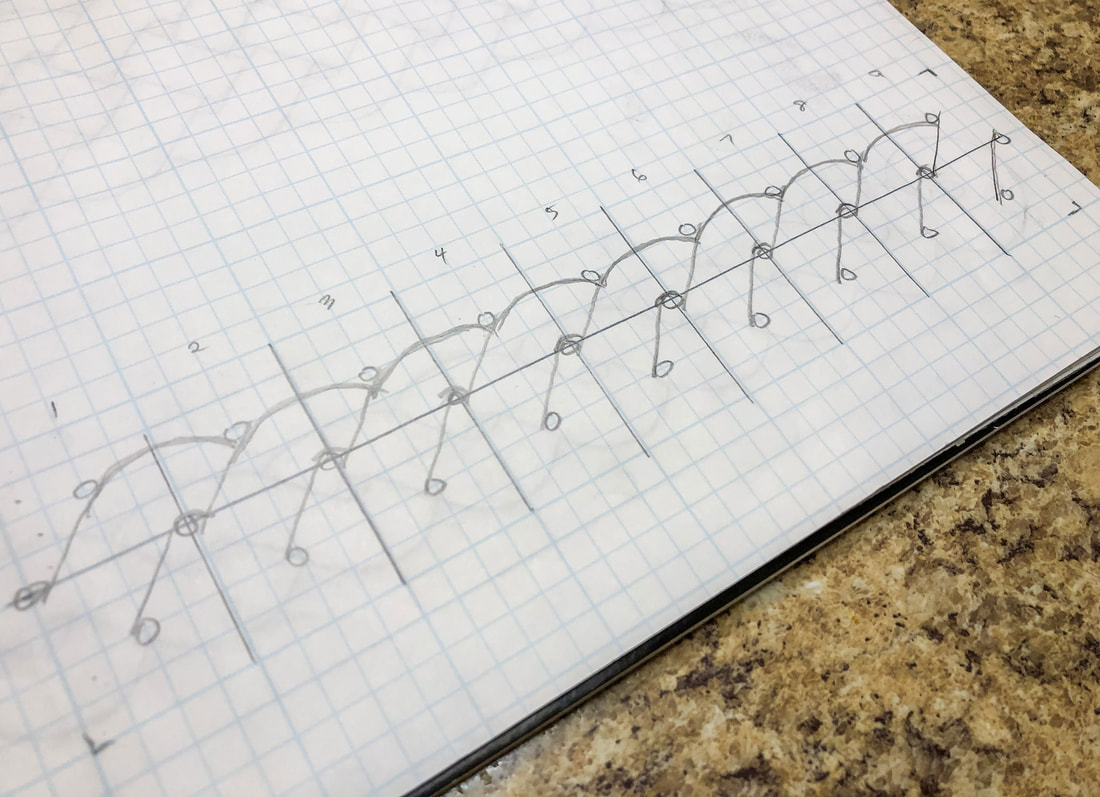 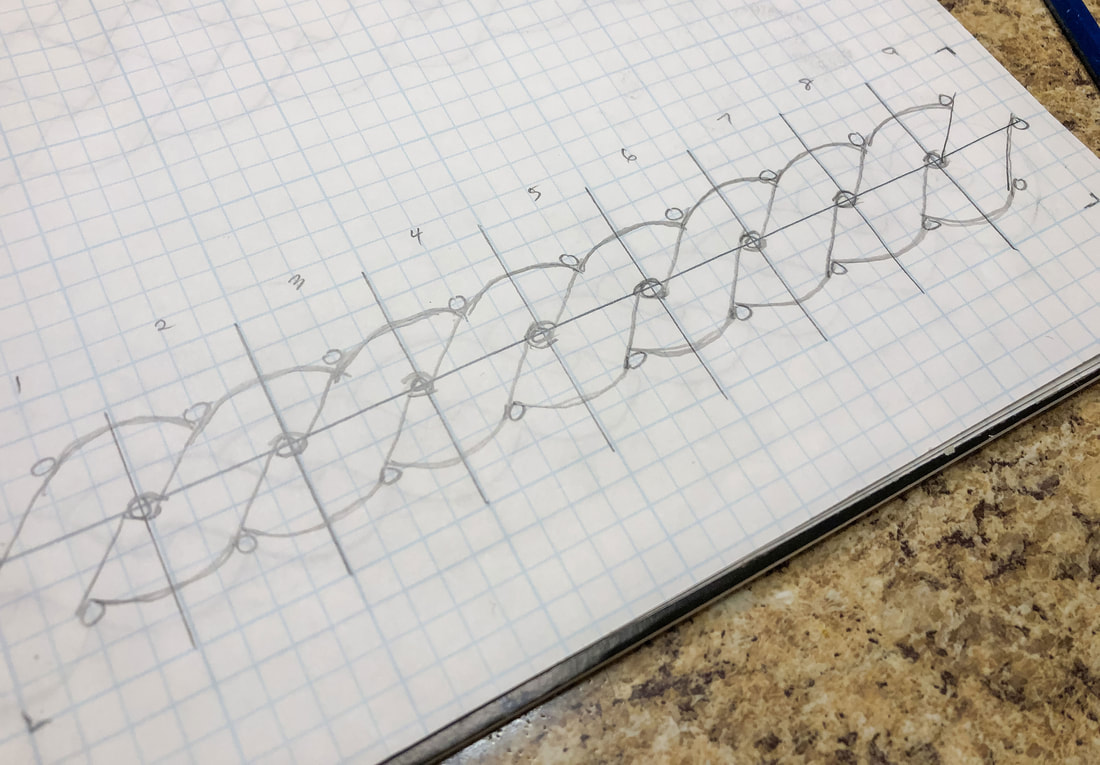 Step 5: Connect the loops at the two ends as shown. 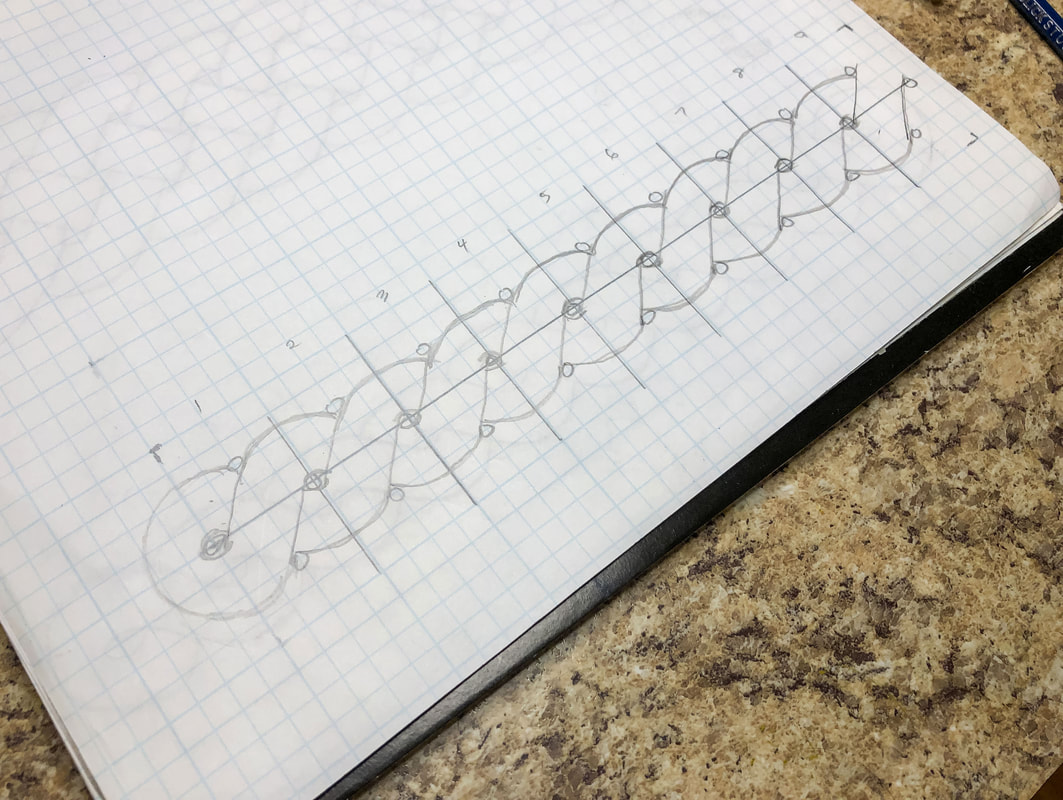 Step 6: Erase any guidelines and trace over the twist pattern with a darker pencil, creating any stylistic changes you may want. 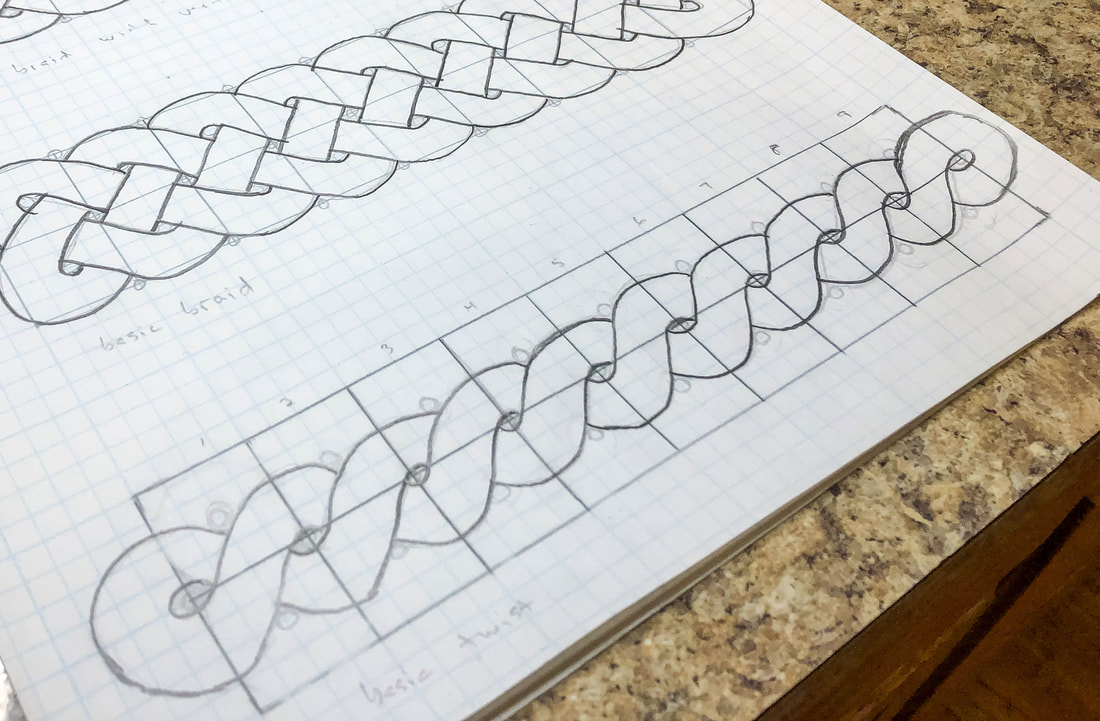 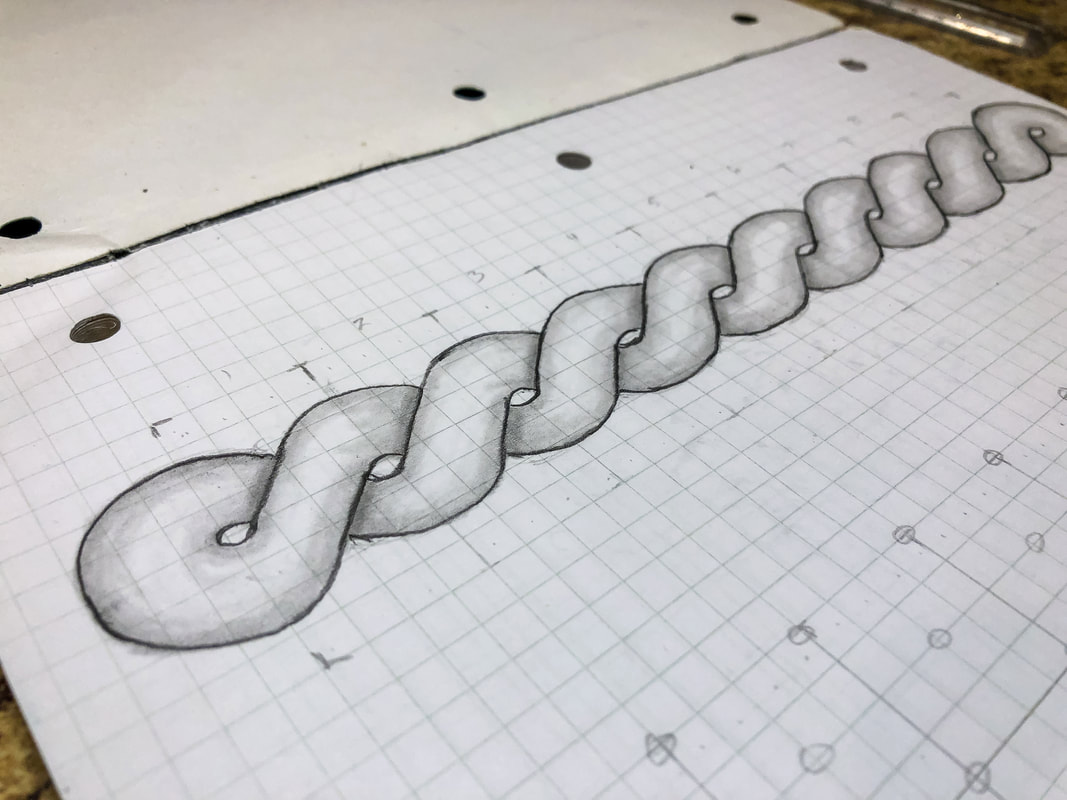 Step 7: Add in the shadows for a 3D effect, blend, and add final details. Go over your finished design with markers if desired. I hope you enjoyed this project and are encouraged to try more designs! I created a YouTube tutorial to go with this blog for those of you who are visual learners like myself! You can view the full video tutorial on my YouTube channel here! Related blogs you may want to read: Celtic braid step-by-step drawing tutorial Basic border knot with vertical breaks, step-by-step drawing tutorial Basic border knot with horizontal breaks, step-by-step drawing tutorial DIY chalk-painted tray with Celtic border A fun DIY project with paint and a thrifted mirror part 2 The Celtic Motherhood Knot, a symbol of love Celtic Tree of Life Basic Celtic knot tutorial part 1 Celtic knot tutorial part 2 Some of the posts in this article contain affiliate links. If you click on the link and purchase the item, I will receive an affiliate commission at no extra cost to you. I will only recommend products or services I use personally and/or believe will add value to my readers, so there is no conflict of interest. Check out these 10 decor items from Amazon for inspiration! 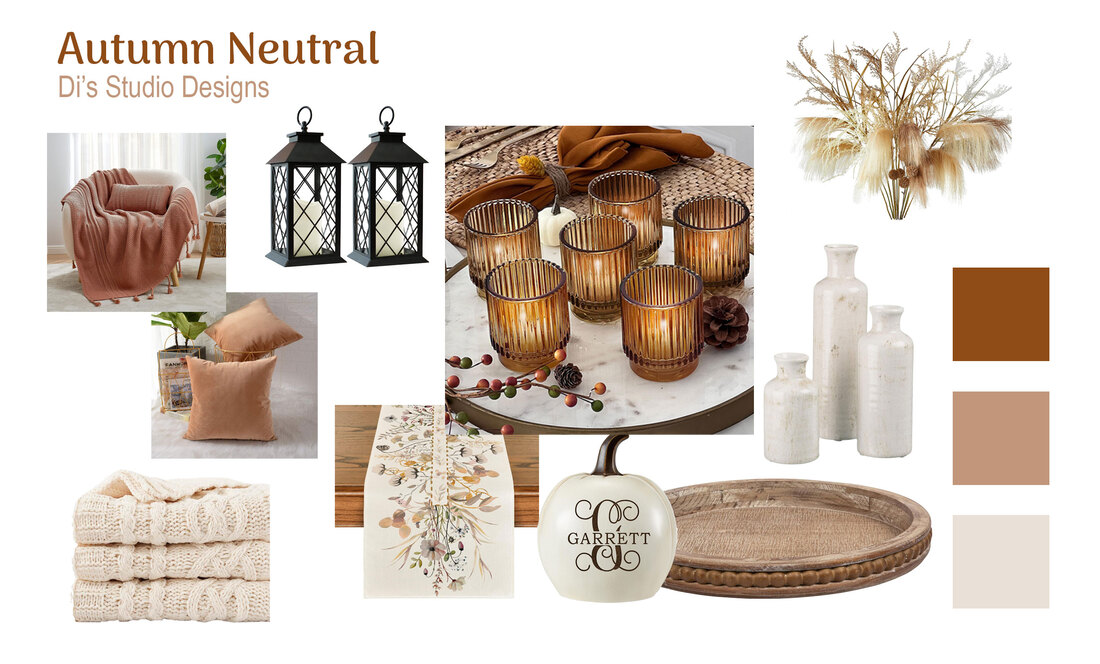 Images from Amazon.com. Click the links below to view or purchase. Some of the posts in this article contain affiliate links. If you click on the link and purchase the item, I will receive an affiliate commission at no extra cost to you. I will only recommend products or services I use personally and/or believe will add value to my readers, so there is no conflict of interest. Fall is the perfect time to bring a little hygge into your home! This decorating season can be an opportunity to create a warm, cozy interior space that lasts through the fall and winter months. Neutral earthy colors—like camel, cream, khaki, off-white, tan, taupe, beige, and white—create an interior space that is relaxed and understated for a place to unwind and retreat from the hectic rush of life. Check out these items from my mood board for inspiration! Item 1—Vintage Candle Lantern with LED Pillar Candle by Bright Zeal Lanterns are a perfect opportunity to introduce cozy candles into your space. These black lanterns with LED pillar candles can be hung or set on a mantle or tabletop. Use as is or decorate with faux florals for the season or holiday. 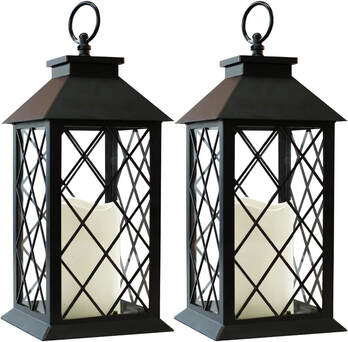 Item 2—Honeycomb Knit Throw Blanket by Cozy Bliss This rust-colored blanket feels warm and organic with its unique tassels. The honeycomb knit texture provides texture and visual interest to a neutral color scheme. 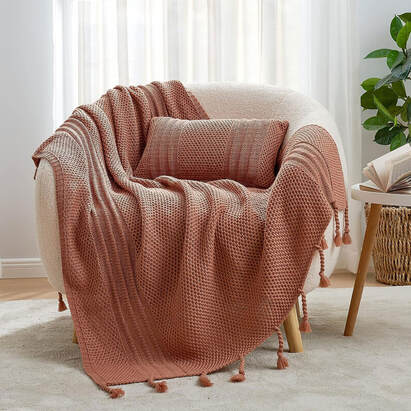 Item 3—Velvet Soft Decorative Square Throw Pillow Covers by MERNETTE How about these luscious pillow covers?! The velvet finish is luxurious, cozy, and inviting, and the neutral light brown color reminds me of a hot winter beverage! 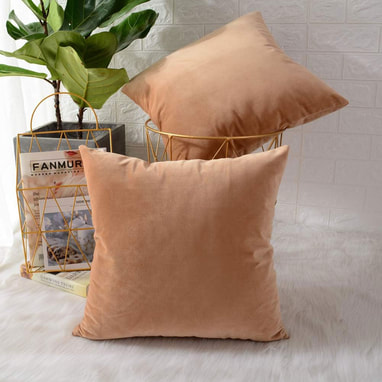 Item 4—Woven Chenille Knit Cream Throw Blanket by Battilo Create more layers of texture with this woven knit chenille cream throw blanket. Use this blanket with the honeycomb throw and light brown pillows on your living room sofa and chairs.  Item 5—Wildflower Leaves Floral Fall Table Runner by Artoid Mode This fall table runner has a soft floral design in neutral brown, green, and rose on a cream background. The pattern breaks up the otherwise solid color scheme by adding visual interest to your dining room table. 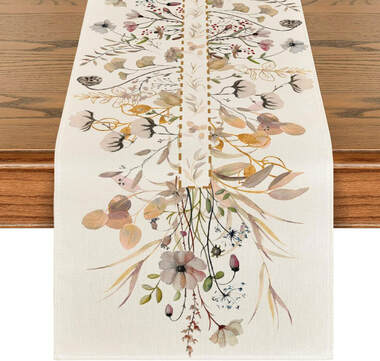 Item 6—Personalized Light Up Pumpkin by Let’s Make Memories These light-up resin pumpkins can be a unique way to personalize your space, and the cream color is perfect for a neutral palette. The pumpkins use remote-operated LED lights. 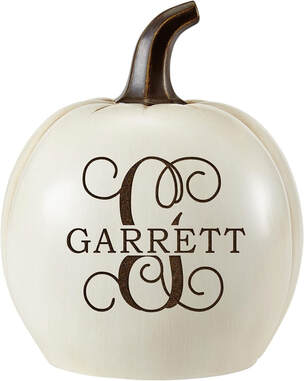 Item 7—Decorative Wood Tray by Creative Co-Op Use this 16”D wood tray to create cozy fall vignettes on a coffee table. The natural wood provides the ideal base for books, flower vases, candles, figurines, or any other cozy decor. 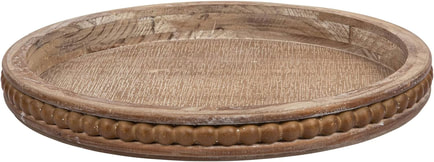 Item 8—Vintage Ribbed Amber Glass Tealight & Votive Candle Holders by Kate Aspen The ribbed glass of these tea light votive holders will undoubtedly radiate a soft, warm glow into your space on a crisp, fall evening. When not lit with candles, the amber votive holders will look right at home with the rest of your earthy, fall decor. 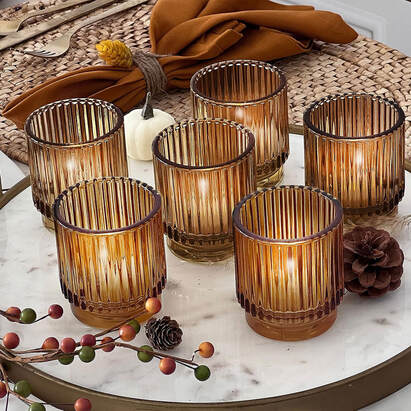 Item 9—White Ceramic Vase Set by Sullivans The distressed finish of these ceramic vases adds to the warm organic feel of the space and provides an excuse to add in seasonal florals. 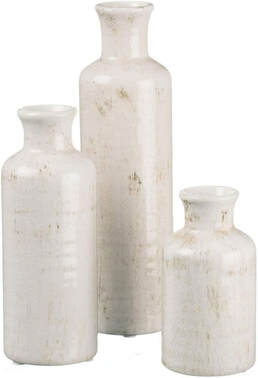 Item 10—Fall Pampas Grass by Anna’s Whimsy Pampas grass is having a moment this year! The whimsical drooping branches and neutral colors of this pampas grass would be right at home in the stone vases mentioned earlier or in any other vase that finishes off your cozy fall space! 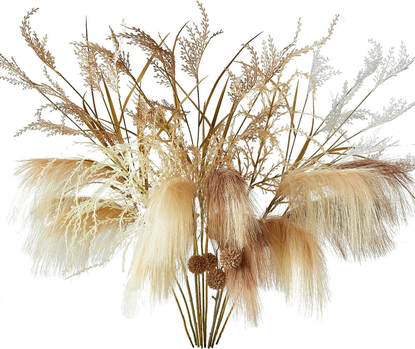 Related blogs you may want to read: Dark Academia Decor for the Fall Brighten up your autumn decor with these items! Pastel decorating ideas for autumn Inspirational ideas for creating that cozy autumn boho style Need ideas for incorporating the color blue into your fall decor? Nine hygge decor ideas Winter color palette ideas for your home decor Design concept for a dreamy coastal interior Let’s talk Bohemian 11 Rustic yet bright decor items for this fall season from Amazon! 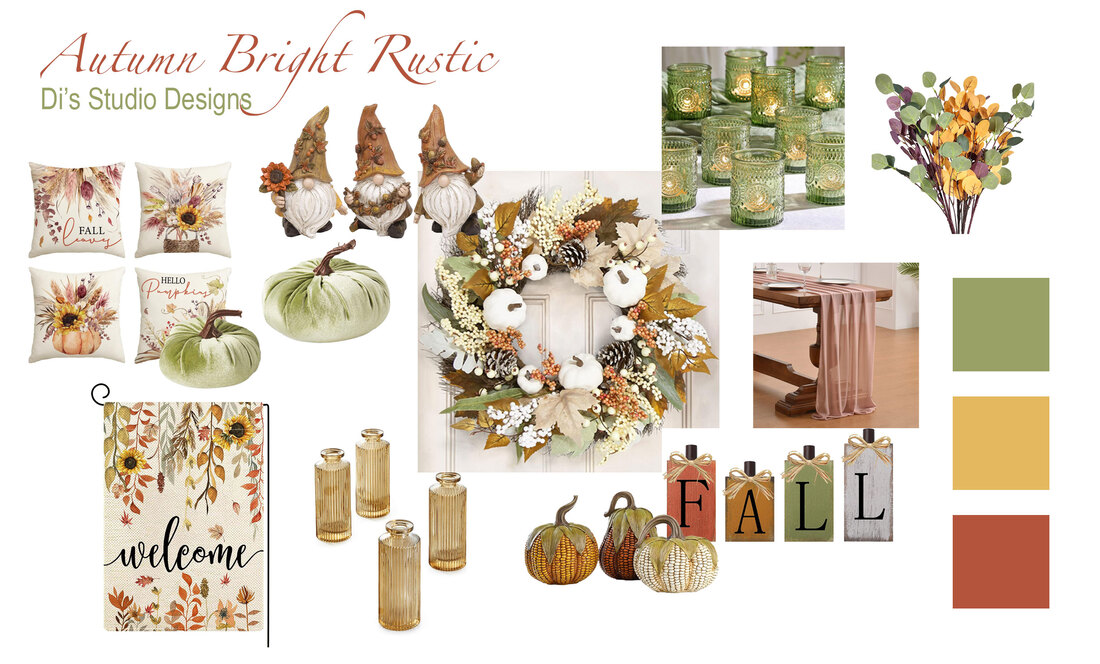 Images from Amazon.com. Click the links below to view or purchase. Some of the posts in this article contain affiliate links. If you click on the link and purchase the item, I will receive an affiliate commission at no extra cost to you. I will only recommend products or services I use personally and/or believe will add value to my readers, so there is no conflict of interest. When August rolls into September, that is the cue for most of us to pull out those fall decorations to make our homes look festive for the season. Some of us love decorating our homes with bold red, orange, and yellow hues that embody the essence of this glorious season of the year. But if that’s a bit much for you, you can still achieve the look and feel of fall with a slightly less bold—but still bright—color palette. The key is to choose muted rustic tones of the typical vibrant fall decor colors to soften the look. Here are a few ideas below to get you started! Item 1—Fall Pumpkin Wheat Cotton Throw Pillow Covers by AVOIN colorlife These dusty rose, pale orange, yellow, and olive green pillow covers work well with a rustic, Farmhouse, or country decor style. 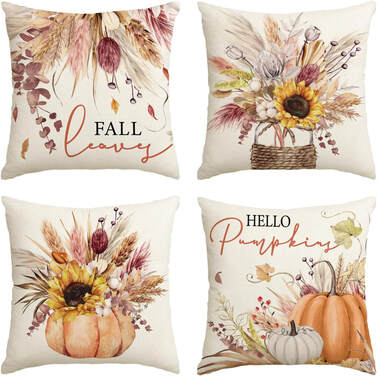 Item 2—Fall Gnomes Resin Figurines by Valery Madelyn Am I the only one who is crushing on gnomes this year?! Check out these resin gnomes with fall leaves and acorns in muted brown, green, orange, and yellow. Group them or use them separately in vignettes. 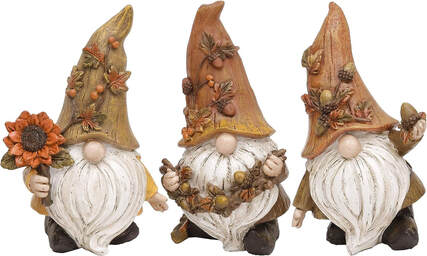 Item 3—Plush Green Velveteen Pumpkins by LampLust Add a little opulence to your autumn decor with these light green pumpkins with luxurious velvet fabric! This pair of pumpkins can sit on a table, mantle, or fireplace hearth. 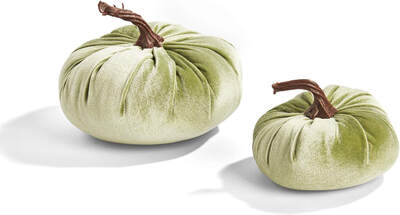 Item 4—Fall Floral Welcome Garden Flag by ORTIGIA Entice visitors into your home with this rustic garden flag! Maple leaves, sunflowers, and strands of fall leaves in muted yellow, orange, and green set the stage for the indoor color scheme. 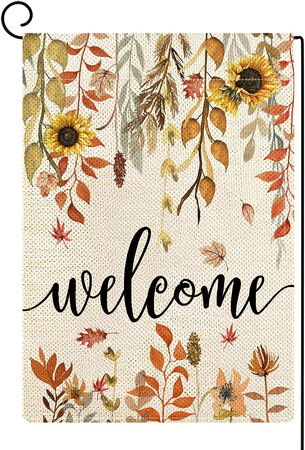 Item 5—Amber Pleated Bud Vases by Serene Spaces Living These glass bud vases come in two sizes, allowing you to create dimension to your table. Mix them with other decorative elements in vignettes and tablescapes to create a rustic but slightly elegant feel to your space. 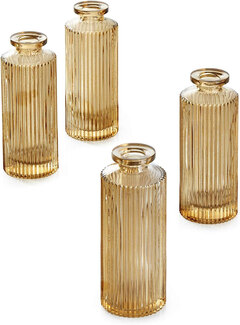 Item 6—18 Inch Autumn Maples Leaf Pumpkin Pine Cone Berry Wreath by ORIENTAL CHERRY This gorgeous door wreath will welcome visitors into your home with maple leaves, white pumpkins, pinecones, and eucalyptus leaves accented with white, cream, and orange berries. 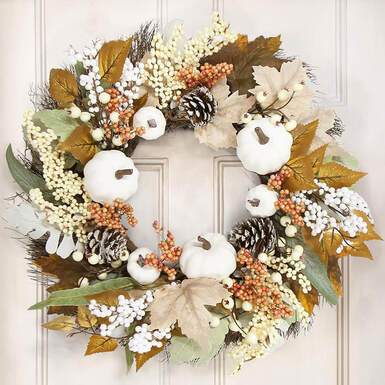 Item 7—Corn Pumpkin Resin Figurines by Valery Madelyn These resin pumpkins with unique corn kernel textures are so unique! The pale orange, rust, and ivory colors are also perfect for a more subtle fall color scheme. 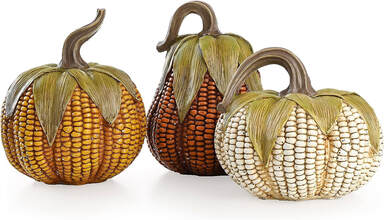 Item 8—Fall Block Sign by CYNOSA Add a handcrafted feel to your fall vignette with this rustic block sign with raffia bows!  Item 9—Dusty Rose Chiffon Table Runner by LINXTAR The lightweight chiffon fabric in this dusty rose table runner keeps your dining decor light and airy. Stretch this long runner across a large table or gather the fabric to create a unique tablescape.  Item 10—Green Glass Votive Candle Holders by DEVI Combine these green glass tea light holders with the gold glass bud vases for welcoming fall vignettes and tablescapes! 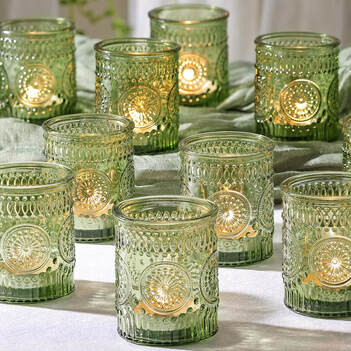 Item 11—Artificial Eucalyptus Stems by QIANYUN The colors in these silk eucalyptus stems work well with a rustic fall decor scheme! Place them in a vase on a mantle or living room coffee table to finish this fall look! 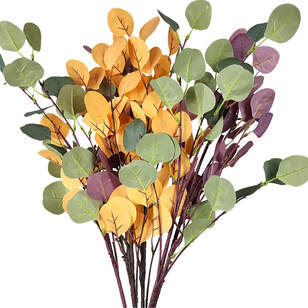 Related blogs you may want to read: Dark Academia Decor for the Fall Create a cozy relaxing interior space this fall with neutral colors Pastel decorating ideas for autumn Inspirational ideas for creating that cozy autumn boho style Need ideas for incorporating the color blue into your fall decor? Nine hygge decor ideas Winter color palette ideas for your home decor Design concept for a dreamy coastal interior Let’s talk Bohemian |
Author
Some of the posts on this site contain affiliate links. This means if you click on the link and purchase the item, I will receive an affiliate commission. 
Categories
All
Archives
April 2024
|